Welcome to the Duckietown Developer
Manual
Contents
Basics
Basics - Terminal
Basics - Development
Beginner
Beginner - The DTProject
Beginner - Use ROS
Beginner - Python Library
Beginner - Code Hierarchy
Beginner - Documentation
Intermediate
The DTROS class
Intermediate - Diagnostics
Simulation in Duckietown
Basics - Terminal
Working over the terminal is a skill that every roboticist-to-be needs to acquire. It enables you to work
on remote agents or computers without the need for a graphical user interface (GUI) and lets you work
very efficiently. Once you get the hang of it, you will find out for yourself how it can make your life
easier.
Using a terminal
It makes sense to learn how to use the terminal very well, as it will save you a lot of time along the way.
If you are completely new to working with a terminal, often also called “console” or “command line”, an
official beginners tutorial can be found on the Ubuntu website.
If you are looking for an extensive list of commands that can be used from the terminal, this is the place
to look at.
Using the Duckietown Shell
The Duckietown Shell, or dts for short, is a pure Python, easily distributable (few dependencies) utility
for Duckietown.
What you will need Laptop setup
Duckietown account
What you will get Know how to use a terminal
The idea is that most of the functionalities are implemented as Docker containers, and dts provides a
nice interface for that, so that users should not type a very long docker run command line. These
functionalities range from calibrating your Duckiebot and running demos to building this
Duckumentation and submitting agents to open challenges and monitoring your evaluations and
leaderboard positioning.
If you followed all the steps in the laptop setup, you already installed dts. If not, now is the time to go
back and do it.
Basics - Development
This section of the book will introduce the basics of software development in Duckietown. The
arguments presented in this section are very general and should be clear to any developer (not just in
Duckietown).
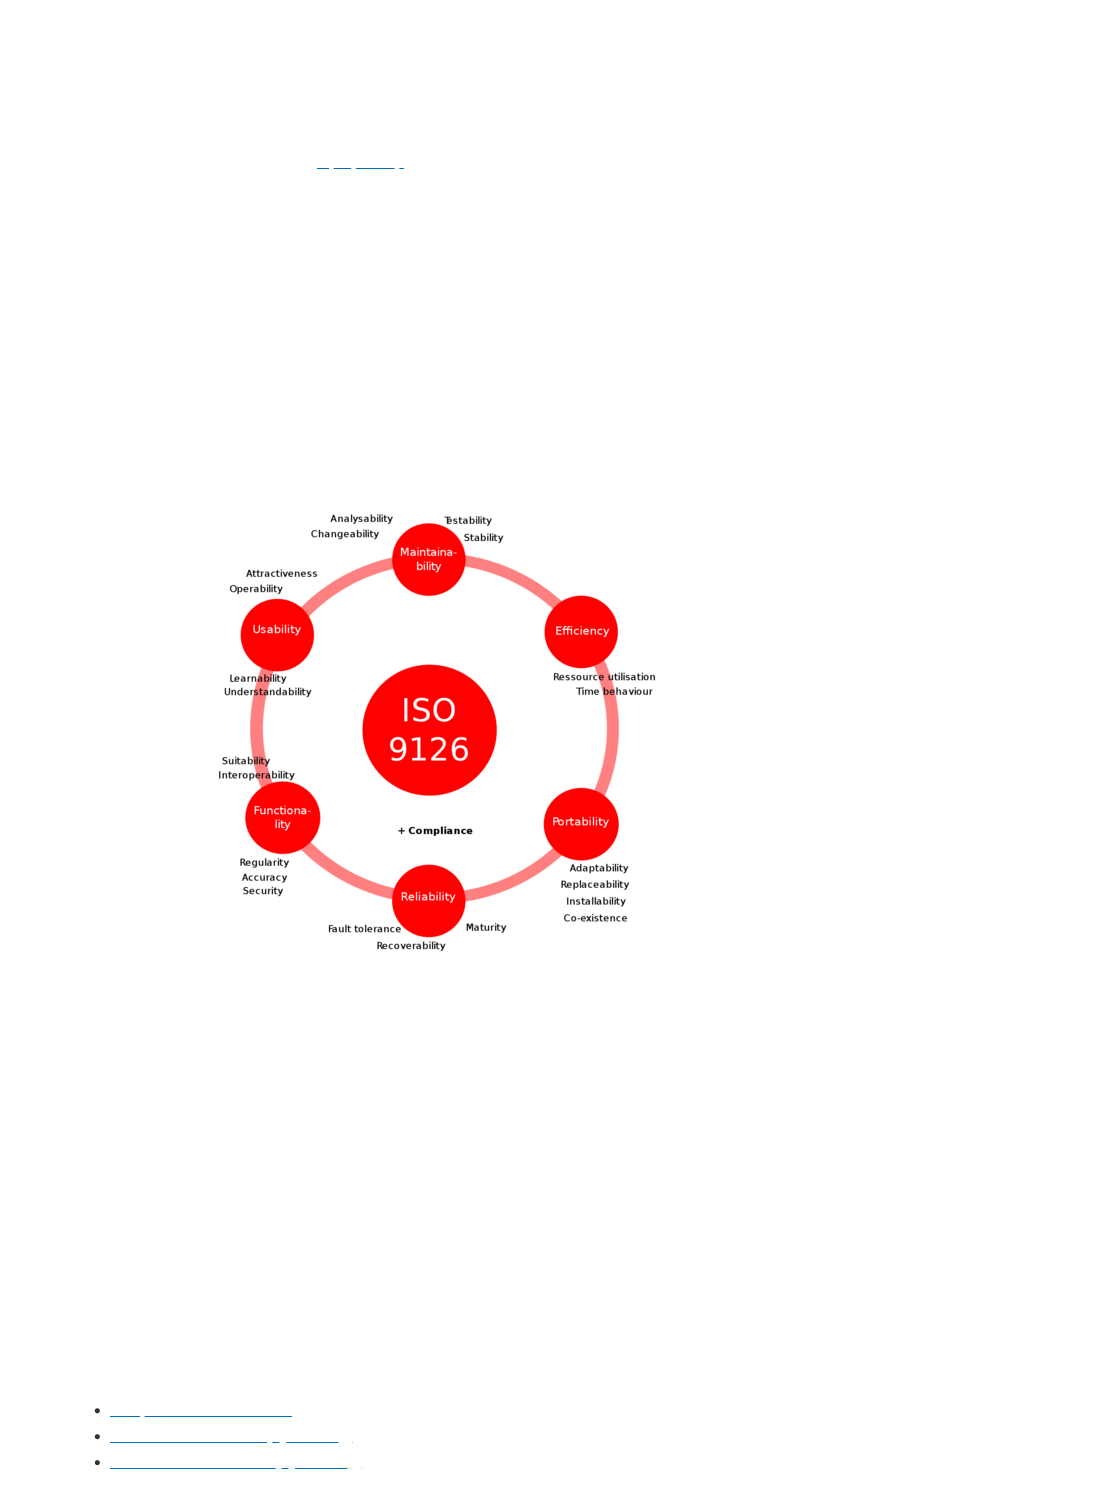
ISO/IEC 9126
ISO/IEC 9126 is a international standard for product quality in Software Engineering. It was officially
replaced by the new ISO/IEC 25010 in 2011 that introduces a few minor changes.
Fig. 1 ISO/IEC 9126 Standard (source: Wikipedia)
Software development, as any other activities carried out by human beings is subject to human biases.
The ISO/IEC 9126 standard’s objective is that of aknowledging the most common biases and
addressing them by definining clear guidelines about what properties a good software product should
have.
In this section, we are not going to dive into this standard, but we strongly believe that such standard
(and its successor ISO/IEC 25010) should be the best friend of any developer.
Throughout this book, we will mention some of these qualities as we motivate some of the decisions
made while creating the Duckietown Development Workflow.
Hands on
We suggest the reader to get familiar with such standard by using these resources:
Wikipedia - ISO/IEC 9126
Official ISO/IEC 9126 (by ISO.org)
Official ISO/IEC 25010 (by ISO.org)

Ask the community
If you have any questions about good practices in software development, join the Duckietown Slack.
Linux
This section of the book will introduce Linux distributions and specifically the Ubuntu distribution. We
will provide guides for installing Ubuntu in dual-boot mode or inside a virtual machine.
Linux
Linux is a group of free and open-source software operating systems built around the Linux kernel first
released in 1991. Typically, Linux is packaged in a form known as a Linux distribution such as Fedora
or Ubuntu.
Ubuntu is the Linux distribution officially supported by the Duckietown community.
Ubuntu
As of this writing, the most recent version of Ubuntu is 22.04 LTS (Long Term Service) which will be
supported until April 2032.
Installation
It is highly recommended to install Ubuntu directly on your laptop or as a dual boot operating system
alongside your existing OS. However we also provide some guidance on installing Ubuntu within a
Virtual Environment on your laptop.
Dual Boot
First you need to download a .iso image file which contains the version of Ubuntu you want.
Here is 22.04 LTS make sure to download the desktop image.
Next, you need a free USB drive with at least 2GB of space. The drive will be completely written
over.
You need some software to write the .iso to the USB. If on Windows you can use Rufus
Create the bootable USB drive, disconnect the USB then reconnect to your computer.
Restart your computer
If your computer simply boots into the existing operating system you need to change the
boot order in your BIOS.
Restart your computer again and press the button during startup which lets you into the
BIOS. It may say on your computer what this button is but you may need to Google
depending on your laptop model. For example Lenovo might be F1 or F2.
Look for an option to change boot order and put priority on your USB drive.
Your computer should now boot into Ubuntu installation and you can follow the instructions for
dual boot.
Virtual Machine
First you need to download a .iso image file which contains the version of Ubuntu you want. Here
is 22.04 LTS make sure to download the desktop image.
Download your desired Virtual Machine platform (popular choices are Virtual Box and VMWare).
Note: Using a Virtual Machine might require some particular settings for you networking settings. The
virtual machine should appear as a device on your local network. For example, in VirtualBox, you need
to set up a Bridged Network. This might differ in other hypervisors.
Terminal
Some pointers:
Open a terminal with Ctrl + Alt + T
/ is the top level root directoy which contains your
~ refers to your home folder located in /home/[username]
Hands on

We suggest that you install a Linux distribution on your computer and get familiar with it before
proceeding to the next sections.
Ask the community
If you have any questions about good practices in installing Ubuntu on your computer or other
questions about Ubuntu, join and ask on the Duckietown Slack!
Git
Every time there is a large project, with many contributors and the need for code versioning and history,
developers rely on VCS (Version Control Systems) tools. Duckietown uses Git as VCS and GitHub.com
as a service provider for it. The Duckietown organization page on GitHub is github.com/duckietown.
Monolithicity VS Modularity
Whether a software project should be monolithic or modular is one of the most debated decisions that
a group of developers faces at the beginning of a software project. Books have been written about it.
Duckietown started as a monolithic project, and some of us still remember the infamous Software
repository, and only later transitioned to a full modular approach.
There are two levels of modularity in Duckietown. We distinguish between Modules and Nodes.
Modules form our first and highest level of modularity, with each module being a collection of nodes.
Nodes constitute the smallest software entities, and each node is usually responsible for a very specific
task. Nodes are not allowed to exist outside modules. We will revisit these concepts later in the book,
but in a nutshell, modules represent high level concepts, like autonomous driving capability for a
vehicle, while nodes within a module tackle more granular tasks, like traffic signs detection.
In Duckietown, code is separated so that each module has its own repository. All official repositories
are hosted under the same GitHub organization github.com/duckietown. Be brave, (as of April 2020)
we have more than 220 repositories there. You can also have your own modules hosted as repositories
on your own GitHub account.
Git
This section goes through the most common operations you can perform on a git project and a git
project hosted on GitHub.com.
Terminology
A non-exhaustive list of terms commonly used in git follow.
Repository
A repo (short for repository), or git project, encompasses the entire collection of files and folders
associated with a project, along with each file’s revision history.
Branch
Branches constitute threads of changes within a repository. Though we call them branches, do not try
to force an analogy with tree branches, they are similar in spirit but quite different in how they work.
A repository is not allowed to exist without a branch, and every operation inside a repository only
makes sense in the context of a branch (the active branch). Inside a repository, you can have as many
branches as you want, but you always work on one branch at a time. Every git project has at least one
main branch, usually called the master branch.
Use the command git branch to see the list of branches present in your repository and which branch
you are currently working on.
Though, branches are used in different scenarios, they simply allow groups of developpers to work on
their own task without having their work affect or be affected by other groups’ work. For example, after
a project is released with version 1.0.0, one team is tasked to develop a new feature for the version

1.1.0 milestone while another team is asked to fix a bug that a user reported and whose patch will be
released in the version 1.0.1.
Branch operations are performed through the command git branch.
Commit
A commit is an atomic change in a repository. A commit is a set of changes to one or more files within
your repository. Each commit is uniquely identified within a repository by the hash (SHA-1) of the
changes it contains (“plus” a header).
When you create/delete/edit one or more files in a git repository and you are confident enough about
those changes, you can commit them using the command git commit.
Note: A commit is not a snapshot (or a copy) of the entire repository at a given point in time. Each
commit contains only the incremental difference from the previous commit, called delta in git.
A chain of commits in which all the ancestors are included makes a branch. Since every commit is
linked to its parent, a branch is simply a pointer to a commit (the full chain of commits can always be
reconstructed from the commit). In other words, you can think of branches as human friendly labels for
commits. Every time you create a new commit, the pointer of the current branch advances to the newly
created commit.
Tag
A tag is a human friendly name for a commit but unlike branches, tags are read-only. Once created,
they cannot be modified to point to a different commit.
Tags are commonly used for labeling commits that constitute milestones in the project development
timeline, for example a release.
Fork
A fork is basically a copy of someone else’s repository. Usually, you cannot create branches or change
code in other people’s repositories, that’s why you create your own copy of it. This is called forking.
Remote
A git remote is a copy of your repository hosted by a git service provider, e.g. GitHub. Remotes allow
you to share your commits and branches so that other developers can fetch them. Technically
speaking, remotes are exactly the same as local repositories, but unlike your local repository, they are
reachable over the internet.
You can use the commands git fetch and git push to bring your local copy of the repository in sync
with a remote, by downloading commits or uploading new commits respectively.
Merging branches
Merging is the dual operation of creating a new branch. Imaigne you have branched out a new branch
(e.g. new-feature) from the some branch (e.g. master), made some improvements and tested them out.
Now you want to incorporate these changes in the master branch which hosts your main code. The
merge operation does exactly that. It takes the changes done in new-feature and applies them to
master.
Often git will manage to apply these changes by itself. However, sometimes if both new-feature and
master changed the same part of the code, git cannot determine by itself which of the two changes
should be kept. Such a case is called merge conflict and you will have to manually select what should
be kept after the merge.
Pull Requests
If you are working on a secondary branch or if you forked a repository and want to submit your
changes for integration into the mainstream branch or repository, you can open a so-called Pull
Request (in short PR).

A pull request can be seen as a three-step merge operation between two branches where the changes
are first proposed, then discussed and adapted (if requested), and finally merged.
Common operations
Fork a repository on GitHub
To fork (creating a copy of a repository, that does not belong to you), you simply have to go to the
repository’s webpage and click fork on the upper right corner.
Clone a repository
Cloning a repository is the act of creating a local copy of a remote repository. A repo is cloned only at
the very beginning, when you still don’t have a local copy of it.
To clone a repository, either copy the HTTPS or SSH link given on the repository’s webpage. Use the
following command to create a local copy of the remote git repository identified by the given URL.
This will create a directory in the current working path with the same name of the repository and the
entire history of commits will be downloaded onto your computer.
Create a new branch
The command for creating a new branch is a little bit counter-intuitive, but you will get use to it. Use the
following command to create a new branch:
This creates a new branch pointing at the same commit your currently active branch is pointing at. In
other words, you will end up with two branches pointing at the same commit. Note that after you issue
this command, the newly created branch becomes your active branch.
Working tree
In git, we use the term working tree to indicate all the changes that are not committed yet. You can
think of it as your workspace. When you create a new commit, the hash for the current working tree is
computed and assigned to the new commit together with the changes since the last commit. The
working tree clears as you commit changes.
Remark: You cannot create commits from a clean working tree.
Use the command git status to inspect the status of your working tree.
Create a new commit
Unlike many git operations, a commit is not created by a single git command. There are two steps to
follow. First, we mark all the changes that we want to be part of our new commit, second, we create the
commit. From your working tree, mark changes to include in the new commit using the command:
The command git status will always show you which changes are marked to be used for a new
commit and which changes are not. Use the command
to create a new commit. Replace [COMMIT-MESSAGE] with your notes about what changes this commit
includes.
Note: Do not underestimate the value of good commit messages, the moment you will go back to your
history of commits looking for a change of interest, having good commit messages will be a game
changer.
git clone [REPOSITORY-URL]
git checkout -b [NEW-BRANCH-NAME]
git add [FILE]
git commit -m "[COMMIT-MESSAGE]"
Push changes
Use the following command to push your local changes to the remote repository so that the two
repositories can get in sync.
Fetch changes
If you suspect that new changes might be available on the remote repository, you can use the
command
to download the new commits available on the remote (if any). These new changes will be appended to
the branch called origin/[BRANCH-NAME] in your local repository. If you want to apply them to your
current branch, use the command
Use the command git pull origin/[BRANCH-NAME] to perform fetch and then merge.
Delete branches
Unlike the vast majority of git commands, git delete does not work on the current branch. You can
delete other branches by running the command
If you want to delete your current branch, you will need to checkout another branch first. This prevents
ending up with a repository with no branches.
To propagate the deletion of a branch to the remote repository, run the command:
Open a GitHub Issue
If you are experiencing issues with any code or content of a repository (such as this operating manual
you are reading right now), you can submit issues. For doing so go to the dashboard of the
corresponding repository and press the Issues tab where you can open a new request.
For example you encounter a bug or a mistake in this operating manual, please visit this repository’s
Issues page to report an issue.
GitHub Issues are a crucial part of the life cycle of a software product, as they constitute a feedback
loop that goes directly from the end-user to the product developers. You don’t have to be a developer
or an expert in software engineering to open an Issue.
Hands on
Git
It is strongly suggested to all git beginners to follow the awesome tutorial Learn Git Branching.
Further reading material can be found at the following links:
Git Handbook
Basic Branching and Merging
GitHub
You can gain access to GitHub by creating an account on github.com (if you don’t have one already).
git push origin [BRANCH-NAME]
git fetch origin [BRANCH-NAME]
git merge origin/[BRANCH-NAME]
git branch -d [BRANCH-NAME]
git push origin --delete [BRANCH-NAME]
A short GitHub tutorial is available at this link.
It is higly suggested that you setup an SSH key for secure passwordless access to GitHub by following
these steps:
1. Generate a new SSH key
2. Add SSH key to your GitHub account.
Ask the community
If you have any questions about how to use of Git in Duckietown, join and ask on the Duckietown
Slack!
Docker
This section will introduce Docker and the features of Docker that the Duckietown community employs.
For a more general introduction to Docker, we suggest reading the official Docker overview page.
What is Docker?
Docker is used to perform operating-system-level virtualization, something often referred to as
“containerization”. While Docker is not the only software that does this, it is by far the most popular
one.
Containerization refers to an operating system paradigm in which the kernel allows the existence of
multiple isolated user space instances called containers. These containers may look like real
computers from the point of view of programs running in them.
A computer program running on an ordinary operating system can see all resources available to the
system, e.g. network devices, CPU, RAM; However, programs running inside of a container can only
see the container’s resources. Resources assigned to the container become thus available to all
processes that live inside that container.
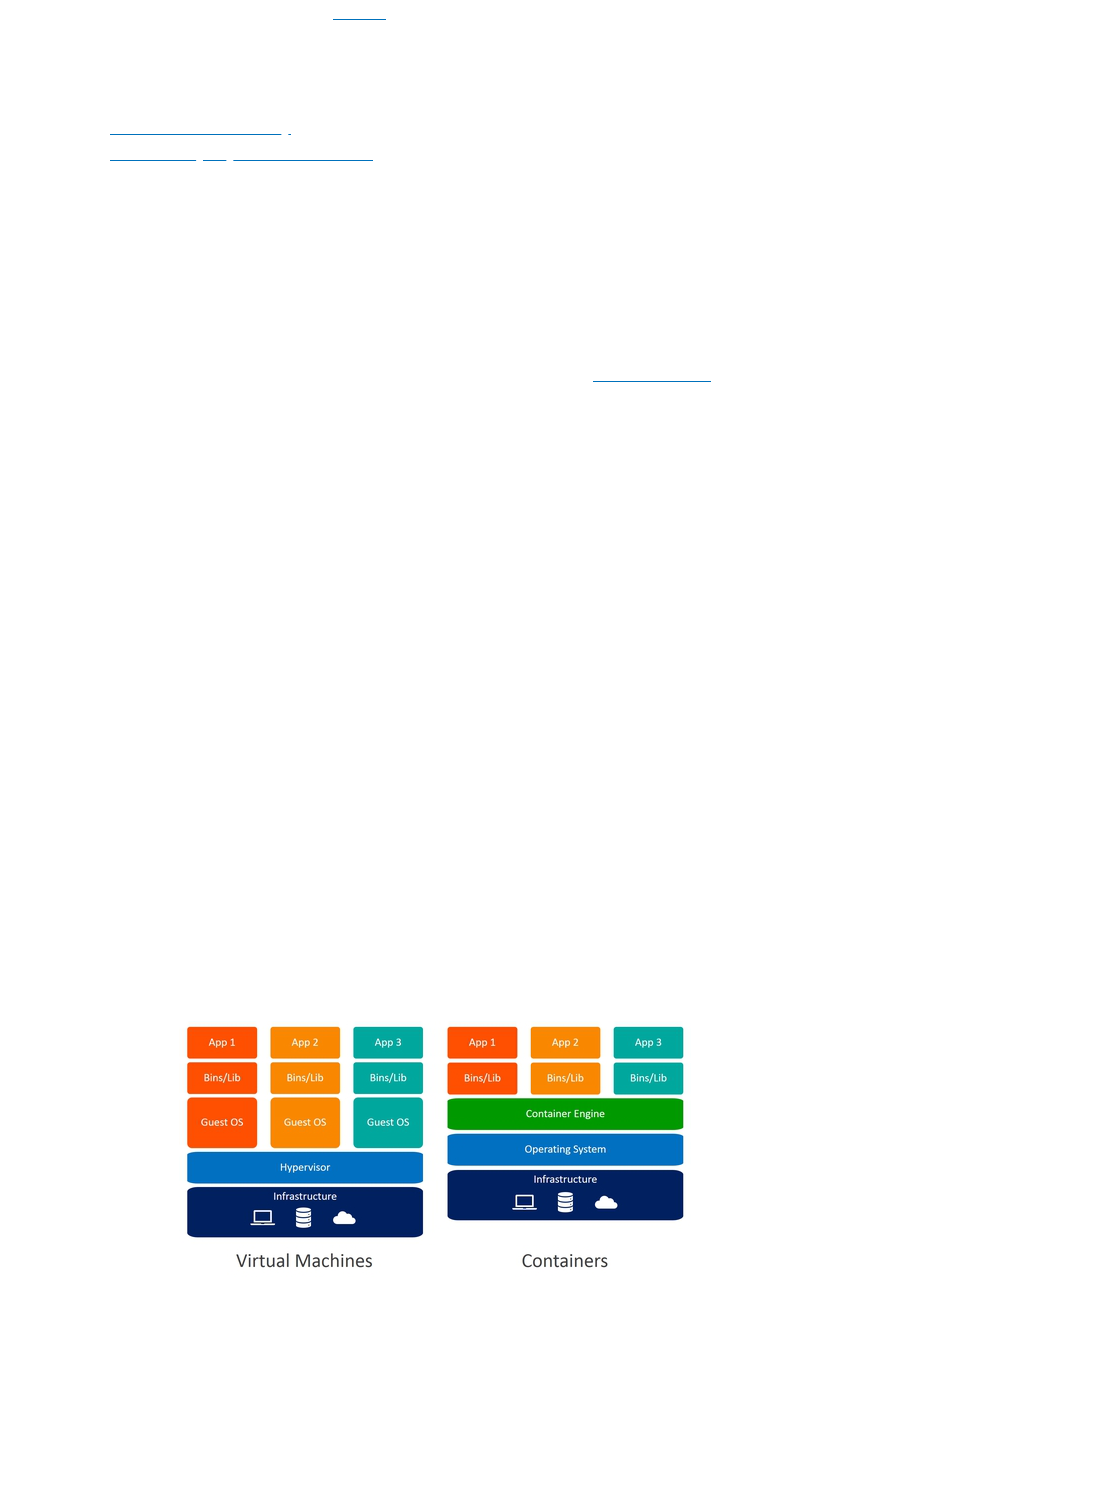
Containers VS. Virtual Machine
Containers are often compared to virtual machines (VMs). The main difference is that VMs require a
host operating system (OS) with a hypervisor and a number of guest OSs, each with their own libraries
and application code. This can result in a significant overhead.
Imagine running a simple Ubuntu server in a VM on Ubuntu: you will have most of the kernel libraries
and binaries twice and a lot of the processes will be duplicated on the host and on the guest OS.
Containerization, on the other hand, leverages the existing kernel and OS and adds only the additional
binaries, libraries and code necessary to run a given application. See the illustration bellow.
Fig. 2 Differences between Virtual Machines and Containers (source: Weaveworks)
Because containers don’t need a separate OS to run they are much more lightweight than VMs. This
makes them perfect to use in cases where one needs to deploy a lot of independent services on the
same hardware or to deploy on not-especially powerful platforms, such as Raspberry Pi - the platform
the Duckietown community uses.

Containers allow for reuse of resources and code, but are also very easy to work with in the context of
version control. If one uses a VM, they would need to get into the VM and update all the code they are
using there. With a Docker container, the same process is as easy as pulling the container image
again.
How does Docker work?
You can think that Docker containers are build from Docker images which in turn are build up of Docker
layers. So what are these?
Docker images are build-time artifacts while Docker containers are run-time constructs. That means
that a Docker image is static, like a .zip or .iso file. A container is like a running VM instance: it starts
from a static image but as you use it, files and configurations might change.
Docker images are build up from layers. The initial layer is the base layer, typically an official stripped-
down version of an OS. For example, a lot of the Docker images we run in Duckietown have
ubuntu:18.04 as a base.
Each layer on top of the base layer constitutes a change to the layers below. The Docker internal
mechanisms translate this sequence of changes to a file system that the container can then use. If one
makes a small change to a file, then typically only a single layer will be changed and when Docker
attempts to pull the new version, it will need to download and store only the changed layer, saving
space, time and bandwidth.
In the Docker world, images get organized by their repository name, image name and tags. As with Git
and GitHub, Docker images are stored in image registers. The most popular Docker register is called
DockerHub and it is what we use in Duckietown.
An image stored on DockerHub has a name of the form:
The parts repository and tag are optional and they default to library (indicating Docker official
images) and latest (special tag always pointing to the latest version of an image). For example, the
Duckietown Docker image
has the repository name duckietown, the image name dt-core, and the tag ente-arm64v8, which
carries both the name of the Duckietown software distribution that the image contains, i.e., ente, and
the CPU architecture that this image is targeting, i.e., arm64v8. We will talk about different CPU
architectures and why they need to be part of the Docker image tag in the section .
All Duckietown-related images are in the duckietown repository. Though images can be very different
from each other and for various applications.
Different CPU architectures
Since Docker images contain binaries, they are not portable across different CPU architectures. In
particular, binaries are executable files that are compiled to the level of CPU instructions. Different CPU
architectures present different instructions sets.
Many modern computers use the amd64 architecture, used by almost all modern Intel and AMD
processors. This means that it is very likely that you can find a Docker image online and run it on your
computer without having to worry about CPU architectures.
In Duckietown, we use low-end computers like the Raspberry Pi (officially used on any Duckietown
device) and Nvidia Jetson. These low-cost computers employ Arm processors that are based on the
arm32v7 instructions set.
[repository/]image[:tag]
duckietown/dt-core:ente-arm64v8
Note: Full disclosure, while all devices officially supported in Duckietown are based on 64-bit capable
Arm processors, thus using the arm64v8 instructions set, the Raspbian OS only supports 32-bit, which
is the reason why we use arm32v7 images.
Working with images
If you want to get a new image from a Docker registry (e.g. DockerHub), you have to pull it. For
example, you can get an Ubuntu image by running the command:
According to , this will pull the image with full name library/ubuntu:latest which, as of May 2020,
corresponds to Ubuntu 20.04.
You will now be able to see the new image pulled by running:
If you don’t need it anymore or you are running out of storage space, you can remove an image with,
You can also remove images by their IMAGE ID as printed by the list command above. A shortcut for
docker image rm is docker rmi.
Sometimes you might have a lot of images you are not using anymore. You can easily remove them all
with:
This will remove all images that are not supporting any container. In fact, you cannot remove images
that are being used by one or more containers. To do so, you will have to remove those containers first.
If you want to look into the heart and soul of your images, you can use the commands docker image
history and docker image inspect to get a detailed view.
Working with containers
Containers are the run-time equivalent of images. When you want to start a container, Docker picks up
the image you specify, creates a file system from its layers, attaches all devices and directories you
want, “boots” it up, sets up the environment up and starts a pre-determined process in this container.
All that magic happens with you running a single command: docker run. You don’t even need to have
pulled the image beforehand, if Docker can’t find it locally, it will look for it on DockerHub.
Here’s a simple example:
This will take the ubuntu image with latest tag and will start a container from it.
The above won’t do much. In fact, the container will immediately exit as it has nothing to execute.
When the main process of a container exits, the container exits as well. By default the ubuntu image
runs bash and as you don’t pass any commands to it, it exits immediately. This is no fun, though.
Let’s try to keep this container alive for some time by using the -it flags. This tells Docker to create an
interactive session.
Now you should see something like:
docker pull ubuntu
docker image list
docker image rm ubuntu
docker image prune
docker run ubuntu
docker run -it ubuntu
Keep in mind that the part after @ will be different — that is your container ID.
In this manual, we will use the following icon to show that the command should be run in the container:
You are now in your new ubuntu container! Try to play around, you can try to use some basic bash
commands like ls, cd, cat to make sure that you are not in your host machine.
You can check which containers you are running using the docker ps command — analogous to the
ps command. Open a new terminal window (don’t close the other one yet) and type:
An alternative (more explicit) syntax is
These commands list all running containers.
Now you can go back to your ubuntu container and type exit. This will bring you back to you host shell
and will stop the container. If you again run the docker ps command you will see nothing running. So
does this mean that this container and all changes you might have made in it are gone? Not at all,
docker ps and docker container list only list the currently running containers.
You can see all containers, including the stopped ones with:
Here -a stands for all. You will see you have two ubuntu containers here. There are two containers
because every time you use docker run, a new container is created. Note that their names seem
strangely random. We could have added custom, more descriptive names—more on this later.
We don’t really need these containers, so let’s get rid of them:
You need to put your container names after rm. Using the containr IDs instead is also possible. Note
that if the container you are trying to remove is still running you will be asked to stop it first.
You might need to do some other operations with containers. For example, sometimes you want to
start or stop an existing container. You can simply do that with:
Imagine you are running a container in the background. The main process is running but you have no
shell attached. How can you interact with the container? You can open a terminal in the container with:
Running images
Often we will ask you to run containers with more sophisticated options than what we saw before. Look
at the following example: (don’t try to run this, it will not do much).
root@73335ebd3355:/#
command to be run inside the container
docker ps
docker container list
docker container list -a
docker container rm ![container name 1] ![container name 2]
docker container start ![container name]
docker container stop ![container name]
docker container restart ![container name]
docker attach ![container name]
docker -H hostname.local run -dit --privileged --name joystick --network=host -v
/data:/data duckietown/rpi-duckiebot-joystick-demo:master18

shows a summary of the options we use most often in Duckietown. Below, we give some examples
Table 1 docker run Options
Short
command
Full command Explanation
-i --interactive
Keep STDIN open even if not attached, typically used together with
-t.
-t --tty
Allocate a pseudo-TTY, gives you terminal access to the container,
typically used together with -i.
-d --detach Run container in background and print container ID.
--name
Sets a name for the container. If you don’t specify one, a random
name will be generated.
-v --volume
Bind mount a volume, exposes a folder on your host as a folder in
your container. Be very careful when using this.
-p --publish
Publish a container’s port(s) to the host, necessary when you need
a port to communicate with a program in your container.
-d --device
Similar to -v but for devices. This grants the container access to a
device you specify. Be very careful when using this.
--privileged
Give extended privileges to this container. That includes access to
all devices. Be extremely careful when using this.
--rm Automatically remove the container when it exits.
-H --hostname
Specifies remote host name, for example when you want to execute
the command on your Duckiebot, not on your computer.
--help Prints information about these and other options.
Examples
Set the container name to joystick:
Mount the host’s path /home/myuser/data to /data inside the container:
Publish port 8080 in the container as 8082 on the host:
Allow the container to use the device /dev/mmcblk0:
Run a container on the Duckiebot:
Other useful commands
Pruning images
Sometimes your docker system will be clogged with images, containers, networks, etc. You can use
docker system prune to clean it up.
Keep in mind that this command will delete all containers that are not currently running and all images
not used by running containers. So be extremely careful when using it.
--name joystick
-v /home/myuser/data:/data
-p 8082:8080
-d /dev/mmcblk0
-H duckiebot.local
docker system prune
Portainer
Often, for simple operations and basic commands, one can use Portainer.
Portainer is itself a Docker container that allows you to control the Docker daemon through your web
browser. You can install it by running:
Note that Portainer comes pre-installed on your Duckiebot, so you don’t need to run the above
command to access the images and containers on your robot. You still might want to set it up for your
computer.
Hands on
Before you can do any software development in Duckietown, you need to get comfortable with Docker
and its tools.
Complete the following steps before proceeding to the next section:
1. Install Docker
2. Orientation and Setup
3. Build and run your image
4. Share images on Docker Hub
If you still feel like there is something that you are missing about Docker, you might want to spend
some time going through this guide as well.
Ask the community
If you need help with Docker basics or the use of Docker in Duckietown, join the Slack channel #help-
docker.
Duckietown Shell
This section of the book will introduce the Duckietown Shell (dts in short) and the reason behind its
creation. In this book, we will use dts commands quite often, make sure you don’t miss this section.
Brief History
The Duckietown Shell is indeed a shell. It was created in July 2018 to help Duckietown users launch
Duckietown demos on a Duckiebot. It became clear pretty soon that having a dedicated shell for
Duckietown was a game changer for the whole community. In fact, since the very beginning, the shell
had a built-in system for auto-update, which allowed developers to develop new commands or improve
old ones and deploy the changes in no time.
Duckietown has a history of using Makefiles as a way to simplify complex and operations involving
many (usually very long) bash commands. Other developers, instead, preferred bash scripts over
Makefiles. And finally, our CI system (based on Jenkins), used Jenkinsfiles to define automated jobs.
The Duckietown Shell came to the rescue and unified everything, while Makefiles, bash scripts and
Jenkinsfiles slowly started disappearing from our repositories. Today, Docker images to run on
Duckiebots, Python libraries published on PyPi and even the book you are reading right now are built
through dts.
Get Started
The Duckietown Shell is released as a Python3 package through the PyPi package store. You can
install the Duckietown Shell on your computer by running,
docker volume create portainer_data
docker run -d -p 9000:9000 --name portainer --restart always -v
/var/run/docker.sock:/var/run/docker.sock -v portainer_data:/data
portainer/portainer
pip3 install duckietown-shell
This will install the dts command. The Duckietown Shell is distribution independent, so the first time
you launch it you have to specify the distribution of Duckietown software you are working on by
following the setup prompts.
Use the command,
to list all the commands available to the chosen distribution.
You don’t really need to run the shell before you can type in your command, for example, you can
achieve the same result as above by running,
The nice thing about opening the shell before typing your command is that then you can use
the Tab key to auto-complete.
Installable commands
Some commands come not pre-installed. These are usually commands that are either very specific to
an application, thus not useful to the majority of Duckietown users, or commands that can only be used
during a short time window, like commands that let you participate to competitions periodically
organized at international AI and Robotics conferences, e.g. AIDO.
Hands on
Install the Duckietown Shell as instructed in . Make sure everything works as expected by running the
command dts update successfully.
Ask the community
If you have any questions about the Duckietown Shell, join and ask on the Duckietown Slack!
Beginner - The DTProject
Table of contents
New project
(Cmd) commands
dts commands
Note
What you will need Working environment setup
Accounts setup
Basic knowledge of Python
What you will get Learn how to use DTProjects, the most important building block
in Duckietown
What you will need Working environment setup
Accounts setup
Basic knowledge of Python
What you will get Learn how to use DTProjects, the most important building block
in Duckietown
Learn how to create a new DTProject from a template
Duckietown-compliant Docker images are built out of Duckietown Projects, in short DTProjects. A
boilerplate for the simplest DTProject is provided by the duckietown/template-basic repository.
Create project from a template
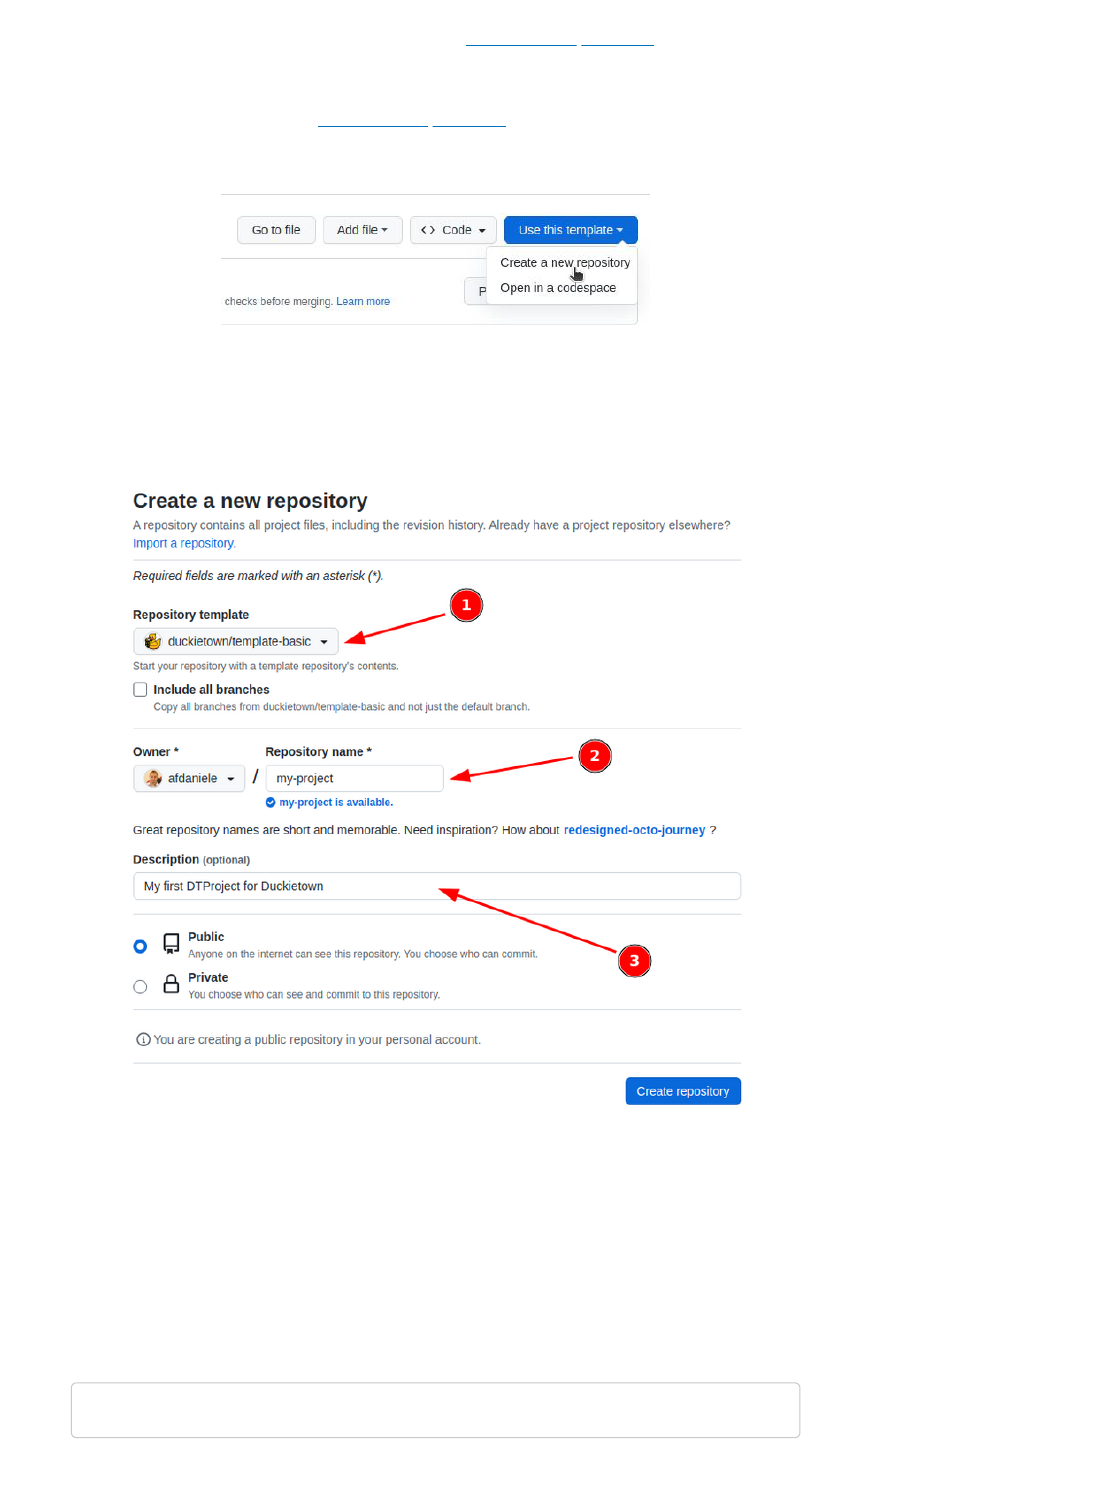
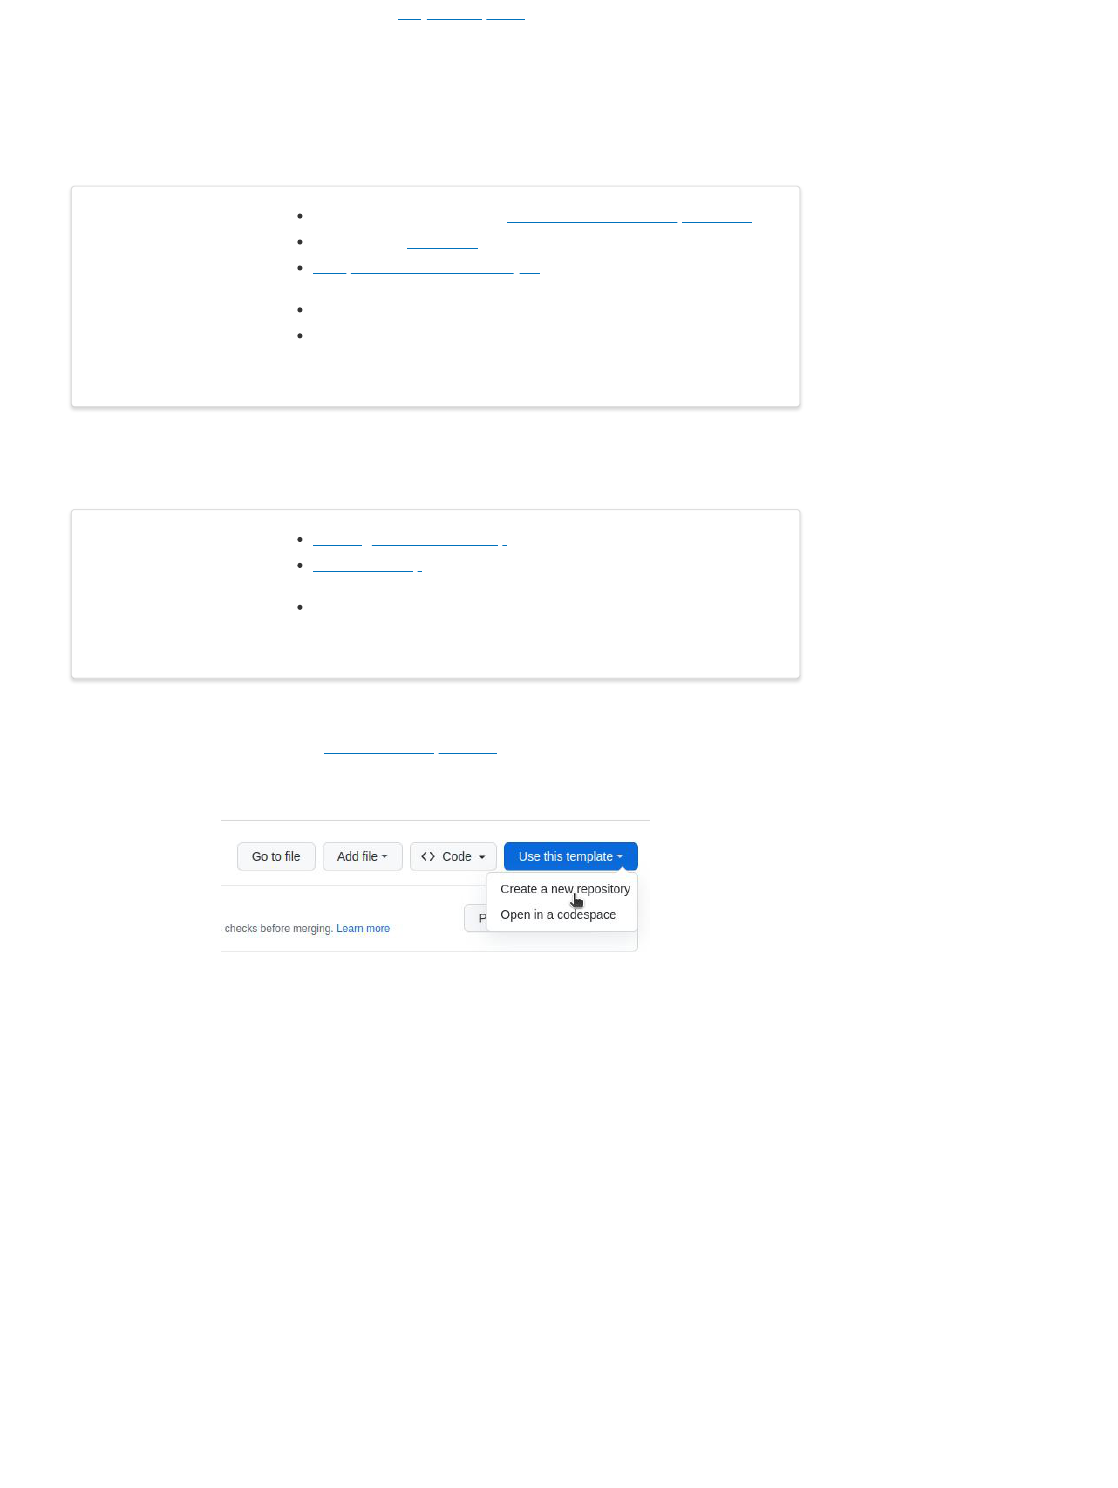
Visit the template repository page duckietown/template-basic. Click on the button that reads “Use this
template” and then choose “Create a new repository” from the dropdown menu.
Fig. 3 Use template repository on GitHub.
This will take you to a page that looks like the following:
Fig. 4 Creating a repository from template.
Pick a name for your repository (say my-project) and press the button Create repository from
template. Note, you can replace my-project with the name of the repository that you prefer, if you do
change it, make sure you use the right name in the instructions going forward.
This will create a new repository and copy everything from the repository template-basic to your new
repository. You can now open a terminal and clone your newly created repository.
git clone https://github.com/YOUR_NAME/my-project
cd my-project
Replace YOUR_NAME in the link above with your GitHub username.
Edit placeholders
The repository contains already everything you need to create a Duckietown-compliant Docker image
for your program. Before doing anything else, we need to head over to the Dockerfile and edit the
following lines using a text editor:
Replace the placeholders strings with, respectively,
the name of the repository (i.e., my-project);
a brief description of the functionalities of the module
your name and email address to claim the role of maintainer;
For example,
Save the changes. We can now build the image, even though there is not going to be much going on
inside it until we place our code in it.
Build the project
Now, in a terminal, move to the directory created by the git clone instruction above and run the
following command (beware that it might take some time):
The flag -f (short for --force) is needed in order to allow dts to build a module out of a non-clean
repository. A repository is not clean when there are changes that are not committed (and in fact our
changes to Dockerfile are not). This check is in place to prevent developers from forgetting to push
local changes. If the build is successful, you will see something like the following:
Note
ARG REPO_NAME="<REPO_NAME_HERE>"
ARG DESCRIPTION="<DESCRIPTION_HERE>"
ARG MAINTAINER="<YOUR_FULL_NAME> (<YOUR_EMAIL_ADDRESS>)"
ARG REPO_NAME="my-project"
ARG DESCRIPTION="My first Duckietown project"
ARG MAINTAINER="Duckie ([email protected])"
dts devel build -f
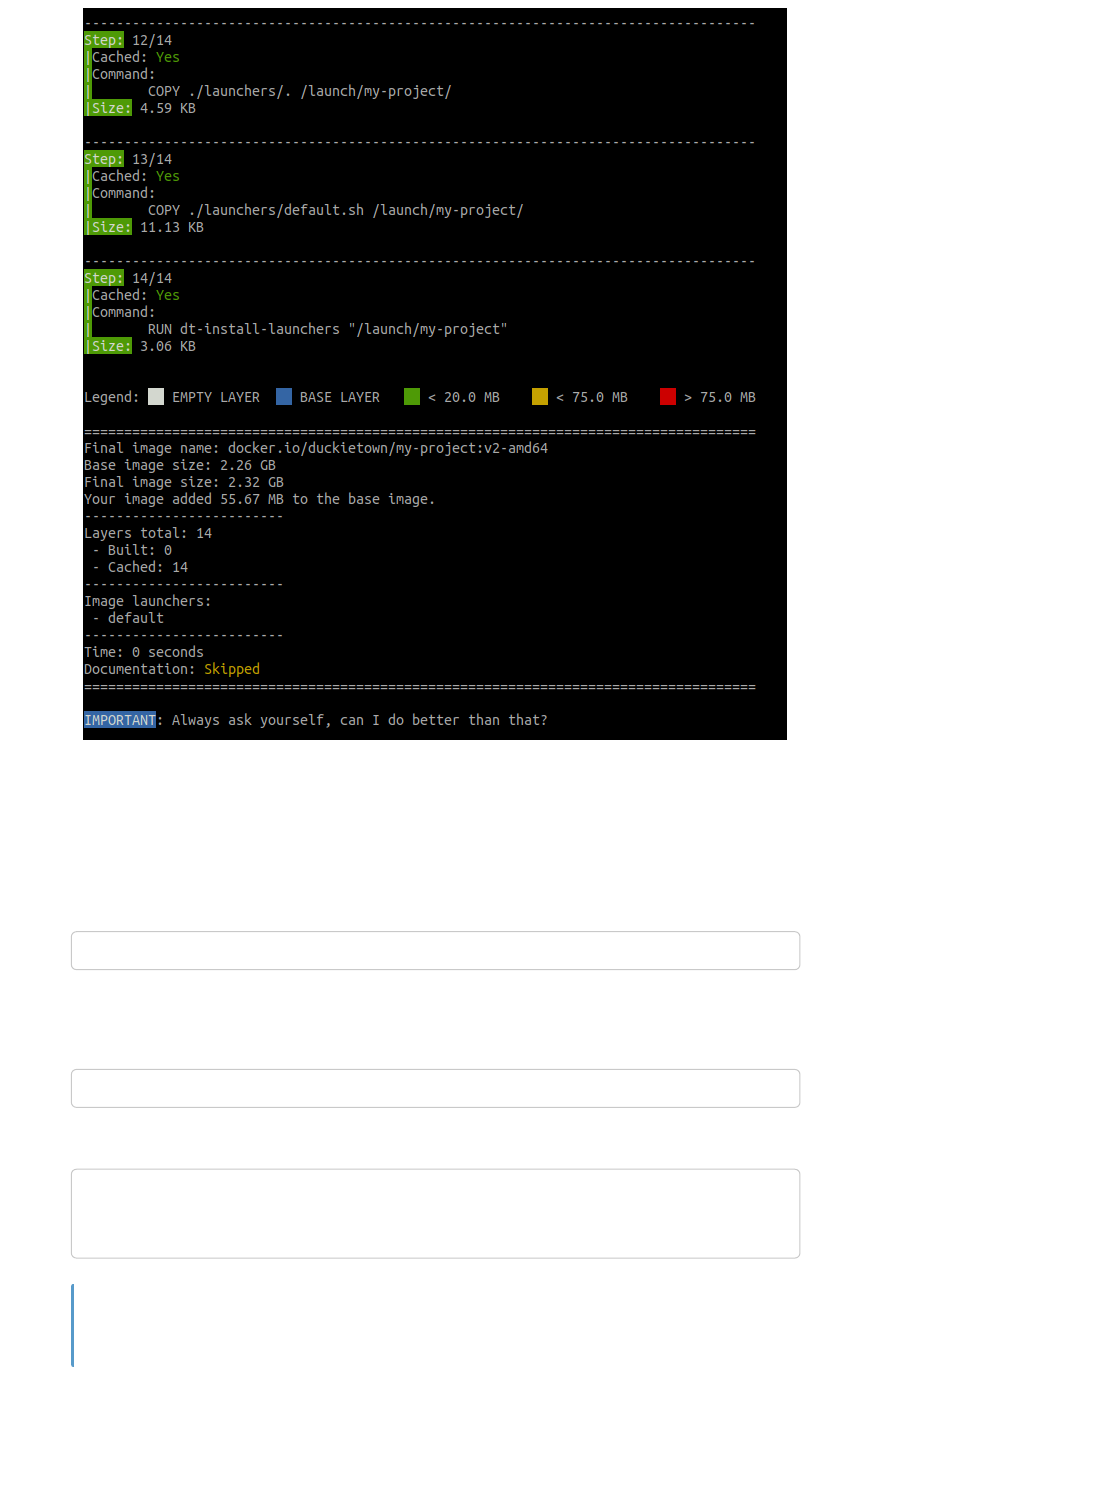
Fig. 5 Building a container through the development command in the Duckietown shell.
As discussed above, building a project produces a Docker image. This image is the compiled version
of your source project. You can find the name of the resulting image at the end of the output of the dts
devel build command. In the example above, look for the line:
Run the project
You can now run your container by executing the following command.
This will show the following message:
You just built and run your first Duckietown-compliant Docker image.
Add your code
Now that we know how to build Docker images for Duckietown, let’s build one with a simple Python
program inside.
Final image name: docker.io/duckietown/my-project:v2-amd64
dts devel run
...
==> Launching app...
This is an empty launch script. Update it to launch your application.
<== App terminated!
Congratulations
Open a terminal and go to the directory my-project created in the previous page. In Duckietown,
Python code must belong to a Python package. Python packages are placed inside the directory
packages/ you can find at the root of my-project. Let us go ahead and create a directory called
my_package inside packages/.
A Python package is simply a directory containing a special file called __init__.py. So, let us turn that
my_package into a Python package.
Now that we have a Python package, we can create a Python script in it. Use your favorite text editor
or IDE to create the file ./packages/my_package/my_script.py and place the following code inside it.
We now need to tell Docker we want this script to be the one executed when we run the command dts
devel run. In order to do so, open the file ./launchers/default.sh and replace the line
with the line
Always prepend dt-exec to the main command in ./launchers/default.sh.
Using dt-exec helps us deal with an interesting problem called “The zombie reaping problem”
(more about this in this article).
You can also create more launcher scripts. To know more about that, check out the page Launchers.
Let us now re-build the image:
and run it:
This will show the following message:
You just built and run your own Duckietown-compliant Docker image.
Define dependencies
mkdir -p ./packages/my_package
touch ./packages/my_package/__init__.py
message = "\nHello World!\n"
print(message)
echo "This is an empty launch script. Update it to launch your application."
dt-exec python3 -m "my_package.my_script"
Note
dts devel build -f
dts devel run
...
==> Launching app...
Hello World!
<== App terminated!
Congratulations
It is quite common that our programs need to import libraries, thus we need a way to install them. Since
our programs reside in Docker images, we need a way to install libraries inside the image when the
image is built.
All the project templates provided by Duckietown support two package managers out of the box:
Advanced Package Tool (apt)
Pip Installs Packages for Python3 (pip3)
List your apt packages or pip3 packages in the files dependencies-apt.txt. As for pip3
dependencies, we make a distinction between Duckietown-owned and third-party libraries. List all the
Duckietown-owned libraries you want to install in the file dependencies-py3.dt.txt and third-party
libraries in the file dependencies-py3.txt.
Dependencies files support comments (lines starting with #) and empty lines. Use them to
group dependencies together and make dependencies lists easier to read and maintain.
Running dts devel build after editing these files will rebuild the image with the new dependencies
installed.
That’s it! Now you know how to customize dependencies as well!
Exercise: Basic NumPy program
Write a program that performs the sum of two numbers using NumPy. Add numpy to the file
dependencies-py3.txt to have it installed in the Docker image.
Run on your Duckiebot
Now that we know how to package a piece of software into a Docker image for Duckietown using
DTProjects, we can go one step further and write code that will run on the robot instead of our local
computer.
This part assumes that you have a Duckiebot up and running with hostname ROBOT_NAME. Of course,
you don’t need to change the hostname to ROBOT_NAME, just replace it with your robot name in the
instructions below. You can make sure that your robot is ready by executing the command
If we can ping the robot, we are good to go.
Let us go back to our script file my_script.py we created in Add your code and change it to:
We can now modify slightly the instructions for building the image so that the image gets built directly
on the robot instead of our computer. Run the command
As you can see, we added -H ROBOT_NAME to the build command. This new option tells dts where to
build the image.
Once the image is built, we can run it on the robot by running the command
Note
ping ROBOT_NAME.local
import os
vehicle_name = os.environ['VEHICLE_NAME']
message = f"\nHello from {vehicle_name}!\n"
print(message)
dts devel build -f -H ROBOT_NAME
dts devel run -H ROBOT_NAME
If everything worked as expected, you should see the following output,
Some WARNING and INFO messages from dts and from the container’s entrypoint are
expected. Here are some examples:
From dts
WARNING:dts:Forced!
INFO:dts:Running an image for arm64v8 on aarch64.
Among entrypoint logs of the container:
INFO: The environment variable VEHICLE_NAME is not set. Using
'myduckiebot'.
You just built and run your first Duckietown-compliant and Duckiebot-compatible Docker
image. We are sure this is just the first of many!
Launchers
As we discussed earlier, the directory launchers/ contains scripts that can serve as entry scripts to the
Docker containers that are spawned out of a DTProject Docker image.
If you are familiar with Docker.
We purposefully refer to these scripts as entry scripts as not to confuse them with
entrypoints as they are defined by Docker. In fact, launcher scripts will not be directly used
as container entrypoints. A generic entrypoint is defined in all Duckietown images and is used
to configure the containers’ network, environment, etc.
The default launcher
Every project template comes with a launcher file called default.sh. This is the launcher that runs by
default inside the container when we run the command dts devel run. This launcher should be
modified and set to launch the main behavior of our project. For example, when making a DTProject
that implements autonomous lane following in Duckietown, we want our default launcher to run the
lane following pipeline.
While the default launcher is great, you will quickly realize that, for some projects, having only one
entry behavior is quite limiting. For example, let us imagine that we are working on an autonomous
lane following behavior DTProject. In this case, apart from running the full behavior (we will use the
default launcher for that), it might be useful to have entry scripts that allow us to run single components
of our multi-component lane follower pipeline, say, so that we can test single components one at a
time.
In some cases, we will use additional launchers as test scripts. In other cases, it might make sense to
leave the default launcher untouched and only implement additional launchers. This might be useful,
for example, when a DTProject implements a collection of sensor calibrations. In this case, we might
...
==> Launching app...
Hello from ROBOT_NAME!
<== App terminated!
Note
Congratulations
Attention
want to leave the default launcher untouched as there is no “default calibration”, and then have the
additional launchers camera-intrinsic-calibration.sh, camera-extrinsic-calibration.sh, etc.
Add new launcher
In order to add a new launcher, you can simply make a new file inside the launchers/ directory. The
only rule is that such file must either have extension .sh, or, have a shebang declaration on its first line.
For example, we can make a launcher out of a Python script file launchers/my-launcher.py with the
content,
The output from the command dts devel build shows the list of launchers installed in the
image we just built. For example,
Launchers inside the container
Launchers inside the container appear as shell commands named as dt-launcher-<LAUNCHER_NAME>.
For example, the launcher file launchers/my-launcher.sh will be available as the shell command
dt-launcher-my-launcher.
Project Templates
While DTProjects are open to all sorts of customizations to accommodate for virtually any need,
Duckietown provides a set of templated projects that cover the most common use cases. For each
project template we provide a templated repository.
Coding project templates
These project templates are designed for projects implementing robot behaviors (e.g., lane following),
back-end systems (e.g., REST APIs), etc.
Table 2 Coding project templates
Name Features Link
basic
Ubuntu 20.04 base image
Support for Python
packages in packages/
duckietown/template-basic
ros
Same as basic
Support for ROS
Support for catkin
packages in packages/
duckietown/template-ros
core
Same as ros
Duckietown autonomous
driving modules baked in
duckietown/template-core
Documentation project templates
These project templates are designed for projects implementing documentation books and manuals
such as the one you are looking at right now.
#!/usr/bin/env python3
message = "This is a Python launcher"
print(message)
Note
...
-------------------------
Image launchers:
- default
- test-agent
- test-lens-distortion
-------------------------
Table 3 Documentation project templates
Name Features Link
book
Based on Jupyter Book
Compiles into HTML and
PDF
Easy cross-reference with
Duckietown books library
duckietown/template-book
Duckietown Learning Experiences (LXs) project templates
These project templates are designed for the development of web-based dashboards based on
\compose\. A project based on this template is the robot dashboard.
Table 4 Duckietown Learning Experiences (LXs) project
templates
Name Link
lx duckietown/template-lx
lx-recipe duckietown/template-lx-recipe
Dashboard project templates
These project templates are designed for the development of web-based dashboards based on
\compose\. A project based on this template is the robot dashboard.
Table 5 Dashboard project templates
Name Link
compose duckietown/template-compose
In Duckietown, everything runs in Docker containers. All you need in order to run a piece of software in
Duckietown is a Duckietown-compliant Docker image with your software in it.
Duckietown-compliant Docker images are built out of Duckietown Projects, in short DTProjects. A
DTProject is a git repository with an agreed-upon structure that our automated tools can parse.
Everybody can use existing DTProjects and everybody can create new ones and distribute them freely
over the internet. Agreeing on a structure for our code is crucial for the creation of a community of
developers who can easily share their solutions.
High level robot behaviors in Duckietown, such as autonomous driving (in Duckiebots) or autonomous
flight (in Duckiedrones), are implemented collectively by a set of DTProjects. Breaking down a complex
problem into smaller problems that are tackled independently is very common in software development
and is inspired by a military strategy called “divide and conquer” (latin: divide et impera) commonly
used by the Roman Empire.
By implementing complex behaviors as the union of smaller and simpler DTProjects, we can drastically
improve the usability, mantainability, and modularity of our software solutions. Moreover,
DTProjects can be exchanged, shared, extended, and improved with and by the community.
Each DTProject produces a Docker Image
As we will see in the next sections, a DTProject needs to be built into its corresponding executable
Docker image before it can be executed.
Understanding the pros and cons of forcing code to only run inside Docker containers right now is
crucial.

Bad news first! The biggest downside of using Docker to isolate the execution of our code is that by
doing so, we are wrapping our source code inside a Docker image. This makes it harder for us to do
development, since our code will not be easily accessible through our local file system. This is what
scares/frustrates people away from Docker the most. Keep it in mind, if it happens to you, you are not
the only one. The Duckietown development workflow explained in this book aims, among other things,
at reducing the effect of this code isolation. We will get back to this topic later in the book.
As for the good news, i.e., why using Docker to isolate our code makes sense and our life easier, we
could write a book about it, but it is better if we discover those benefits as we go.
Structure of a DTProject
DTProjects have an agreed-upon files structure with known locations for source code, configuration
files, dependencies lists, etc.
Meta-files
.dtproject: Signals that this directory contains a Duckietown Project;
.gitignore: List of files and directories ignore by git;
.dockerignore: List of files and directories ignore by docker;
.bumpversion.cfg: Configuration for bumpversion, used to perform semantic versioning on the
project;
Docker
Dockerfile: Dockerfile building the project’s Docker image;
configurations.yaml: Collection of Docker container configurations that can be used on this
project;
Source code
packages/: This directory can contain both Python and Catkin packages;
launchers/: Scripts that can be used as entry scripts inside the project’s Docker container;
Dependencies
dependencies-apt.txt: List of dependency packages that can be installed via apt;
dependencies-py3.dt.txt: List of Duckietown-owned dependency packages that can be
installed via pip;
dependencies-py3.txt: List of third-party dependency packages that can be installed via pip;
Assets and Documentation
assets/: Store static assets in this directory. For example, configuration files you need to bake
into the image;
docs/: Contains a book project that can be used to write documentation about this project;
html/: Hosts the HTML of the compiled documentation in docs/;
Other
LICENSE.pdf: The Duckietown Software Terms of Use;
README.md: Brief description of the DTProject;
Project Templates
While a DTProject exposes a lot of parameters that the final user can tune, e.g., base Docker image,
support for ROS, etc., it helps to have a set of predefined presets covering the most common use
cases. We call these Project Templates. Project templates are stored on GitHub as Template
Repositories. These are of a special kind of repositories and their main characteristic is that one can
use them to initialize new repositories.
The simplest module template is called basic and its template repository is duckietown/template-basic.
Since understanding the differences between different templates is outside the scope of this section,
we can use any template for the remainder of this section, we suggest using the one above. For a list
of predefined project templates, check out the Project Templates
In the next sections of this chapter we will learn how to customize, build, and run our own DTProjects
both locally and on a Duckietown robot.
Beginner - Use ROS
Table of contents
New ROS DTProject
Create project from a template
Visit the template repository page duckietown/template-ros. Click on the button that reads “Use this
template” and then choose “Create a new repository” from the dropdown menu.
Fig. 6 Use template repository on GitHub.
This will take you to a page that looks like the following:
What you will need A computer set up with the Duckietown software requirements
An initialized Duckiebot
Completed tutorial on DTProject
What you will get A working knowledge of ROS development in Duckietown
A custom ROS node with a publisher and a subscriber running
on your Duckiebot
What you will need Working environment setup
Accounts setup
What you will get Learn how to create a new ROS-compatible DTProject from a
template
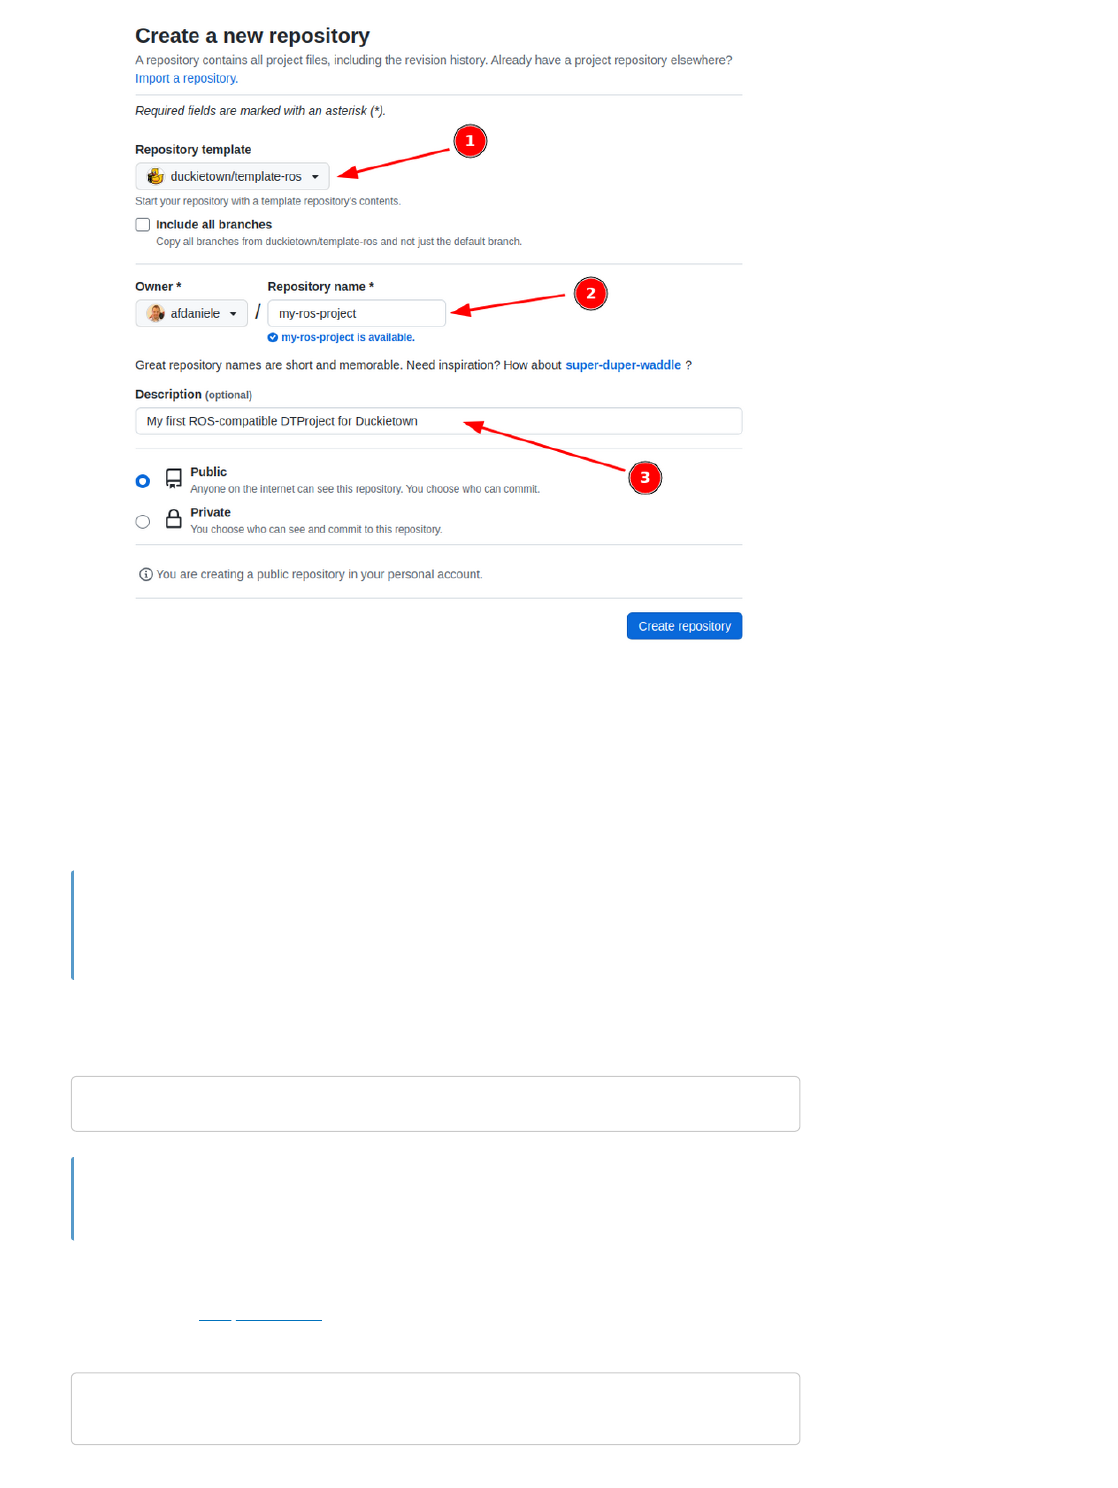
Fig. 7 Creating a repository from template.
Make sure the selected template is duckietown/template-ros, pick a name for our repository (e.g.,
my-ros-project), and add a description for the new repository.
Click on the button Create repository.
You can replace my-ros-project with the name of the repository that you prefer. If you do
change it, make sure you use the right name in the instructions going forward.
This will create a new repository starting from the content of the template template-ros. You can now
open a terminal and clone your newly created repository.
Replace YOUR_NAME in the link above with your GitHub username.
Edit placeholders
As we learned in Edit placeholders, we now need to edit the placeholders left by the template. Head
over to the Dockerfile and edit the following lines using any text editor:
Replace the placeholders strings with, respectively,
Note
git clone https://github.com/YOUR_NAME/my-ros-project
cd my-ros-project
Note
ARG REPO_NAME="<REPO_NAME_HERE>"
ARG DESCRIPTION="<DESCRIPTION_HERE>"
ARG MAINTAINER="<YOUR_FULL_NAME> (<YOUR_EMAIL_ADDRESS>)"
the name of the repository (i.e., my-ros-project);
a brief description of the functionalities implemented in this project;
your name and email address to claim the role of maintainer;
Save the changes. We can now compile this project into a Docker image.
Build the project
Exactly as in Build the project, we can now move to the project root and run the following command to
build our project (beware that it might take some time):
Again, building a project produces a Docker image. This image is the compiled version of your source
project. You can find the name of the resulting image at the end of the output of the dts devel build
command. In this case, look for the line:
Run the project
Again, as in Run the project, we can run our project by executing the command,
This will show the following message:
You just built and run your first ROS-based Duckietown-compliant Docker image.
Catkin Packages
ROS uses the catkin build system to organize and build its software. If you are not familiar with the
catkin build system, you can learn about it by following the official tutorials.
In a nutshell, catkin organizes entire projects in the so-called catkin workspaces. A catkin workspace is
nothing more than a directory containing a bunch of software modules called catkin packages. Each
software module can contain a set of executables (e.g., binaries, script files) called ROS nodes. ROS
nodes interact with one another using two of the most common communication patterns, called
publish-subscribe and request-reply.
ROS implements the publish-subscribe pattern using ROS Publishers and ROS Subscribers, and
the request-reply pattern using ROS Services. More on these later.
Let us now take a step back and review catkin workspaces, packages, and nodes more in details.
Catkin workspace
The directory packages/ you find at the root of a DTProject is a catkin workspace.
dts devel build -f
Final image name: duckietown/my-ros-project:v2-amd64
dts devel run
...
==> Launching app...
This is an empty launch script. Update it to launch your application.
<== App terminated!
Congratulations
What you will need New ROS DTProject as described here
What you will get Learn how to create a new catkin package inside a DTProject
Create a new Catkin package
Open a terminal at the root of the DTProject my-ros-project created earlier. Again, Catkin packages
are directories inside the directory packages/ of my-ros-project. Let us go ahead and create a new
directory called my_package inside packages/.
A Catkin package (also known as a ROS package) is simply a directory containing two special files,
package.xml and CMakeLists.txt. So, let us turn the my_package folder into a ROS package by
creating these two files.
Create the file package.xml inside my_package using your favorite text editor and place/adjust the
following content inside it:
Replace YOUR_FULL_NAME with your first and last name and [email protected] with your email
address.
Now, create the file CMakeLists.txt inside my_package using your favorite text editor and place/adjust
the following content inside it:
We now have a catkin package inside a catkin workspace in a ROS-capable DTProject. We will now
add our code by adding ROS nodes to our catkin package.
ROS Publisher
The most common communication pattern in Robotics is known as publish-subscribe. ROS
implements the publish-subscribe pattern using ROS Publishers and ROS Subscribers. In this
section, we will learn to create a ROS Publisher.
In reality, packages/ is more of a sub-workspace, as it is internally joined with other
packages/ directories from other projects (the ancestor projects) to form a full catkin
workspace.
Advanced: the real story behind the packages directory
mkdir -p ./packages/my_package
<package>
<name>my_package</name>
<version>0.0.1</version>
<description>
My first Catkin package in Duckietown.
</description>
<maintainer email="[email protected]">YOUR_FULL_NAME</maintainer>
<license>None</license>
<buildtool_depend>catkin</buildtool_depend>
</package>
cmake_minimum_required(VERSION 2.8.3)
project(my_package)
find_package(catkin REQUIRED COMPONENTS
rospy
)
catkin_package()
What you will need A Duckietown robot turned ON and visible on dts fleet
discover
What you will get Learn how to create a new ROS Node publishing messages
using a ROS Publisher
The general concept is simple, a publisher has the job of publishing messages from a ROS node into
the ROS network for other nodes to receive (using ROS Subscribers).
Create Publisher ROS Node
We will see how to write a simple ROS program with Python, but any language supported by ROS
should do it. In Create a new Catkin package, we learned how to make a new Catkin package, we will
now populate that package with a ROS node hosting a ROS Publisher.
Nodes are placed inside the directory src/ of a Catkin package. Let us go ahead and create the
directory src inside my_package. We can do so by running the following command from the root of our
DTProject.
We now use our favorite text editor to create the file my_publisher_node.py inside the src/ directory
we just created and place the following code in it:
Using the super class DTROS provided by the Python module duckietown.dtros is not
mandatory but it is highly suggested as it provides a lot of useful features that plain ROS does
not. More on these later.
We now need to the tell our file system that we want our file my_publisher_node.py be treated as an
executable file. We do so by running the following command from the root of our DTProject:
Define launcher
As we discussed above, everything in Duckietown runs inside Docker containers. This means that we
also need to tell Docker what to run when the container is started. In this case, we want our new ROS
publisher node to run.
mkdir -p ./packages/my_package/src
#!/usr/bin/env python3
import os
import rospy
from std_msgs.msg import String
from duckietown.dtros import DTROS, NodeType
class MyPublisherNode(DTROS):
def __init__(self, node_name):
# initialize the DTROS parent class
super(MyPublisherNode, self).__init__(node_name=node_name,
node_type=NodeType.GENERIC)
# static parameters
self._vehicle_name = os.environ['VEHICLE_NAME']
# construct publisher
self._publisher = rospy.Publisher('chatter', String, queue_size=10)
def run(self):
# publish message every 1 second (1 Hz)
rate = rospy.Rate(1)
message = f"Hello from {self._vehicle_name}!"
while not rospy.is_shutdown():
rospy.loginfo("Publishing message: '%s'" % message)
self._publisher.publish(message)
rate.sleep()
if __name__ == '__main__':
# create the node
node = MyPublisherNode(node_name='my_publisher_node')
# run node
node.run()
# keep the process from terminating
rospy.spin()
Note
chmod +x ./packages/my_package/src/my_publisher_node.py
Each DTProject compiles into a single Docker image, but we can declare multiple start “behaviors” for
the same project/image so that the same project can serve multiple (though related) purposes. As we
learned in Launchers, we can use launchers to accomplish this. As we learned in Add new launcher,
we create a new launcher to allow for this new start behavior.
In order to do so, we create the file ./launchers/my-publisher.sh and add the following content,
Launch the Publisher node
This part assumes that you have a Duckiebot up and running with a known hostname, e.g.,
ROBOT_NAME. Let us make sure that our robot is ready by executing the command,
If you can ping the robot, you are good to go.
Let us now re-compile our project using the command
and run it using the newly defined launcher (we use the flag -L/--launcher to achieve this):
This will show the following message:
You just built and run your first Duckietown-compliant and Duckiebot-compatible ROS
publisher.
If you want to stop it, just use Ctrl+C.
ROS Subscriber
#!/bin/bash
source /environment.sh
# initialize launch file
dt-launchfile-init
# launch publisher
rosrun my_package my_publisher_node.py
# wait for app to end
dt-launchfile-join
ping ROBOT_NAME.local
dts devel build -H ROBOT_NAME -f
dts devel run -H ROBOT_NAME -L my-publisher
...
==> Launching app...
[INFO] [1693000564.020676]: [/my_publisher_node] Initializing...
[INFO] [1693000564.028260]: [/my_publisher_node] Node starting with switch=True
[INFO] [1693000564.029052]: [/my_publisher_node] Found 0 user configuration files in
'/data/config/nodes/generic'
[INFO] [1693000564.029608]: [/my_publisher_node] Found 0 user configuration files in
'/data/config/nodes/my_publisher_node'
[INFO] [1693000564.034693]: [/my_publisher_node] Health status changed [STARTING] ->
[STARTED]
[INFO] [1693000564.035819]: Publishing message: 'Hello from vbot!'
[INFO] [1693000565.036489]: Publishing message: 'Hello from vbot!'
[INFO] [1693000566.036378]: Publishing message: 'Hello from vbot!'
...
Congratulations
What you will need A Duckietown robot turned ON and visible on dts fleet
discover
What you will get Learn how to create a new ROS Node receiving messages
The most common communication pattern in Robotics is known as publish-subscribe. ROS
implements the publish-subscribe pattern using ROS Publishers and ROS Subscribers. In this
section, we will learn to create a ROS Subscriber.
The general concept is simple: a subscriber has the job of listening for messages about a specific topic
that are published by other ROS nodes (using ROS Publishers) over a ROS network.
Create Subscriber ROS Node
In Create a new Catkin package, we learned how to make a new Catkin package, we will now populate
that package with a ROS node hosting a ROS Subscriber.
Again, nodes are placed inside the directory src/ of a Catkin package. If we followed the tutorial
Create Publisher ROS Node we should already have this directory.
We now use our favorite text editor to create the file my_subscriber_node.py inside the src/ directory
we just created and place the following code in it:
Using the super class DTROS provided by the Python module duckietown.dtros is not
mandatory but it is highly suggested as it provides a lot of useful features that plain ROS does
not. More on these later.
We now need to the tell our file system that we want our file my_subscriber_node.py be treated as an
executable file. We do so by running the following command from the root of our DTProject:
Define launcher
We now create a new launcher file ./launchers/my-subscriber.sh with the following content inside,
using a ROS Subscriber
#!/usr/bin/env python3
import rospy
from duckietown.dtros import DTROS, NodeType
from std_msgs.msg import String
class MySubscriberNode(DTROS):
def __init__(self, node_name):
# initialize the DTROS parent class
super(MySubscriberNode, self).__init__(node_name=node_name,
node_type=NodeType.GENERIC)
# construct subscriber
self.sub = rospy.Subscriber('chatter', String, self.callback)
def callback(self, data):
rospy.loginfo("I heard '%s'", data.data)
if __name__ == '__main__':
# create the node
node = MySubscriberNode(node_name='my_subscriber_node')
# keep spinning
rospy.spin()
Note
chmod +x ./packages/my_package/src/my_subscriber_node.py
Launch the Subscriber node
This part assumes that you have a Duckiebot up and running with a known hostname, e.g.,
ROBOT_NAME. Let us make sure that our robot is ready by executing the command,
If you can ping the robot, you are good to go.
Let us now re-compile our project using the command
and run it using the newly defined launcher (we use the flag -L/--launcher to achieve this):
This will show the following messages before hanging,
This is because the ROS Subscriber is now waiting for messages to come in. Let us open a new
terminal at the root of the project and launch an instance of the publisher we built previously. We can
do so by running the following command,
We need to add the option -n publisher to tell dts to allow multiple instances of the same
project to run simultaneously.
You should notice that messages will start to appear on the subscriber side. The expected output is the
following,
#!/bin/bash
source /environment.sh
# initialize launch file
dt-launchfile-init
# launch subscriber
rosrun my_package my_subscriber_node.py
# wait for app to end
dt-launchfile-join
ping ROBOT_NAME.local
dts devel build -H ROBOT_NAME -f
dts devel run -H ROBOT_NAME -L my-subscriber
...
==> Launching app...
[INFO] [1693000997.289437]: [/my_subscriber_node] Initializing...
[INFO] [1693000997.296816]: [/my_subscriber_node] Node starting with switch=True
[INFO] [1693000997.297660]: [/my_subscriber_node] Found 0 user configuration files
in '/data/config/nodes/generic'
[INFO] [1693000997.298273]: [/my_subscriber_node] Found 0 user configuration files
in '/data/config/nodes/my_subscriber_node'
[INFO] [1693000997.303460]: [/my_subscriber_node] Health status changed [STARTING] -
> [STARTED]
...
dts devel run -H ROBOT_NAME -L my-publisher -n publisher
Note
You just built and run your first Duckietown-compliant and Duckiebot-compatible ROS
subscriber.
If you want to stop it, just use Ctrl+C.
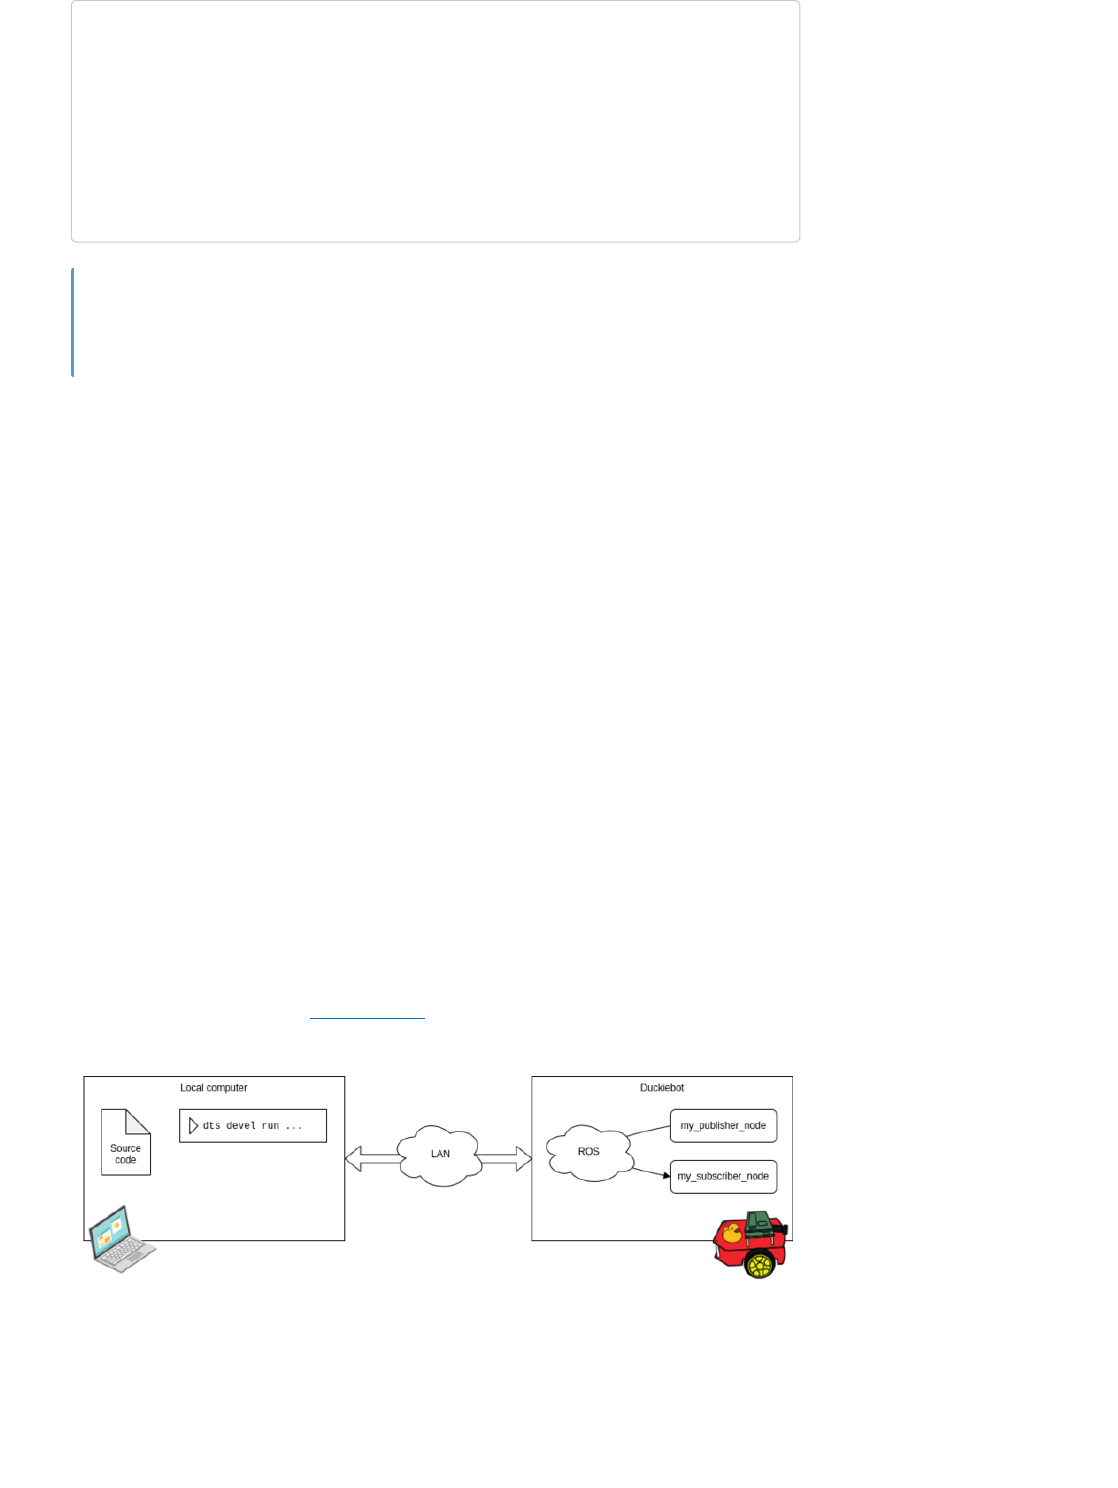
Faster Development Workflow
In this section we will learn some tricks that enable a much faster development workflow in dts.
Run locally
As we have seen so far, we can add new code to a DTProject or make a change to existing code and
then build and run either locally or directly on a Duckiebot. While working with ROS, we only have seen
examples in which all the nodes were run on the Duckiebot. This is because ROS sets up all the nodes
to defaultly look for a ROS network on the local machine, and given that our ROS network originates
on the Duckiebot, we can leverage the default configuration of ROS by running the nodes directly on
the Duckiebot. Unfortunately, building and running on the Duckiebot is not the best option when it
comes to speed, though having a responsive development workflow is crucial in software development.
There are two major issues with the current workflow,
1. our source code always resides on our local computer, so Docker needs to transfer it over to the
Duckiebot for the image to be built;
2. the Duckiebot’s on-board computer is too slow to be used as a development testbed (while it is
fine for final deployments);
Ideally, we would like to be able to build and run ROS nodes on our local computer in a way that is
transparent to all other ROS nodes. This can be done very easily with dts, and we will now see how.
Let us go back to the example in ROS Subscriber. A block diagram showing the ROS nodes and their
location in the network would be the following,
Fig. 8 Block diagram for a Pub-Sub setup with both nodes running on the Duckiebot.
Let us now keep everything as is for the Publisher and slightly change the commands we use to build
and run the Subscriber. In particular, we use the following commands instead,
...
==> Launching app...
[INFO] [1693000997.289437]: [/my_subscriber_node] Initializing...
[INFO] [1693000997.296816]: [/my_subscriber_node] Node starting with switch=True
[INFO] [1693000997.297660]: [/my_subscriber_node] Found 0 user configuration files
in '/data/config/nodes/generic'
[INFO] [1693000997.298273]: [/my_subscriber_node] Found 0 user configuration files
in '/data/config/nodes/my_subscriber_node'
[INFO] [1693000997.303460]: [/my_subscriber_node] Health status changed [STARTING] -
> [STARTED]
[INFO] [1693001092.577549]: I heard 'Hello from ROBOT_NAME!'
[INFO] [1693001093.557725]: I heard 'Hello from ROBOT_NAME!'
...
Congratulations
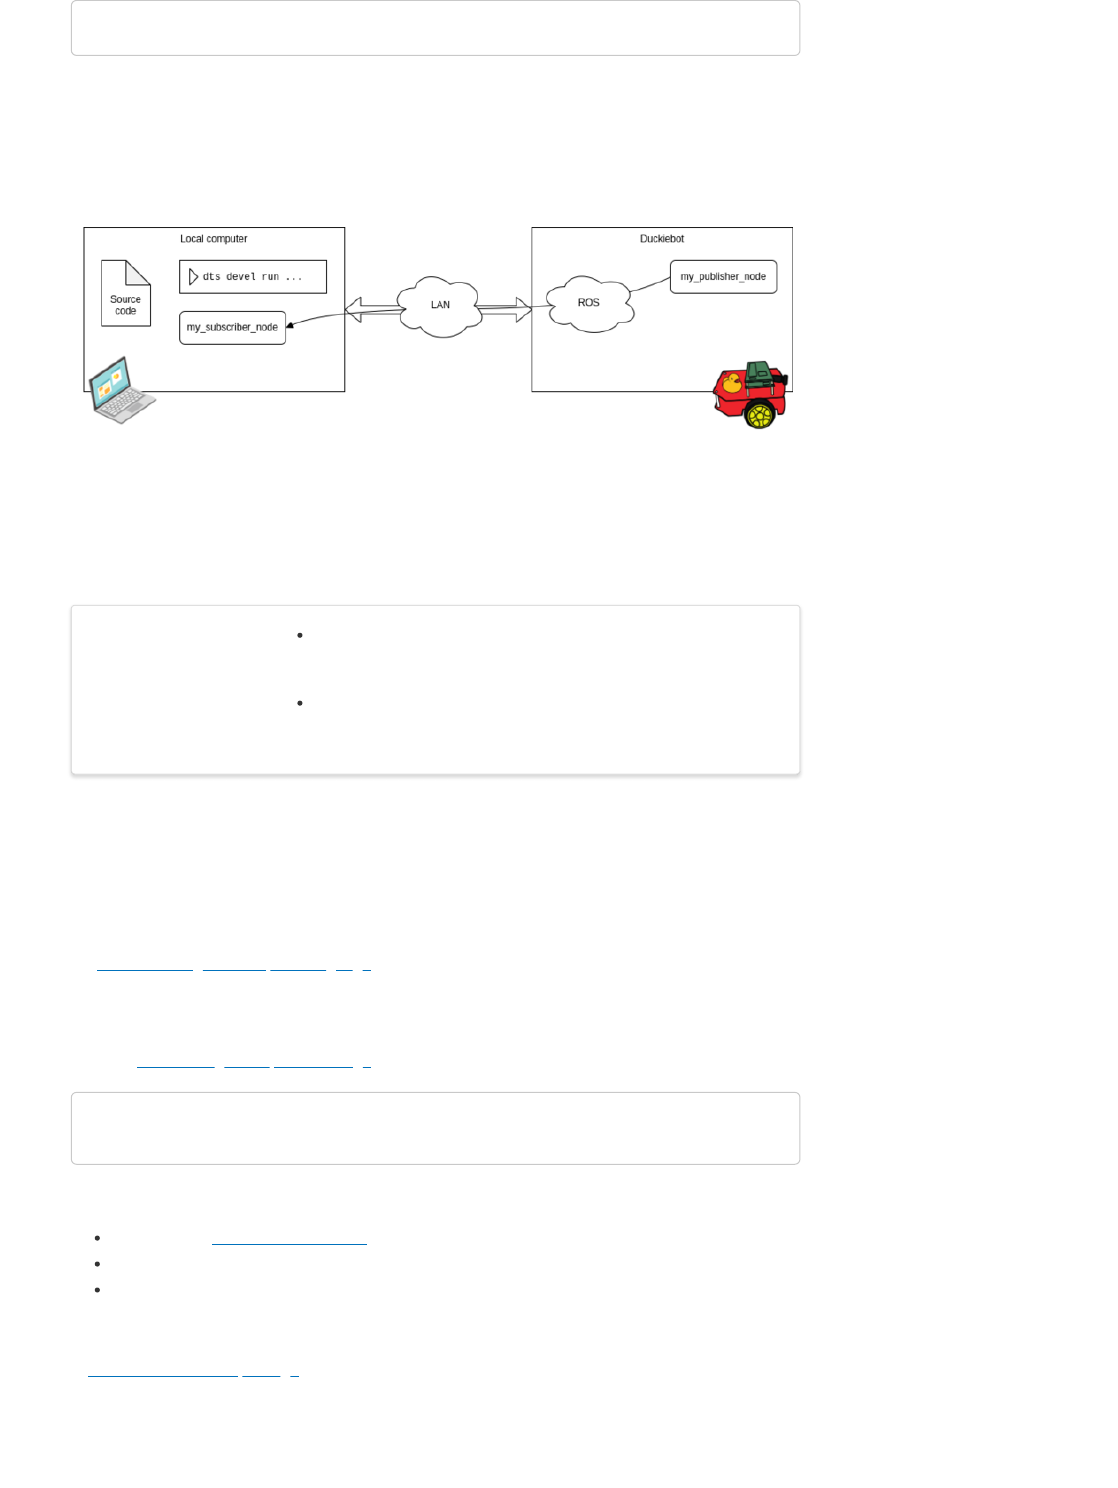
We are now telling dts to build the project locally (we removed -H ROBOT_NAME from the build
command). We are also telling dts to run the subscriber node locally (we removed -H ROBOT_NAME
from the run command) but to connect it to the ROS network of the Duckiebot (using the --ros/-R
ROBOT_NAME option on the run command). A block diagram showing the new configuration of ROS
nodes and their location in the network would be the following,
Fig. 9 Block diagram for a Pub-Sub setup with the Subscriber node running on the local
computer.
Subscribe to camera
Topic and message type of interest
As you should know by now, ROS allows different processes to communicate with one another by
exchanging messages over topics. In order for two ROS nodes to be able to talk, they need to agree
on a topic name (e.g., camera images), and a message type (e.g., each message is a JPEG image).
In ROS, a topic is identified by a string (e.g., camera/image), while message types are defined using
the official messages description language.
In the case of the camera sensor, the topic used by the Duckiebot to publish camera frames is
/ROBOT_NAME/camera_node/image/compressed, while the message type used over this topic is the
standard sensor_msgs/CompressedImage, and contains the following fields.
where,
header: is the standard ROS header object;
format: specifies the format of the data, for example, png or jpeg;
data: is an array of bytes containing the actual image in the format specified;
Create Subscriber ROS Node
In Create a new Catkin package, we learned how to make a new Catkin package. We will assume that
a catkin package already exists, i.e., packages/my_package/. You can reuse the one we created
earlier.
dts devel build -f
dts devel run -R ROBOT_NAME -L my-subscriber
What you will need A Duckietown robot turned ON and visible on dts fleet
discover
What you will get Learn how to receive camera images from your robot using a
ROS Subscriber
std_msgs/Header header
string format
uint8[] data
We now use our favorite text editor to create the file camera_reader_node.py inside the src/ directory
of our catkin package and add the following content,
Again, we make our node executable,
Define launcher
Similarly to what we did in the section Define launcher, we create a new launcher file
./launchers/camera-reader.sh with the content,
Let us now re-compile our project using the command
Launch the node
We are now ready to run our camera reader node,
#!/usr/bin/env python3
import os
import rospy
from duckietown.dtros import DTROS, NodeType
from sensor_msgs.msg import CompressedImage
import cv2
from cv_bridge import CvBridge
class CameraReaderNode(DTROS):
def __init__(self, node_name):
# initialize the DTROS parent class
super(CameraReaderNode, self).__init__(node_name=node_name,
node_type=NodeType.VISUALIZATION)
# static parameters
self._vehicle_name = os.environ['VEHICLE_NAME']
self._camera_topic = f"/{self._vehicle_name}/camera_node/image/compressed"
# bridge between OpenCV and ROS
self._bridge = CvBridge()
# create window
self._window = "camera-reader"
cv2.namedWindow(self._window, cv2.WINDOW_AUTOSIZE)
# construct subscriber
self.sub = rospy.Subscriber(self._camera_topic, CompressedImage,
self.callback)
def callback(self, msg):
# convert JPEG bytes to CV image
image = self._bridge.compressed_imgmsg_to_cv2(msg)
# display frame
cv2.imshow(self._window, image)
cv2.waitKey(1)
if __name__ == '__main__':
# create the node
node = CameraReaderNode(node_name='camera_reader_node')
# keep spinning
rospy.spin()
chmod +x ./packages/my_package/src/camera_reader_node.py
#!/bin/bash
source /environment.sh
# initialize launch file
dt-launchfile-init
# launch subscriber
rosrun my_package camera_reader_node.py
# wait for app to end
dt-launchfile-join
dts devel build -f
dts devel run -R ROBOT_NAME -L camera-reader -X
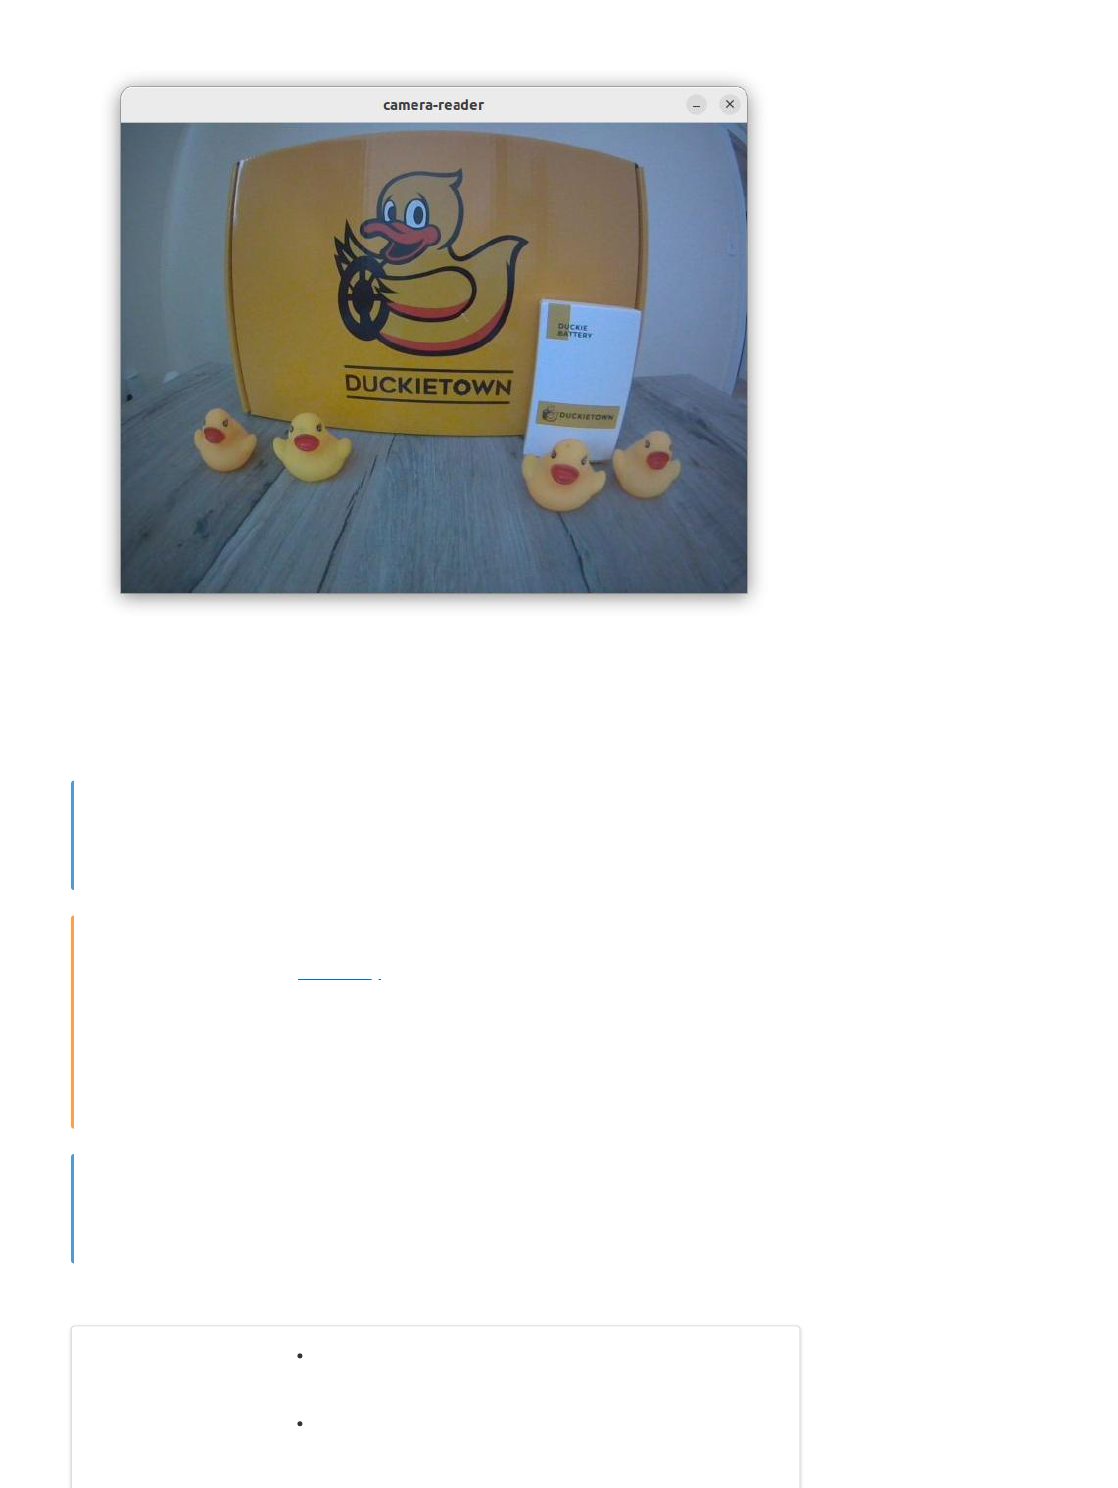
This will open a new window like the following,
Fig. 10 Camera feed window.
If you want to stop the node, just use Ctrl+C in the terminal.
We used the flag -X to instruct dts to allow this project to create new windows on this
computer’s screen.
The trick we learned in Run locally to speed up our development workflow becomes
mandatory here. In fact, this particular node needs access to a screen to be able to open the
window showing the camera feed, hence the need to run it locally as the Duckiebot is not
connected to a monitor. You can put this to the test by attempting to build and run this node
on the Duckiebot (using the -H ROBOT_NAME) flag, you will be presented the error cannot
open display.
You just built and run your first ROS node connected to the existing ROS network exposed by
the Duckiebot.
Subscribe to wheel encoders
Note
Attention
Congratulations
What you will need A Duckietown robot turned ON and visible on dts fleet
discover
What you will get Learn how to receive wheel encoder data from your robot using
a ROS Subscriber
Topic and message type of interest
For the wheel encoders, the topics used by the Duckiebot to publish the encoder ticks are
/ROBOT_NAME/left_wheel_encoder_node/tick
/ROBOT_NAME/right_wheel_encoder_node/tick
And the message type used over these topics is duckietown_msgs/WheelEncoderStamped and
contains the following fields.
where,
header: is the standard ROS header object;
data: is the current accumulated number of ticks on that motor;
resolution: is how many ticks will be recorded when the motor spins for a full revolution (360
degrees);
type: indicates the type of the encoder, absolute or incremental, and it takes the values from
the constants ENCODER_TYPE_ABSOLUTE and ENCODER_TYPE_INCREMENTAL defined in the message
itself. For a detailed explanation of the difference between the two types of encoders, we direct
the reader to this page;
For example, on the DB21 series robot, the resolution is 135 and the type is 1
(ENCODER_TYPE_INCREMENTAL). This means that each motor records 135 ticks per full revolution, and
that data=0 at whatever the initial position of the wheel was when the robot was turned ON.
If the wheels are spun by hand, the ticks only increase. The robot can only sense direction
(hence decrease the counter) when the wheels are spun by the motors.
Create Subscriber ROS Node
We now use our favorite text editor to create the file wheel_encoder_reader_node.py inside the src/
directory of our catkin package and add the following content,
uint8 ENCODER_TYPE_ABSOLUTE=0
uint8 ENCODER_TYPE_INCREMENTAL=1
std_msgs/Header header
int32 data
uint16 resolution
uint8 type
Note

Again, we make our node executable,
Define launcher
Similarly to what we did in the section Define launcher, we create a new launcher file
./launchers/wheel-encoder-reader.sh with the content,
#!/usr/bin/env python3
import os
import rospy
from duckietown.dtros import DTROS, NodeType
from duckietown_msgs.msg import WheelEncoderStamped
class WheelEncoderReaderNode(DTROS):
def __init__(self, node_name):
# initialize the DTROS parent class
super(WheelEncoderReaderNode, self).__init__(node_name=node_name,
node_type=NodeType.PERCEPTION)
# static parameters
self._vehicle_name = os.environ['VEHICLE_NAME']
self._left_encoder_topic =
f"/{self._vehicle_name}/left_wheel_encoder_node/tick"
self._right_encoder_topic =
f"/{self._vehicle_name}/right_wheel_encoder_node/tick"
# temporary data storage
self._ticks_left = None
self._ticks_right = None
# construct subscriber
self.sub_left = rospy.Subscriber(self._left_encoder_topic,
WheelEncoderStamped, self.callback_left)
self.sub_right = rospy.Subscriber(self._right_encoder_topic,
WheelEncoderStamped, self.callback_right)
def callback_left(self, data):
# log general information once at the beginning
rospy.loginfo_once(f"Left encoder resolution: {data.resolution}")
rospy.loginfo_once(f"Left encoder type: {data.type}")
# store data value
self._ticks_left = data.data
def callback_right(self, data):
# log general information once at the beginning
rospy.loginfo_once(f"Right encoder resolution: {data.resolution}")
rospy.loginfo_once(f"Right encoder type: {data.type}")
# store data value
self._ticks_right = data.data
def run(self):
# publish received tick messages every 0.05 second (20 Hz)
rate = rospy.Rate(20)
while not rospy.is_shutdown():
if self._ticks_right is not None and self._ticks_left is not None:
# start printing values when received from both encoders
msg = f"Wheel encoder ticks [LEFT, RIGHT]: {self._ticks_left},
{self._ticks_right}"
rospy.loginfo(msg)
rate.sleep()
if __name__ == '__main__':
# create the node
node = WheelEncoderReaderNode(node_name='wheel_encoder_reader_node')
# run the timer in node
node.run()
# keep spinning
rospy.spin()
chmod +x ./packages/my_package/src/wheel_encoder_reader_node.py
Let us now re-compile our project using the command
Launch the node
We are now ready to run our reader node,
The resolution and type values will be printed at the top of the logs once.
Then in the console, the received left and right encoder data will be printed. Try:
spinning the left/right wheel, in both directions
driving the robot back and forth with the virtual joystick
Observe how the values change in both cases.
If you want to stop the node, just use Ctrl+C in the terminal.
You just built and run a ROS node capable of reading information from the wheel encoder
sensors on the Duckiebot.
Publish to wheels
Topic and message type of interest
The topic used by the Duckiebot to receive wheel commands is
/ROBOT_NAME/wheels_driver_node/wheels_cmd, while the message type used over this topic is
duckietown_msgs/WheelsCmdStamped which contains the following fields.
where,
header: is the standard ROS header object;
vel_left: is the signed duty cycle for the left wheel (-1.0: full throttle backwards; 0.0: still; 1.0: full
throttle forward)
vel_right: is the signed duty cycle for the right wheel (-1.0: full throttle backwards; 0.0: still; 1.0:
full throttle forward)
#!/bin/bash
source /environment.sh
# initialize launch file
dt-launchfile-init
# launch subscriber
rosrun my_package wheel_encoder_reader_node.py
# wait for app to end
dt-launchfile-join
dts devel build -f
dts devel run -R ROBOT_NAME -L wheel-encoder-reader
Congratulations
What you will need A Duckietown robot turned ON and visible on dts fleet
discover
What you will get Learn how to control the Duckiebot’s wheels using a ROS
Publisher
std_msgs/Header header
float32 vel_left
float32 vel_right
There is no physical interpretation of these values, as in velocity or angular velocity, because
the commands are PWM duty cycles. Therefore, the term throttle (0% - 100%) is used. And
even given with the same throttle commands, the physical velocities would vary with different
motors and wheels, which could be then measured by sensors like encoders.
Create Publisher ROS Node
We now use our favorite text editor to create the file wheel_control_node.py inside the src/ directory
of our catkin package and add the following content,
Again, we make our node executable,
Define launcher
We create a new launcher file ./launchers/wheel-control.sh with the content,
Note
#!/usr/bin/env python3
import os
import rospy
from duckietown.dtros import DTROS, NodeType
from duckietown_msgs.msg import WheelsCmdStamped
# throttle and direction for each wheel
THROTTLE_LEFT = 0.5 # 50% throttle
DIRECTION_LEFT = 1 # forward
THROTTLE_RIGHT = 0.3 # 30% throttle
DIRECTION_RIGHT = -1 # backward
class WheelControlNode(DTROS):
def __init__(self, node_name):
# initialize the DTROS parent class
super(WheelControlNode, self).__init__(node_name=node_name,
node_type=NodeType.GENERIC)
# static parameters
vehicle_name = os.environ['VEHICLE_NAME']
wheels_topic = f"/{vehicle_name}/wheels_driver_node/wheels_cmd"
# form the message
self._vel_left = THROTTLE_LEFT * DIRECTION_LEFT
self._vel_right = THROTTLE_RIGHT * DIRECTION_RIGHT
# construct publisher
self._publisher = rospy.Publisher(wheels_topic, WheelsCmdStamped,
queue_size=1)
def run(self):
# publish 10 messages every second (10 Hz)
rate = rospy.Rate(0.1)
message = WheelsCmdStamped(vel_left=self._vel_left,
vel_right=self._vel_right)
while not rospy.is_shutdown():
self._publisher.publish(message)
rate.sleep()
def on_shutdown(self):
stop = WheelsCmdStamped(vel_left=0, vel_right=0)
self._publisher.publish(stop)
if __name__ == '__main__':
# create the node
node = WheelControlNode(node_name='wheel_control_node')
# run node
node.run()
# keep the process from terminating
rospy.spin()
chmod +x ./packages/my_package/src/wheel_control_node.py
Let us now re-compile our project using the command
Launch the node
The robot’s wheels will start spinning as soon as the node is launched. Please, make sure
that your robot has enough space to drive around without the risk of harming somebody or
himself (e.g., by falling off a desk).
We run the node,
And observe the wheels rotate as instructed. If you want to stop it, just use Ctrl+C, and the wheels
should stop spinning as per the behavior defined in the function on_shutdown() above.
You just built and run your first ROS node capable of interacting with the Duckiebot and
control one of its actuators.
Publish chassis-level commands
Topic and message type of interest
The topic used by the Duckiebot to receive Twist commands and compute inverse kinematics to obtain
lower level wheel commands is /ROBOT_NAME/car_cmd_switch_node/cmd, while the message type
used over this topic is duckietown_msgs/Twist2DStamped which contains the following fields.
where,
header: is the standard ROS header object;
v: is the linear velocity in m/s with positive signs in the forward driving direction;
omega: is the angular velocity in rad/s with positive signs in counter-clockwise direction when
looking down to the Duckiebot;
#!/bin/bash
source /environment.sh
# initialize launch file
dt-launchfile-init
# launch subscriber
rosrun my_package wheel_control_node.py
# wait for app to end
dt-launchfile-join
dts devel build -f
Danger
dts devel run -R ROBOT_NAME -L wheel-control
Congratulations
What you will need A Duckietown robot turned ON and visible on dts fleet
discover
What you will get Learn how to control the Duckiebot’s chassis linear and angular
velocities using a ROS Publisher
std_msgs/Header header
float32 v
float32 omega
The commanded expected v and omega relies on good kinematic calibration and car model to
function.
Create Publisher ROS Node
We now use our favorite text editor to create the file twist_control_node.py inside the src/ directory
of our catkin package and add the following content,
Again, we make our node executable,
Define launcher
We create a new launcher file ./launchers/twist-control.sh with the content,
Note
#!/usr/bin/env python3
import os
import rospy
from duckietown.dtros import DTROS, NodeType
from duckietown_msgs.msg import Twist2DStamped
# Twist command for controlling the linear and angular velocity of the frame
VELOCITY = 0.3 # linear vel , in m/s , forward (+)
OMEGA = 4.0 # angular vel , rad/s , counter clock wise (+)
class TwistControlNode(DTROS):
def __init__(self, node_name):
# initialize the DTROS parent class
super(TwistControlNode, self).__init__(node_name=node_name,
node_type=NodeType.GENERIC)
# static parameters
vehicle_name = os.environ['VEHICLE_NAME']
twist_topic = f"/{vehicle_name}/car_cmd_switch_node/cmd"
# form the message
self._v = VELOCITY
self._omega = OMEGA
# construct publisher
self._publisher = rospy.Publisher(twist_topic, Twist2DStamped, queue_size=1)
def run(self):
# publish 10 messages every second (10 Hz)
rate = rospy.Rate(10)
message = Twist2DStamped(v=self._v, omega=self._omega)
while not rospy.is_shutdown():
self._publisher.publish(message)
rate.sleep()
def on_shutdown(self):
stop = Twist2DStamped(v=0.0, omega=0.0)
self._publisher.publish(stop)
if __name__ == '__main__':
# create the node
node = TwistControlNode(node_name='twist_control_node')
# run node
node.run()
# keep the process from terminating
rospy.spin()
chmod +x ./packages/my_package/src/twist_control_node.py
#!/bin/bash
source /environment.sh
# initialize launch file
dt-launchfile-init
# launch subscriber
rosrun my_package twist_control_node.py
# wait for app to end
dt-launchfile-join
Let us now re-compile our project using the command
Launch the node
The robot’s wheels will start moving and spinning as soon as the node is launched. Please,
make sure that your robot has enough space to drive around without the risk of harming
somebody or himself (e.g., by falling off a desk).
We run the node,
And observe the wheels rotate as instructed. If you want to stop it, just use Ctrl+C, and the wheels
should stop spinning as per the behavior defined in the function on_shutdown() above.
You just built and run a ROS node capable of interacting with the Duckiebot and control the
wheels by leveraging existing functionalities exposed by the Duckiebot (e.g., inverse
kinematics, wheel calibration).
Basic Project Structure
In Duckietown, everything runs in Docker containers. All you need in order to run a piece of software
that uses ROS in Duckietown is a Duckietown-compliant Docker image with your software in it.
A boilerplate is provided here. If you have completed the Tutorial on DTProject (as you should have),
you will recognize the content of this repository as being a DTProject template.
Similarly to what we learned in New project, we will instantiate a new project repository by using the
template repository available on GitHub.
The procedure for building and executing a ROS-compatible DTProject is the same we learned in the
Tutorial on DTProject section.
Let’s get started!
Beginner - Python Library
In this section, you will create your own Python library following the Duckietown template.
Step 1: Get the Duckietown library template
A boilerplate is provided by the library template repository.
The repository contains a lot of files, but do not worry, we will analyze them one by one. Click on the
button that reads “Use this template” and then choose “Create a new repository” from the dropdown
menu.
dts devel build -f
Danger
dts devel run -R ROBOT_NAME -L twist-control
Congratulations
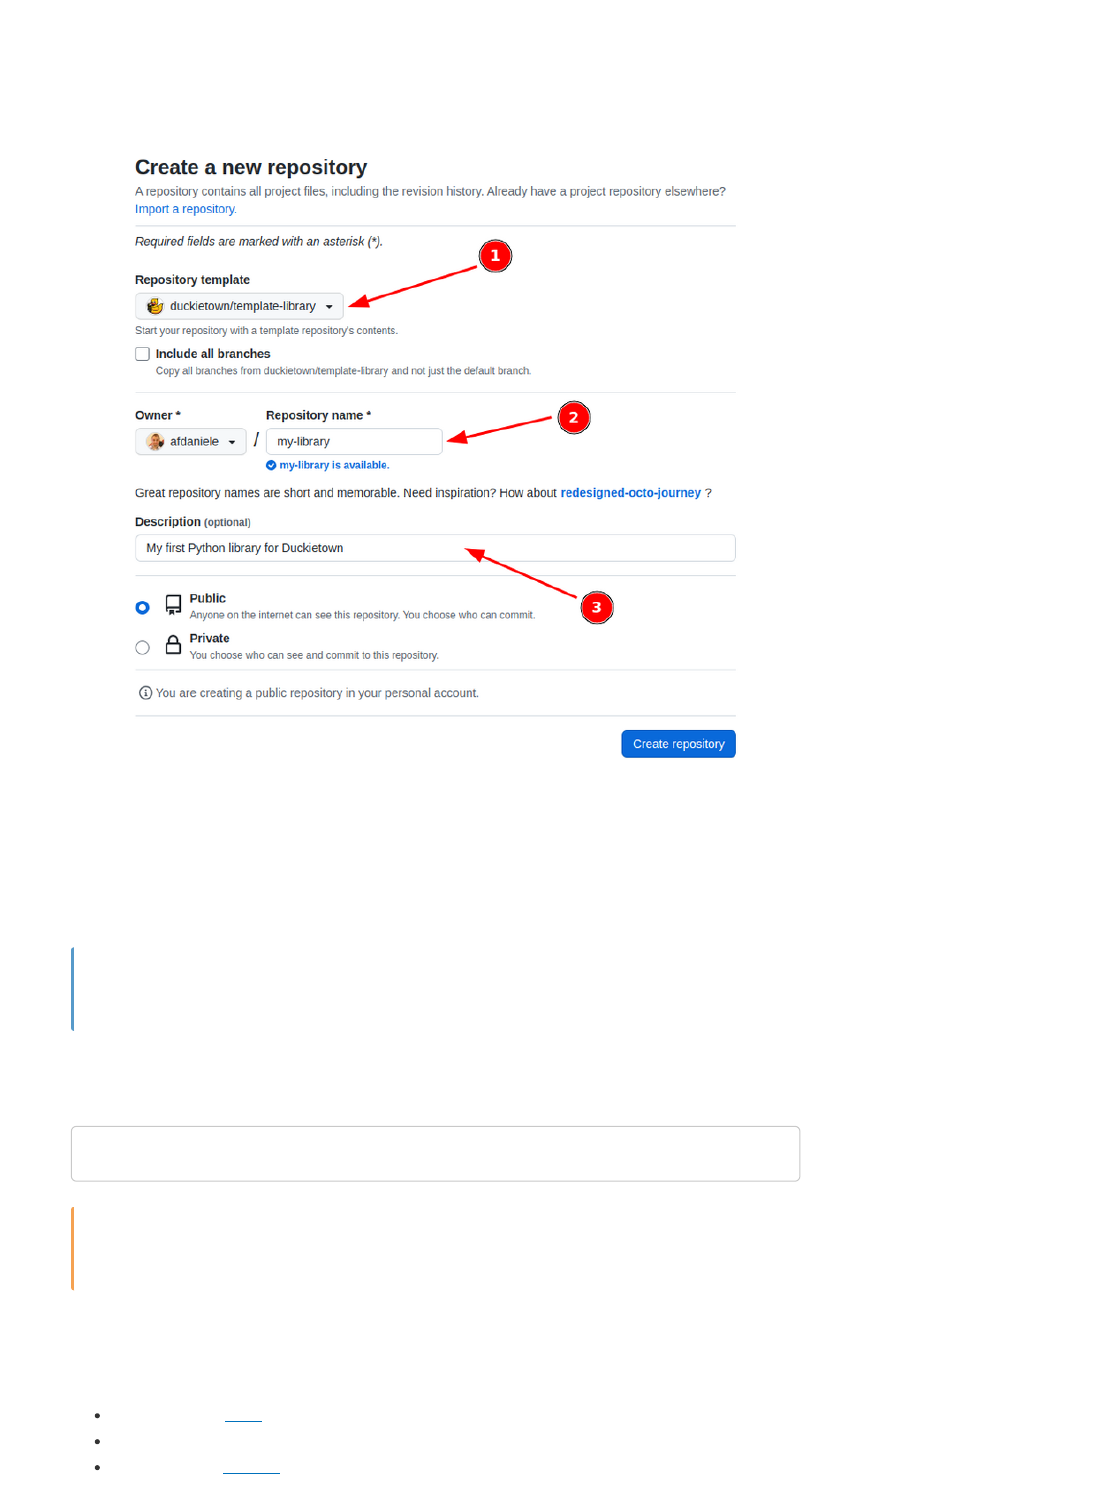
Fig. 11 Use template repository on GitHub.
This will take you to a page that looks like the following:
Fig. 12 Creating a repository from template.
Pick a name for your repository (say my-library) and press the button Create repository from
template.
You can replace my-library with the name of the repository that you prefer.
This will create a new repository and copy everything from the repository template-library to your
new repository. You can now open a terminal and clone your newly created repository.
Replace YOUR_USERNAME in the link above with your GitHub username.
Features of the library template
We have the following features in our new library:
Unit-tests using Nose.
Building/testing in Docker environment locally.
Integration with CircleCI for automated testing.
Note
git clone https://github.com/YOUR_USERNAME/my-library
cd my-library
Attention

Integration with CodeCov for displaying coverage result.
Integration with Sphinx to build code docs. (So far, only built locally.)
Jupyter notebooks, which are run also in CircleCI as tests.
Version bump using Bumpversion.
Code formatting using Black.
Command-line program for using the library.
Anatomy of the library template
This repository describes a library called “duckietown_pondcleaner” and there is one command-line
tool called dt-pc-demo.
Meta-files
.gitignore: Files ignore by Git.
.dtproject: Enables the project to be built and used by dts devel tools
.bumpversion.cfg: Configuration for bumpversion
Makefile: Build tools configuration with Make
Python packaging
requirements.txt: Contains the pinned versions of your requirement that are used to run tests.
MANIFEST.in: Deselects the tests to be included in the egg.
setup.py: Contains meta information, definition of the scripts, and the dependencies information.
Python code
src/ - This is the path that you should set as “sources root” in your tool
src/duckietown_pondcleaner: Contains the code.
src/duckietown_pondcleaner/__init__.py: Contains the __version__ library.
src/duckietown_pondcleaner_tests: Contains the tests - not included in the egg.
Docker testing
These are files to build and run a testing container.
.dockerignore: Describes what files go in the docker container.
Dockerfile: The build configuration for the software image
Sphinx
src/conf.py: Sphinx settings
src/index.rst: Sphinx main file
src/duckietown_pondcleaner/index.rst: Documentation for the package
Coverage
.coveragerc: Options for code coverage.
Notebooks
notebooks: Notebooks that are run also as a test.
notebooks-extra: Other notebooks (not run as test)
notebooks/*.ipynb: The notebooks themselves.
Step 2: Creating your Library
Using the repo you have already created:
Clone the newly created repository;
Place your Python packages inside src/;
List the python dependencies in the file dependencies.txt;
Update the appropriate section in the file setup.py;
Make sure that there are no other remains:
Update the branch names in README.md.
Other set up (for admins)
The following are necessary steps for admins to do:
1. Activate on CircleCI. Make one build successful.
2. Activate on CodeCov. Get the CODECOV_TOKEN. Put this token in CircleCI environment.
Step 3: Using the library template utilities
Test the code
Test the code using Docker by:
This runs the test using a Docker container built from scratch with the pinned dependencies in
requirements.txt. This is equivalent to what is run on CircleCI.
To run the tests natively on your pc, use:
To run the tests you will need to have installed the libraries listed in the file requirements.txt
on your computer.
For that we assume you have already set up a Python virtual environment.
To use a Python virtual environment you will need to pip install virtualenv then
virtualenv duckietown then source duckietown/bin/activate. In order to install the
requirements to run the test do pip install -r requirements.txt.
Development
In the same virtual environment as above run:
This will install the library in an editable way (rather than copying the sources somewhere else).
If you don’t want to install the deps, do:
For example, this is done in the Dockerfile so that we know we are only using the dependencies in
requirements.txt with the exact pinned version.
Adding tests
To add another tests, add files with the name test_*py in the package
duckietown_podcleaner_tests. The name is important.
Make sure that the tests are actually run by looking at the coverage results.
Using the notebooks
grep -r . pondcleaner
make test-docker
make test
Note
python setup.py develop
python setup.py develop --no-deps
Tip
Always clean the notebooks before committing them:
If you don’t think you can be diligent about this, then add the notebooks using Git LFS.
Step 4: Releasing a new version of your library
Updating the version
The first step is to change the version and tag the repo. DO NOT change the version manually; use the
CLI tool bumpversion instead.
The tool can be called by:
If you need to include the version in a new file, list it inside the file .bumpversion.cfg using the syntax
[bumpversion:file: <FILE_PATH >].
Releasing the package
The next step is to upload the package to PyPy. We use twine. Invoke it using:
For this step, you need to have admin permissions on PyPy.
Beginner - Code Hierarchy
In order to develop new functionality within the Duckietown ecosystem, you need to understand how
the existing code is structured. This module will introduce you to the top-level structure as well as the
references that can help you delve deeper.
While on the outside Duckietown seems to be all about a simple toy car with some duckies on top,
once you dive deeper you will find out that it is much bigger on the inside. It’s not only about cars, but
also boats and drones. And you can run the same code on a real Duckiebot, in simulation, or in a
competitive AI Driving Olympics environment. You can also use some of the dozens of projects done
before. As we clearly cannot cover everything in a concise way, this module will instead focus only on
the code that runs on a Duckiebot during the standard demos, e.g. Lane Following and Indefinite
Navigation.
Main images and repositories
You probably noticed three container and image names popping up when you were running the demos,
calibrating your Duckiebot, or developing some of the previous exercises: dt-duckiebot-interface,
dt-car-interface, and dt-core. In this section, we’ll discuss what each image provides and how they
interact.
Let’s first look at the bigger picture: the container hierarchy in Duckietown.
make -C notebooks cleanup
Warning
make bump # bump the version, tag the tree
make upload # upload to PyPI
What you will need An understanding of the basics of Docker
An initialized Duckiebot
What you will get Knowledge of the software architecture on a Duckiebot

Fig. 13 The Docker image hierarchy
As you can see in the above image, all three of the containers actually inherit the same container.
Recall that ‘inheritance’ in a Docker images means that the ‘child’ image has a FROM statement with the
‘parent’ image in its Dockerfile. We typically say that the ‘child’ is based on ‘the parent’.
The image on which everything is based is ubuntu. It is simply the official Ubuntu image, with no added
perks. Ubuntu 22.04 (Jammy Jellyfish) is used for the ente distribution of the Duckietown stack. Of
course, as you can imagine, it is missing many key features that we would need. Also, it needs to be
properly configured in order to work correctly with our software.
The duckietown/dt-base-environment adds many of the core libraries and configurations that we
need. It installs development tools such as vim, git, nano and libraries for handling i2c devices,
processing images, and efficiently doing linear algebra. It adds compilers, linkers, and libraries
necessary for the compiling/building of software from source. Furthermore, we add pip and a bunch of
handy python3 libraries, such as numpy, scipy, matplotlib, and smbus (used to communicate with
motors, LEDs, etc). Finally, duckietown/dt-base-environment also provides the core ROS libraries,
including rospy: ROS’s Python bindings. The version of ROS used is ROS Noetic Ninjemys.
Then, duckietown/dt-commons builds on top of duckietown/dt-base-environment. We provide a
number of Duckietown libraries here that deal with files handling, infrastructure communication, and
everything else that makes our development tools run smoothly. This image configures the
environment so that the hostname resolution is correctly performed also, and ensures that the
environment variables pertaining to the type of the robot, its hardware, and its configuration are all
properly set. It also makes sure that all Python libraries are discoverable, and that ROS is setup
correctly.
Building on top of it we have duckietown/dt-ros-commons, which has everything you need in order to
start developing code that directly works on your Duckiebot. However, as there are a few components
that all Duckietown ROS nodes share, it is convenient to package them in an image. These are
duckietown-utils (a library with a number of useful functions), duckietown_msgs (a ROS package
that contains all the ROS message types used in Duckietown), and DTROS. DTROS is a ‘mother’ node for
all other nodes in Duckietown. You have already seen it while working with ROS publishers and
subscribers, but we will look at it in more detail soon.
The duckietown/dt-ros-commons is also the place where we keep protocols that are key for the
communication between nodes found in different repositories. By placing them here, we ensure that all
repositories work with the exact same protocol, and hence we prevent communication issues.
Currently, the only protocol there is LED_protocol, which is used by the led_emitter_node in
dt-duckiebot-interface, which emits LED-encoded messages, and by the led_detector_node in
dt-core, which interprets the messages encoded in the LED flashing of other robots.
Finally, duckietown/dt-ros-commons packs another handy node: the ros_http_api_node. It exposes
the ROS environment as an HTTP API. The ROS HTTP API runs by default on any Duckietown device
and allows access to ROS topics, parameters, services, nodes, etc, over HTTP, which is an extremely
portable interface. This is the technology behind our web-based interfaces that communicate with
ROS, such as the Duckietown Dashboard.
We finally can focus on dt-duckiebot-interface, dt-car-interface, and dt-core. The first,
dt-duckiebot-interface, contains all the hardware drivers you need to operate your Duckiebot. In
particular these are the drivers for the camera (in the camera_driver package), the ones for the motors
(wheels_driver), and the LED drivers (led_emitter). Thanks to these nodes, you don’t need to
interact with low level code to control your Duckiebot. Instead, you can simply use the convenient ROS
topics and services provided by these nodes.
The dt-car-interface image provides additional basic functionality that is not on hardware level. It is
all you need to be able to drive your Duckiebot around, in particular the parts that handle the
commands sent by a (virtual) joystick (the joy_mapper package) and the forward and inverse
kinematics that convert the desired robot movement to wheel commands (dagu_car package). It might
not be immediately clear at first why these are not part of dt-duckiebot-interface or dt-core. In
some use cases, e.g. for the demos or controlling a robot via a joystick, it is beneficial to have these
two packages. For others, e.g. when deploying a completely different pipeline, e.g. end-to-end
reinforcement learning, one would prefer to interact directly with the drivers. We will see more
examples of use cases shortly.
The dt-core image provides all the high level robot behavior that you observe when running a demo.
The image processing pipeline, decision-making modules, lane and intersection contollers, and many
others reside there.
If you are curious to see all the ROS packages available in each of these images, you can check out
the corresponding GitHub repositories:
dt-base-environment
dt-commons
dt-ros-commons
dt-duckiebot-interface
dt-car-interface
dt-core
Make sure to look at the ente branches of these repositories! This is the most current release
of the Duckietown software.
As you will see in the nodes, there’s a lot of inline documentation provided.
Unfortunately, for the moment only dt-ros-commons, dt-duckiebot-interface, and
dt-car-interface are documented. We are working on providing similar level of
documentation for dt-core as well.
Various configurations of the Duckietown codebase
As we already mentioned, the Duckietown codebase can be used in various configurations: on a
physical robot, in simulation, as an AI Driving Olympics submission, etc. Depending on how you want
to deploy or use your code, you will be using different Docker images. Here we will take a look at a
Note
Warning
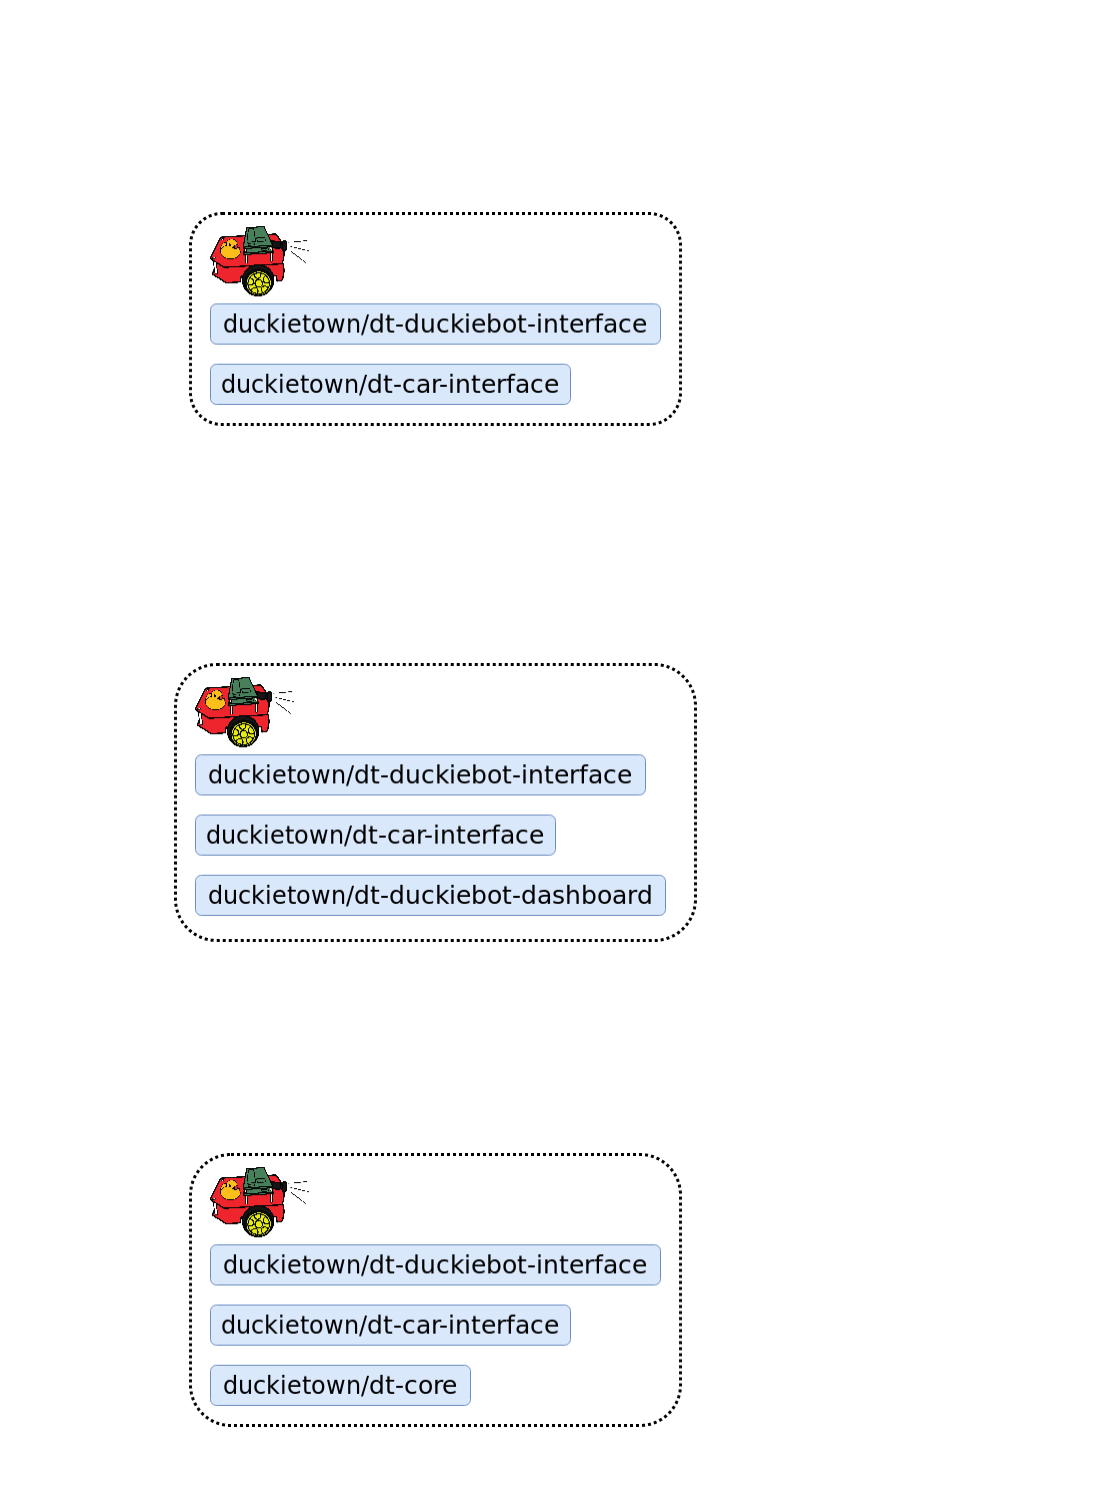
some of the most common use cases.
Driving with a (virtual) joystick
If you only want to drive your Duckiebot around, you need the joy_mapper node that translates the
joystick Joy messages to car command messages, the kinematics node that in turn converts these to
wheel command messages, and the wheels_driver node that controls the motors. So the
dt-duckiebot-interface and dt-car-interface images are enough.
Fig. 14 Driving with a virtual joystick.
Driving through the Dashboard
As you saw when setting up your Duckiebot, the Dashboard and the Compose interface also provide
manual driving functionality. For this, one needs the same images as before, of course together with
the Dashboard image itself:
Fig. 15 Driving through the Dashboard.
Running a demo on a Duckiebot
Running a demo requires to drive around together with the high-level processing and logic that reside
in the dt-core image:
Fig. 16 Running a demo on a Duckiebot.
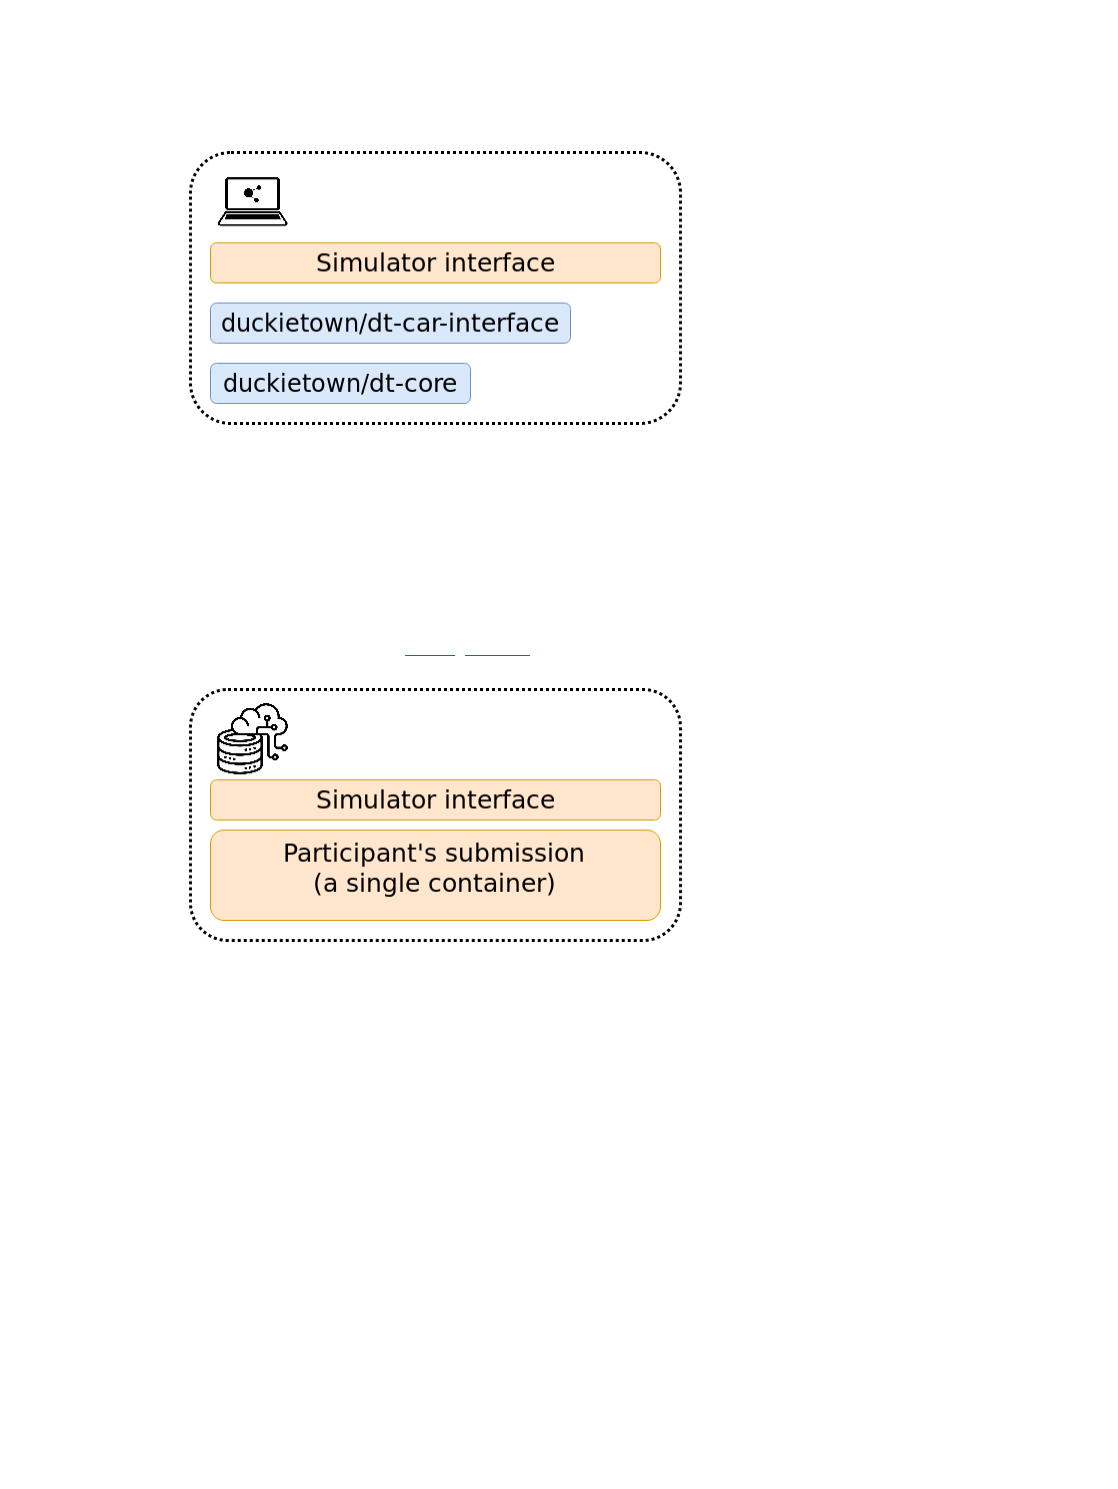
Running a demo in simulation
A demo can also be executed in simulation. In this case, instead of using the hardware drivers
dt-duckiebot-interface provides, we substitute them with the simulator interface:
Fig. 17 Running a demo in simulation.
Evaluating AIDO submissions in simulation
An AI Driving Olympics submission is essentially a container that receives image data and outputs
wheel commands. Therefore, it can replace the dt-car-interface and dt-core images and still use
the same simulator framework. This can also be done in the cloud, and that is exactly how AIDO
submissions get evaluated in simulation on the challenges server.
Fig. 18 Evaluating an AIDO submission in simulation.
Evaluating AIDO submissions on a Duckiebot
The same submission image, with not a single change, can be also tested on a real Duckiebot! Simply
substitute the simulator with the dt-duckiebot-interface. As the containers don’t need to run on the
same device, we can also use much powerful computers (also state-of-the-art GPUs) when testing
submissions. This is the way that AIDO submissions get evaluated in Autolabs. In this way, even if you
don’t have a Duckiebot, you can develop your submission in simulation, then submit it to be evaluated
in simulations on the challenges server, and if it performs well, you can request remote evaluation on a
real Duckiebot in a Duckietown Autolab!
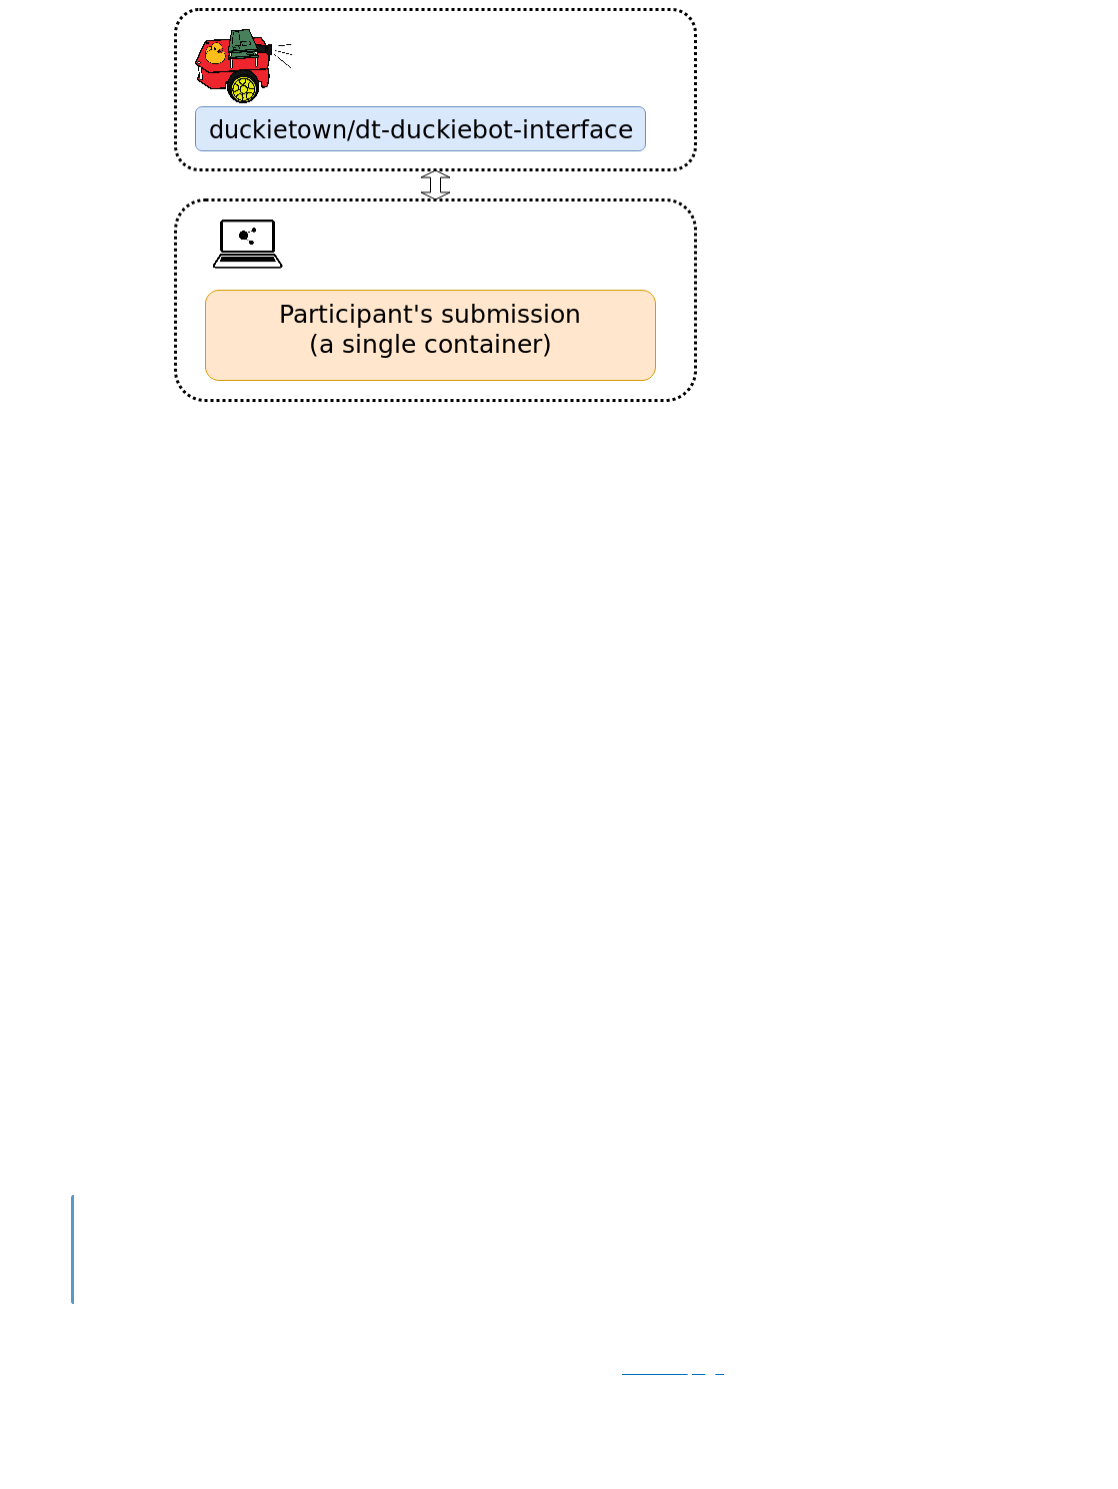
Fig. 19 Evaluating an AIDO submission on a Duckiebot.
Beginner - Documentation
This section provides a comprehensive guide to writing inline documentation to your ROS nodes and
libraries. We will discuss both what should be documented and how it should be documented. Head to
for the details about how to then create a human-friendly webpage showing the documentation.
Table of contents
Write documentation
Basics about inline code documentation
Documentation is a must-do in any software project. As harsh as it sounds, you can write an absolutely
revolutionary and beautiful software package that can save anyone who uses it years of their time
while simultaneously solving all of humanity’s greatest problems. But if people do not know that your
code exists, have no idea how to use it, or understanding its intricacies takes too much effort, then you
will neither save anyone any time, nor solve any problem. In fact, as far as the world beyond you is
concerned, all your work is as good as if never done. Therefore, if you wish your code to be ever used,
document it as extensively as possible!
Inline documentation is a pretty handy way of helping people use your software. On one hand, it is right
in the place where it is needed: next to the classes and methods that you are documenting. On the
hand, it is also much easier to update when you change something in the code: the documentation of
your function is typically no more than 20 lines above your change. On the third hand (should you have
one) documentation written in this way inherits the structure of your software project, which is a very
natural way of organizing it. On the fourth hand (you can borrow someone else’s), there are some
really nice packages that take your documentation and make it into a beautiful webpage.
The documentation that you are currently reading is called a book and exists independent of
any code repository.
In Duckietown we use Sphinx for building our code documentation. Sphinx is the most popular way of
creating code documentation for Python projects. You can find out more on their webpage and there
are a lot of interesting things to read there. Documenting your code is as simple as writing docstrings
and the occasional comment. Then, Sphinx takes care of parsing all your docstrings and making a nice
webpage for it. However, in order for all this to work nicely, you need to format your documentation in a
particular way. We will discuss this later in this page.
Note

What should be documented and where?
The short answer to this question is “everything and in the right place”. The long answer is the same.
Every ROS node should be documented, meaning a general description of what it is for, what it does,
and how it does it. Additionally, all its parameters, publishers, subscribers, and services need to be
described. The default values for the parameters should be also added in the documentation. Every
method that your node’s class has should also be documented, including the arguments to the method
and the returned object (if there is such), as well as their types.
Every library in your include directory should also be documented. That again means, every class,
every method, every function. Additionally, the library itself, and its modules should have a short
description too.
Finally, your whole repository, and every single package should also be documented.
Let’s start from a node. Here is a sample for the camera node:
The documentation of the node itself should always be as a docstring after the class definition. Do not
put it, or anything else as a docstring for the __init__ method. This will not be rendered in the final
output.
class CameraNode(DTROS):
"""
The node handles the image stream, initializing it, publishing frames
according to the required frequency and stops it at shutdown.
`Picamera <https://picamera.readthedocs.io/>`_ is used for handling
the image stream.
Note that only one :obj:`PiCamera` object should be used at a time.
If another node tries to start an instance while this node is running,
it will likely fail with an `Out of resource` exception.
Args:
node_name (:obj:`str`): a unique, descriptive name for the node that ROS
will use
Configuration:
~framerate (:obj:`float`): The camera image acquisition framerate, default
is 30.0 fps
~res_w (:obj:`int`): The desired width of the acquired image, default is
640px
~res_h (:obj:`int`): The desired height of the acquired image, default is
480px
~exposure_mode (:obj:`str`): PiCamera exposure mode
Publisher:
~image/compressed (:obj:`CompressedImage`): The acquired camera images
Service:
~set_camera_info:
Saves a provided camera info to
`/data/config/calibrations/camera_intrinsic/HOSTNAME.yaml`.
input:
camera_info (obj:`CameraInfo`): The camera information to save
outputs:
success (:obj:`bool`): `True` if the call succeeded
status_message (:obj:`str`): Used to give details about success
"""
def __init__(self, node_name):
# Initialize the DTROS parent class
super(CameraNode, self).__init__(node_name=node_name,
node_type=NodeType.PERCEPTION)
[...]
def save_camera_info(self, camera_info_msg, filename):
"""Saves intrinsic calibration to file.
Args:
camera_info_msg (:obj:`CameraInfo`): Camera Info containing
calibration
filename (:obj:`str`): filename where to save calibration
Returns:
:obj:`bool`: whether the camera info was successfully written
"""
# Convert camera_info_msg and save to a yaml file
self.log("[saveCameraInfo] filename: %s" % (filename))
# Converted from camera_info_manager.py
calib = {'image_width': camera_info_msg.width,
[...]
self.log("[saveCameraInfo] calib %s" % (calib))
try:
f = open(filename, 'w')
yaml.safe_dump(calib, f)
return True
except IOError:
return False

The documentation of the node should start with a general description about the node, its purpose,
where it fits in the bigger picture of the package and repository, etc. Feel generous with the description
here. Then there is a section with the arguments needed for initializing the node (the arguments of the
__init__ method) which will almost always be exactly the same as shown. After that there is a
configuration section where you should put all the parameters for the node, their type, a short
description, and their default value, as shown.
This is then followed by Subscribers, Publishers and Services, in this order. If the node has no
Subscribers, for example as the camera node, then you don’t need to add this section. Note the
specific way of structuring the documentation of the service!
Then, every method should be documented as a docstring immediately after the function definition (as
the save_camera_info example). Again, add a short description of the method, as well as the
arguments it expects and the return value (should such exist).
Libraries should be documented in a similar way. However, when documenting libraries, it is important
to actually invoke the Sphinx commands for documenting particular objects in the __init__.py file.
Furthermore, this file should contain a description of the package itself. Here’s an example from the
line_detector library’s __init__.py file:
You can see that it describes the library and its elements, and then uses the Sphinx commands which
will parse these classes and functions and will add their documentation to this page. You can find more
details about these functions in .
Similarly, every ROS package needs a documentation file. This should go in the docs/packages
directory of your repository and should be named package_name.rst. It should describe the package
and then should invoke the Sphinx commands for building the documentation for the individual nodes
and libraries. See the following example:
"""
line_detector
-------------
The ``line_detector`` library packages classes and tools for handling line
section extraction from images. The
main functionality is in the :py:class:`LineDetector` class.
:py:class:`Detections` is the output data class for
the results of a call to :py:class:`LineDetector`, and :py:class:`ColorRange` is
used to specify the colour ranges
in which :py:class:`LineDetector` is looking for line segments.
There are two plotting utilities also included: :py:func:`plotMaps` and
:py:func:`plotSegments`
.. autoclass:: line_detector.Detections
.. autoclass:: line_detector.ColorRange
.. autoclass:: line_detector.LineDetector
.. autofunction:: line_detector.plotMaps
.. autofunction:: line_detector.plotSegments
"""
Style guide
You probably noticed the plethora of funky commands in the above examples. These are called
directives, and we’ll now take a closer look at them. The basic style of the documentation comes from
reStructuredText, which is the default plaintext markup language used by Sphinx. The rest are Sphinx
directives which Sphinx then replaces with markup which it creates from your docstrings.
Basic styles
You can use *text* to italicize the text.
You can use **text** to make it in boldface.
Values, names of variables, errors, messages, etc. should be in grave accent quotes:
Section are created by underlying section title with a punctuation character, at least as long as
the text:
External links can be added like this:
When describing standard types (like int, float, etc.) use
If the type is an object of one of the libraries in the repository, then use the referencing directives
from the next section in order to create hyperlinks. If it is a message, use the message type. If a
list, a dictionary, or a tuple, you can use expressions like :obj:`list` of :obj:`float`
Attributes of a class can also be documented. We recommend that you do that for all important
attributes and for constants. Here are examples of the various ways you can document attributes:
ROS Package: ground\_projection
===============================
.. contents::
The ``ground_projection`` package provides the tools for projecting line segments
from an image reference frame to the ground reference frame, as well as a ROS node
that implements this functionality. It has been designed to be a part of the lane
localization pipeline. Consists of the ROS node
:py:class:`nodes.GroundProjectionNode` and the :py:mod:`ground_projection` library.
GroundProjectionNode
--------------------
.. autoclass:: nodes.GroundProjectionNode
Included libraries
------------------
.. automodule:: ground_projection
``like that``
What a cool heading
===================
Nice subsection
---------------
A neat subsubsection
^^^^^^^^^^^^^^^^^^^^
For this, we use `Picamera <https://picamera.readthedocs.io/>`_ which is an
external library.
:obj:`int`
You can find more examples with reStructuredText here and here, and detailed specification
here.
Referencing other objects
You can add a link to a different package, node, method, or object like that:
All of these refer to the duckietown Python package. When dealing will nodes, things are a bit trickier,
because they are not a part of a package. However, in order to make Sphinx work nicely with ROS
nodes, we create a fake package that has them all as classes. Hence, if you want to refer to the
CameraNode, you can do it like that:
We are considering replacing nodes with the repository name, so keep in mind this might
change soon.
Custom sections
When documenting a node, you can (and you should) make use of the following ROS-specific sections:
Examples, Raises, Configuration, Subscribers, Subscriber, Publishers, Publisher, Services,
Service, Fields, inputs, input, outputs, output. If you need other custom sections you can add
them in the docs/config.yaml file in your repository.
Using autodoc
We use the autodoc extension of Sphinx in order to automatically create the markup from the
docstrings in our Python code. In particular, you can use the following directives:
You can find more details here.
class Foo:
"""Docstring for class Foo."""
#: Doc comment for class attribute Foo.bar.
#: It can have multiple lines.
bar = 1
flox = 1.5 #: Doc comment for Foo.flox. One line only.
baz = 2
"""Docstring for class attribute Foo.baz."""
def __init__(self):
#: Doc comment for instance attribute qux.
self.qux = 3
self.spam = 4
"""Docstring for instance attribute spam."""
See also
:py:mod:`duckietown`
:py:class:`duckietown.DTROS`
:py:meth:`duckietown.DTROS.publisher`
:py:attr:`duckietown.DTROS.switch`
:py:class:`nodes.CameraNode`
Warning
.. automodule:: ground_projection
.. autoclass:: line_detector.ColorRange
.. autofunction:: line_detector.plotMaps
.. automethod:: nodes.CameraNode.save_camera_info
Build documentation
You can write a Jupyter Book to document your project. The book source code is located in /docs/src
and you can refer to the Book Writer Manual for details on the supported features and a syntax cheat
sheet.
To build the book you can simply run from the root of your project:
Including reStructuredText in Markdown
To insert rST into Markdown, you can use the eval-rst directive:
A note written in reStructuredText.
Automatic API generation (advanced)
It is also possible to automatically generate the API documentation from docstrings written in your
source code. You can refer to the official guide for how to do this.
The DTROS class
This section deals with how you should write the code in a ROS node. In particular, how to structure it.
Writing the code of a node goes hand-in-hand with documenting it, but this will be discussed in more
detail in Beginner - Documentation.
General structure
All ROS nodes should be in the src directory of the respective package. If the node is called
some_name, then the file that has its implementation should be called some_name_node.py. This file
should always be executable. Furthermore, all the logic of the node should be implemented in a Python
class called SomeNameNode.
The structure of the some_name_node.py should generally look like the following example (without the
comments):
dts docs build
```{eval-rst}
.. note::
A note written in reStructuredText.
.. include:: ./include-rst.rst
```
Note
Observe that all nodes in Duckietown should inherit from the super class DTROS. This is a hard
requirement. DTROS provides a lot of functionalities on top of the standard ROS nodes which make
writing and debugging your node easier, and also sometimes comes with performance improvements.
In Python code, never ever do universal imports like from somepackage import *. This is a terrible
practice. Instead, specify exactly what you are importing, i.e. from somepackage import
somefunction. It is fine if you do it in __init__.py files but even there try to avoid it if possible.
When using a package that has a common practice alias, use it, e.g. import numpy as np, import
matplotlib.pyplot as plt, etc. However, refrain from defining your own aliases.
The code in this node definition should be restricted as much as possible to ROS-related
functionalities. If your node is performing some complex computation or has any logic that can be
separated from the node itself, implement it as a separate library and put it in the include directory of
the package.
Node initialization
There are a lot of details regarding the initialization of the node so let’s take a look at an example
structure of the __init__ method of our sample node.
#!/usr/bin/env python
# import external libraries
import rospy
# import libraries which are part of the package (i.e. in the include dir)
import library
# import DTROS-related classes
from duckietown.dtros import \
DTROS, \
NodeType, \
TopicType, \
DTReminder,\
DTParam, \
ParamType
# import messages and services
from std_msgs.msg import Float32
from duckietown_msgs.msg import \
SegmentList, \
Segment, \
BoolStamped
class SomeNameNode(DTROS):
def __init__(self, node_name):
# class implementation
if __name__ == '__main__':
some_name_node = SomeNameNode(node_name='same_name_node')
rospy.spin()
Now, let’s take a look at it section by section.
Node Creation
In classic ROS nodes, you would initialize a ROS node with the function rospy.init_node(...).
DTROS does that for you, you simply need to pass the node name that you want to the super
constructor as shown above.
DTROS supports node categorization, this is useful when you want to visualize the ROS network as a
graph, where graph nodes represent ROS nodes and graph edges represent ROS topics. In such a
graph, you might want to group all the nodes working on the PERCEPTION problem together, say, to
clear the clutter and make the graph easier to read. Use the parameter node_type in the super
constructor of your node to do so. Use the values from the NodeType enumeration.
Possible node types are the following:
class SomeNameNode(DTROS):
def __init__(self, node_name):
super(SomeNameNode, self).__init__(
node_name=node_name,
node_type=NodeType.PERCEPTION
)
# Setting up parameters
self.detection_freq = DTParam(
'~detection_freq',
param_type=ParamType.INT,
min_value=-1,
max_value=30
)
# ...
# Generic attributes
self.something_happened = None
self.arbitrary_counter = 0
# ...
# Subscribers
self.sub_img = rospy.Subscriber(
'image_rect',
Image,
self.cb_img
)
self.sub_cinfo = rospy.Subscriber(
'camera_info',
CameraInfo,
self.cb_cinfo
)
# ...
# Publishers
self.pub_img = rospy.Publisher(
'tag_detections_image/compressed',
CompressedImage,
queue_size=1,
dt_topic_type=TopicType.VISUALIZATION
)
self.pub_tag = rospy.Publisher(
'tag_detections',
AprilTagDetectionArray,
queue_size=1,
dt_topic_type=TopicType.PERCEPTION
)
# ...
GENERIC
DRIVER
PERCEPTION
CONTROL
PLANNING
LOCALIZATION
MAPPING
SWARM
BEHAVIOR
VISUALIZATION
INFRASTRUCTURE
COMMUNICATION
DIAGNOSTICS
DEBUG
Node Parameters
All parameters should have names relative to the namespace of the node, i.e. they should start with ~.
Also, all parameters should be in the scope of the instance, not the method, so they should always be
declared inside the constructor and start with self. .
The parameters should never have default values set in the code. All default values should be
in the configuration file!
This makes sure that we don’t end up in a situation where there are two different default values in two
different files related to the node.
In classic ROS, you get the value of a parameter with rospy.get_param(...). One of the issues of the
ROS implementation of parameters is that a node cannot request to be notified when a parameter’s
value changes at runtime. Common solutions to this problem employ a polling strategy (which consists
of querying the parameter server for changes in value at regular intervals). This is highly inefficient and
does not scale. The dtros library provides a solution to this. Alternatively to using
rospy.get_param(...) which simply returns you the current value of a paramter, you can create a
DTParam object that automatically updates when a new value is set. Use self.my_param =
DTParam("~my_param") to create a DTParam object and self.my_param.value to read its value.
Generic attributes
Then we initialize all the non-ROS attributes that we will need for this class. Note that this is done
before initializing the Publishers and Subscribers. The reason is that if a subscriber’s callback depends
on one of these attributes, we need to define it before we use it. Here’s an example that might fail:
And something that is better:
Publishers and Subscribers
Finally, we initialize all the Subscribers and Publishers as shown above. The dtros library automatically
decorates the methods rospy.Publisher and rospy.Subscriber. By doing so, new parameters are
added. All the parameters added by dtros have the prefix dt_ (e.g., dt_topic_type). Use the values
from the TopicType enumeration. Possible types list is identical to the node types list above.
Only declare a topic type in a rospy.Publisher call.
Naming of variables and functions
All functions, methods, and variables in Duckietown code should be named using snake_case. In other
words, only lowercase letters with spaces replaced by underscored. Do not use CamelCase. This is to
be used only for class names.
Attention
class CoolNode(DTROS):
def __init__(...):
self.sub_a = rospy.Subscriber(..., callback=cb_sth, ...)
self.important_variable = 3.1415
def cb_sth(self):
self.important_variable *= 1.0
class CoolNode(DTROS):
def __init__(...):
self.important_variable = 3.1415
sub_a = rospy.Subscriber(..., callback=cb_sth, ...)
def cb_sth(self):
self.important_variable *= 1.0
Note

The names of all subscribers should start with sub_ as in the example above. Similarly, names of
publishers should start with pub_ and names of callback functions should start with cb_.
Initalizing publishers and subscribers should again always be in the scope of the instance, hence
starting with self..
Switching nodes on and off
Custom behavior on shutdown
If you need to take care of something before when ROS tries to shut down the node, but before it
actually shuts it down, you can implement the on_shutdown method. This is useful if you are running
threads in the background, there are some files that you need to close, resources to release, or to put
the robot into a safe state (e.g. to stop the wheels).
Handling debug topics
Often we want to publish some information which helps us analyze the behavior and performance of
the node but which does not contribute to the behavior itself. For example, in order to check how well
the lane filter works, you might want to plot all the detected segments on a map of the road. However,
this can be quite computationally expensive and is needed only on the rare occasion that someone
wants to take a look at it.
A frequent (but bad design) way of handling that is to have a topic, to which one can publish a
message, which when received will induce the node to start building a publishing the debug message.
A much better way, and the one that should be used in Duckietown is to create and publish the debug
message only if someone has subscribed to the debug topic. This is very easy to achieve with the help
of dtros. Publishers created within a DTROS node exports the utility function anybody_listening().
Here’s an example:
Note also that all debug topics should be in the debug namespace of the node, i.e.
~debug/debug_topic_name.
Similarly, a Subscriber created within a DTROS node exports the utility function
anybody_publishing() that checks whether there are nodes that are currently publishing messages.
Timed sections
If you have operations that might take non-trivial amount of computational time, you can profile them in
order to be able to analyze the performance of your node. DTROS has a special context for that which
uses the same mechanism as the debug topics. Hence, if you do not subscribe to the topic with the
timing information, there would be no overhead to your performance. Therefore, be generous with the
use of timed sections.
The syntax looks like that:
Then, if you subscribe to ~debug/phase_times you will be able to see for each separate section
detailed information about the frequency of executing it, the average time it takes, and also the exact
lines of code and the file in which this section appears.
Config files
if self.pub_debug_img.anybody_listening():
debug_img = self.very_expensive_function()
debug_image_msg = self.bridge.cv2_to_compressed_imgmsg(debug_img)
self.pub_debug_img.publish(debug_image_msg)
with self.time_phase("Step 1"):
run_step_1()
...
with self.time_phase("Step 2"):
run_step_2()

If your node has at least one parameter, then it should have a configuration file. If there is a single
configuration (as is the case with most nodes) this file should be called default.yaml. Assuming that
our node is called some_node, the configuration files for the node should be in the config/some_node/
directory.
Every parameter used in the implementation of the node should have a default value in the
configuration file. Furthermore, there should be no default values in the code. The only place where
they should be defined is the configuration file.
Launch files
Assuming that our node is called some_node then in the launch directory of the package there should
be an atomic launch file with the name some_node.launch which launches the node in the correct
namespace and loads its configuration parameters.
The launch file content of most node will be identical to the following, with only the node name and
package name being changed.
Intermediate - Diagnostics
One of the strengths of Duckietown is that of allowing complex (sometimes state-of-the-art) algorithms
to run on low-end computing devices like the Raspberry Pi. Unfortunately, low-end devices are not
famous for their computational power, so we developers have to be smart about the way we use the
resources available.
The Duckietown Diagnostics tool provides a simple way of recording the status of a system during an
experiment. The easiest way to think about it is that of an observer taking snapshots of the status of
our system at regular temporal intervals.
Introduction
Running example
Throughout this section we will refer to the toy example of a robot with a single camera (just like our
Duckiebots) in which camera drivers produce image frames at a frequency of 20Hz and we are
interested in pushing the camera to its limit, i.e., 30Hz.
When do I need it?
You need to run the diagnostics tool every time you have made changes to a piece of code and you
want to test how these changes affect the footprint of your code on the system resources and the
system as a whole.
Considering our toy example above, we expect that changing the drivers frequency will likely result in
higher usage of resources in order to cope with the increase in images that need to be processed.
Sometimes these changes have a direct and expected effect on the system’s resources, e.g., CPU
cycles, RAM, etc. Others, they have effects that are legitimate from a theoretical point of view but hard
to exhaustively enumerate a priori, e.g., increase in CPU temperature due to higher clock frequencies,
increase in network traffic if the images are transferred over the network.
<launch>
<arg name="veh"/>
<arg name="pkg_name" value="some_package"/>
<arg name="node_name" default="some_node"/>
<arg name="param_file_name" default="default" doc="Specify a param file"/>
<group ns="$(arg veh)">
<node name="$(arg node_name)" pkg="$(arg pkg_name)" type="$(arg node_name).py"
output="screen">
<rosparam command="load" file="$(find some_package)/config/$(arg
node_name)/$(arg param_file_name).yaml"/>
</node>
</group>
</launch>
The diagnostics tool provides a standard way of analyzing the response of a system to a change.
When do I run it?
The diagnostics tool is commonly used for two use cases:
analysis of steady states (long-term effects) of a system;
analysis of transient states (short-term effects) of a system;
The steady state analysis consists of measuring the activity of a system in the long run and in the
absence of anomaly or changes. For example, if we want to check for memory leaks in a system, we
would run a steady state analysis and look at the RAM usage in a long period of time. In this case, we
would run the diagnostics tool only after the system reached a stable (steady) state and we don’t
expect significant events to happen.
The transient state analysis consists of measuring how a system reacts to a change in the short run.
For example, you have a process that receives point clouds from a sensor and stores them in memory
to perform ICP alignment on them every T seconds. In this case, we expect that this process will be
fairly inactive in terms of CPU usage for most of the time with periodical spikes every T seconds.
Clearly, small values of T mean fewer point clouds to align every time ICP fires but more frequent
alignments while large values of T mean longer queues of point clouds to align every time ICP fires. We
might be interested in tuning the value of T so that those spikes do not starve other processes of
resources while still maximizing T. In this case, we would monitor the system around those ICP events
for different values of T. In this case, we would run the diagnostics tool at any point in time for a
duration of t > T seconds so that at least one event of interest (e.g., ICP event) is captured.
Get Started
In this section, we will see how to perform a diagnostics experiment.
NOTE: At the end of each diagnostics test, the resulting log is automatically transferred to a remote
server. If the diagnostics tool fails to transfer the log to the server, the tests data will be lost and the test
need to be run again.
Run a (single test) diagnostics experiment
You can run a diagnostics test for 60 seconds on the target device [ROBOT] with the command
Let the diagnostics tool run until it finishes. A successful experiment concludes with a log similar to the
following:
The most important thing to look for is the line
which indicates that the diagnostics log was successfully transferred to the remote diagnostics server.
Visualize the results
dts diagnostics run -H [ROBOT] -G my_experiment -d 60
. . .
[system-monitor 00h:00m:55s] [healthy] [8/8 jobs] [13 queued] [0 failed] ...
[system-monitor 00h:00m:58s] [healthy] [8/8 jobs] [13 queued] [0 failed] ...
INFO:system-monitor:The monitor timed out. Clearing jobs...
INFO:system-monitor:Jobs cleared
INFO:system-monitor:Collecting logged data
INFO:system-monitor:Pushing data to the cloud
INFO:system-monitor:Pushing to the server [trial 1/3]...
INFO:system-monitor:The server says: [200] OK
INFO:system-monitor:Data transferred successfully!
INFO:system-monitor:Stopping workers...
INFO:system-monitor:Workers stopped!
INFO:system-monitor:Done!
INFO:system-monitor:The server says: [200] OK
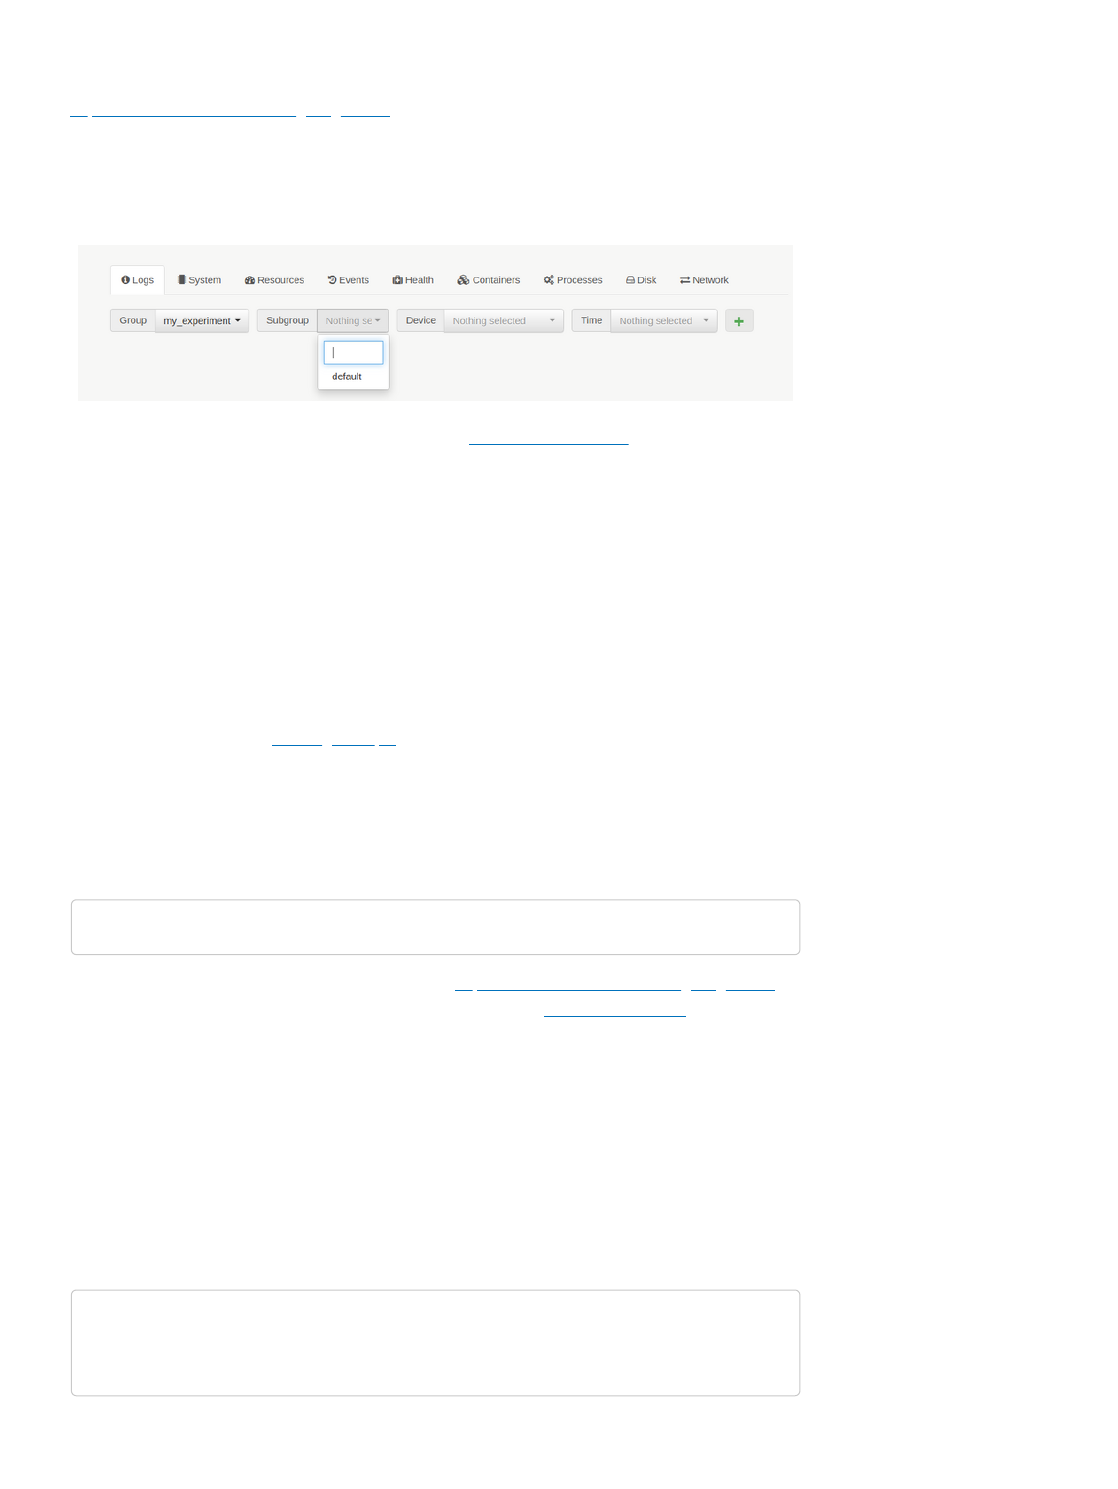
The diagnostics server collects diagnostics logs and organizes them according to the given group,
subgroup and hostname of the target machine of each test.
To check the outcome of a diagnostics test, open your browser and navigate to
https://dashboard.duckietown.org/diagnostics. Tests will be available on this page a few seconds after
the upload is complete.
Use the dropdowns Group and Subgroup to find your experiment and test. Remember, when the
subgroup is not explicitly specified with the argument -S/--subgroup, default is used.
Fig. 20 Selecting diagnostics test on dashboard.duckietown.org
Use the tabs System, Resources, etc. to see the content of the diagnostics log.
One experiment, many tests
In many cases, your experiment is that of comparing two or more configurations or implementations of
part of your system. In these cases, you need to run multiple tests as part of a single experiment. The
diagnostics tool allows you to declare a group (-G/--group) and a subgroup (-S/--subgroup) when
you run a test. Use the group argument to name your experiment and the subgroup to name the single
tests.
Let us recall the example of Running example. We want to measure the effects of changing the drivers
frequency on the system, so we run (and monitor) the system twice, a first time with the frequency
tuned at 20Hz, and a second time with the frequency at 30Hz. We call the overall experiment
camera_frequency and the two tests, 20hz and 30hz respectively. We can use the following
commands to run the two tests described above, one before and the other after applying the change to
the camera drivers code.
We can now use the Diagnostics page available at https://dashboard.duckietown.org/diagnostics. to
visualize both tests side by side. Similarly to what we have done in Visualize the results, we will use the
dropdown buttons to select our tests and add them to the list. Once we have both on the list, we can
move to the other tabs to see how the results of the two tests compare.
Reference
In this section, we will describe the various arguments that the diagnostics tool accepts. Use them to
configure the diagnostics tool to fit your needs.
Usage
You can run a diagnostics test using the command:
Options
The following table describes the options available to the diagnostics tool.
dts diagnostics run -H [ROBOT] -G camera_frequency -S 20hz -d 60
dts diagnostics run -H [ROBOT] -G camera_frequency -S 30hz -d 60
dts diagnostics run \
-H/--machine [ROBOT] \
-G/--group [EXPERIMENT] \
-d/--duration [SECONDS] \
[OPTIONS]
Table 6 Options available to the command dts diagnostics run
Argument Type Description
-H
--machine
-
Machine where the diagnostics tool will run. This can be any machine
with a network connection to the target machine.
-T
--target
localhost
Machine target of the diagnostics. This is the machine about which
the log is created.
--type auto
Specify a device type (e.g., duckiebot, watchtower). Use --help to
see the list of allowed values.
--app-id -
ID of the API App used to authenticate the push to the server. Must
have access to the ‘data/set’ API endpoint
--app-secret - Secret of the API App used to authenticate the push to the server
-D
--database
- Name of the logging database. Must be an existing database.
-G
--group
- Name of the experiment (e.g., new_fan)
-S
--subgroup
“default” Name of the test within the experiment (e.g., fan_model_X)
-D
--duration
- Length of the analysis in seconds, (-1: indefinite)
-F
--filter
“*” Specify regexes used to filter the monitored containers
-m
--notes
“empty” Custom notes to attach to the log
--no-pull False
Whether we do not try to pull the diagnostics image before running
the experiment
--debug False Run in debug mode
--vv
--verbose
False Run in debug mode
Simulation in Duckietown
_images/simplesim_free.png
Why simulation?
Daphne is an avid Duckietowner who loves Duckies. In her mission to “save the Duckies” from bugs in
her code she used to spend a large portion of her time writing unit tests for her algorithms and ROS
nodes. Some of these tests would check that the accuracy of her object detection pipeline was above a
certain threshold, that the estimated offset of the Duckiebot from the lane given several input images
was correct or that the output of the controller given several offsets gave sensible results. She noticed
that this way of testing would fall short in several aspects:
The number of hand-crafted edge cases was not representative of the number of situations the
Duckiebot would encounter in a single drive
Issues at the interface of these algorithms would not be caught
To increase code coverage and maintain it, a lot of time would need to go into writing tests, mock
ups, gathering and labelling test data, etc
What you will need Implementing Basic Robot Behaviors
What you will get Results: Experience with running and testing on the Duckietown
simulator

Quantifying controller performance was hard without having access to a model of the vehicle
used to propagate the state forward in time
Daphne also found that having to charge her robot’s battery, setting up her Duckietown loop, placing
her Duckiebot on the loop, connecting to it, and running the part of the pipeline that had to be tested
everytime she or someone in her team wanted to merge new changes into the codebase was
extremely time consuming.
More over, Daphne and her real Duckiebot only have access to a small Duckietown loop. But she
wants to ensure that her algorithms work in the most complicated and busy environments of
Duckietown.
All of the above were compelling reasons for Daphne to start looking at full-stack simulators that would
allow her to simultaneously address the shortcomings of unit testing, the inconvenience of manual
testing and the ability to test scenarios that are not possible or too risky in real life.
Luckily, she found just the right thing at the Duckietown gym.
Daphne’s story is the story of every autonomous driving company, whose mission is instead to “save
the humans” and which cannot afford to make mistakes on the real roads, and which require
automated integration testing tools that can be run faster-than-real-time under challenging conditions.
As an example, Waymo has driven around 20 million miles on real roads, but around 15 billion miles in
simulation!
Introduction to the Duckietown Simulator
Gym-Duckietown is a simulator for the Duckietown universe, written in pure Python/OpenGL (Pyglet). It
places your agent, a Duckiebot, inside an instance of a Duckietown: a loop of roads with turns,
intersections, obstacles, Duckie pedestrians, and other Duckiebots.
Gym-Duckietown is fast, open, and incredibly customizable. What started as a lane-following simulator
has evolved into a fully-functioning autonomous driving simulator that you can use to train and test your
Machine Learning, Reinforcement Learning, Imitation Learning, or even classical robotics algorithms.
Gym-Duckietown offers a wide range of tasks, from simple lane-following to full city navigation with
dynamic obstacles. Gym-Duckietown also ships with features, wrappers, and tools that can help you
bring your algorithms to the real robot, including domain-randomization, accurate camera distortion,
and differential-drive physics (and most importantly, realistic waddling).
_images/finalmain.gif
Quickstart Guide
To run a minimal demo of the simulator, you simply need a (virtual) environment with the
gym_duckietown pip3 package installed.
To set up such an environment, the safest way is to run the following (you could also skip the virtual
environment but you may have clashing packages installed):
Now you need to create a simple python script with uses the gym-duckietown API to connect to the
simulator, the API is very simple as you will see.
Create and run the following file, from within the environment you have set up above:
$ cd ~ && virtualenv dt-sim
$ source dt-sim/bin/activate
$ pip3 install duckietown-gym-daffy
What do you observe? Does this make sense? Why is it driving straight? Can you make it drive
backwards or turn? When is done = True? What is observation?
Driving around in the simulator
If you want to drive the robot around in simulation you might have read about the utility script
manual_control.py. This is located in the root of the gym_duckietown repository and can be run after
making sure that all the dependencies are met. Clone the repository and in the root of it run:
You should be able to drive around with the arrow keys. If you are experiencing large delays and low
frame rate, please replace the lines
by
Environments
There are multiple registered gym environments, each corresponding to a different map file:
Duckietown-straight_road-v0
Duckietown-4way-v0
Duckietown-udem1-v0
Duckietown-small_loop-v0
Duckietown-small_loop_cw-v0
Duckietown-zigzag_dists-v0
Duckietown-loop_obstacles-v0 (static obstacles in the road)
Duckietown-loop_pedestrians-v0 (moving obstacles in the road)
The MultiMap-v0 environment is essentially a wrapper for the simulator which will automatically cycle
through all available map files. This makes it possible to train on a variety of different maps at the same
time, with the idea that training on a variety of different scenarios will make for a more robust
#!/usr/bin/env python3
import gym_duckietown
from gym_duckietown.simulator import Simulator
env = Simulator(
seed=123, # random seed
map_name="loop_empty",
max_steps=500001, # we don't want the gym to reset itself
domain_rand=0,
camera_width=640,
camera_height=480,
accept_start_angle_deg=4, # start close to straight
full_transparency=True,
distortion=True,
)
while True:
action = [0.1,0.1]
observation, reward, done, misc = env.step(action)
env.render()
if done:
env.reset()
$ ./manual_control.py --env-name Duckietown-udem1-v0
pyglet.clock.schedule_interval(update, 1.0 / 30)
# Enter main event loop
pyglet.app.run()
import time
...
dt = 0.01
while True:
update(dt)
time.sleep(dt)

policy/model.
gym-duckietown is an accompanying simulator to real Duckiebots, which allow you to run your code on
the real robot. We provide a domain randomization API, which can help you transfer your trained
policies from simulation to real world. Without using a domain transfer method, your learned models will
likely overfit to various aspects of the simulator, which won’t transfer to the real world. When you
deploy, you and your Duckiebot will be running around in circles trying to figure out what’s going on.
_images/domainrand-sim.gif
Installation
We have covered the basic installation in the quickstart guide.
Alternative Installation Instructions (Alternative Method)
Alternatively, you can find further installation instructions here
Docker Image
There is a pre-built Docker image available on Docker Hub, which also contains an installation of
PyTorch.
In order to get GPU acceleration, you should install and use nvidia-docker.
Design
Map File Format
The simulator supports a YAML-based file format which is designed to be easy to hand edit. See the
maps subdirectory for examples. Each map file has two main sections: a two-dimensional array of tiles,
and a listing of objects to be placed around the map. The tiles are based on the Duckietown
appearance specification.
The available tile types are:
empty
straight
curve_left
curve_right
3way_left (3-way intersection)
3way_right
4way (4-way intersection)
asphalt
grass
floor (office floor)
The available object types are:
barrier
cone (traffic cone)
duckie
duckiebot (model of a Duckietown robot)
tree
house
truck (delivery-style truck)
bus
building (multi-floor building)
sign_stop, sign_T_intersect, sign_yield, etc. (see meshes subdirectory )
Note

Although the environment is rendered in 3D, the map is essentially two-dimensional. As such, objects
coordinates are specified along two axes. The coordinates are rescaled based on the tile size, such
that coordinates [0.5, 1.5] would mean middle of the first column of tiles, middle of the second row.
Objects can have an optional flag set, which means that they randomly may or may not appear during
training, as a form of domain randomization.
Observations
The observations are single camera images, as numpy arrays of size (120, 160, 3). These arrays
contain unsigned 8-bit integer values in the [0, 255] range. This image size was chosen because it is
exactly one quarter of the 640x480 image resolution provided by the camera, which makes it fast and
easy to scale down the images. The choice of 8-bit integer values over floating-point values was made
because the resulting images are smaller if stored on disk and faster to send over a networked
connection.
Actions
The simulator uses continuous actions by default. Actions passed to the step() function should be
numpy arrays containining two numbers between -1 and 1. These two numbers correspond to the left
and right wheel input respectively. A positive value makes the wheel go forward, a negative value
makes it go backwards. There is also a Gym wrapper class named DiscreteWrapper which allows you
to use discrete actions (turn left, move forward, turn right) instead of continuous actions if you prefer.
Reward Function
The default reward function tries to encourage the agent to drive forward along the right lane in each
tile. Each tile has an associated Bezier curve defining the path the agent is expected to follow. The
agent is rewarded for being as close to the curve as possible, and also for facing the same direction as
the curve’s tangent. The episode is terminated if the agent gets too far outside of a drivable tile, or if the
max_steps parameter is exceeded. See the step function in this source file.
Customizing the Simulator
You can modify the parameters of the simulator. Simply modify the parameters sent to the Simulator
constructor:
When we take a look at the constructor, you’ll notice that we aren’t using all of the parameters listed. In
particular, the three you should focus on are:
map_name: What map to use;
domain_rand: Applies domain randomization, a popular, black-box, sim2real technique
randomized_maps_on_reset: Slows training time, but increases training variety.
camera_rand: Randomizes the camera calibration to increase variety.
dynamics_rand: Simulates a miscalibrated Duckiebot, to better represent reality.
Running headless
The simulator uses the OpenGL API to produce graphics. This requires an X11 display to be running,
which can be problematic if you are trying to run training code through on SSH, or on a cluster. You can
create a virtual display using Xvfb. The instructions shown below illustrate this. Note, however, that
these instructions are specific to MILA, look further down for instructions on an Ubuntu box:
from gym_duckietown.simulator import Simulator
env = Simulator(
seed=123, # random seed
map_name="loop_empty",
max_steps=500001, # we don't want the gym to reset itself
domain_rand=0,
camera_width=640,
camera_height=480,
accept_start_angle_deg=4, # start close to straight
full_transparency=True,
distortion=True,
)
Troubleshooting
If you run into problems of any kind, don’t hesitate to open an issue on this repository. It’s quite
possible that you’ve run into some bug we aren’t aware of. Please make sure to give some details
about your system configuration (ie: PC or Max, operating system), and to paste the command you
used to run the simulator, as well as the complete error message that was produced, if any.
# Reserve a Debian 9 machine with 12GB ram, 2 cores and a GPU on the cluster
sinter --reservation=res_stretch --mem=12000 -c2 --gres=gpu
# Activate the gym-duckietown Conda environment
source activate gym-duckietown
cd gym-duckietown
# Add the gym_duckietown package to your Python path
export PYTHONPATH="${PYTHONPATH}:`pwd`"
# Load the GLX library
# This has to be done before starting Xvfb
export LD_LIBRARY_PATH=/Tmp/glx:$LD_LIBRARY_PATH
# Create a virtual display with OpenGL support
Xvfb :$SLURM_JOB_ID -screen 0 1024x768x24 -ac +extension GLX +render -noreset
&<code>></code> xvfb.log $
export DISPLAY=:$SLURM_JOB_ID
Troubleshooting
SYMPTOM ImportError: Library “GLU” not found
RESOLUTION You may need to manually install packaged needed by Pyglet or
OpenAI Gym on your system. The command you need to use will vary
depending which OS you are running. For example, to install the glut
package on Ubuntu:
$ sudo apt-get install freeglut3-dev
And on Fedora:
$ sudo dnf install freeglut-devel
Troubleshooting
SYMPTOM NoSuchDisplayException: Cannot connect to “None”
RESOLUTION If you are connected through SSH, or running the simulator in a
Docker image, you will need to use xvfb to create a virtual display in
order to run the simulator. See the Running Headless subsection.
Troubleshooting
SYMPTOM Poor performance, low frame rate
RESOLUTION It’s possible to improve the performance of the simulator by disabling
Pyglet error-checking code. Export this environment variable before
running the simulator:
$ export PYGLET_DEBUG_GL=True
Troubleshooting
SYMPTOM Unknown encoder ‘libx264’ when using gym.wrappers.Monitor
RESOLUTION It is possible to use gym.wrappers.Monitor to record videos of the
agent performing a task. See examples here.
How to cite
Please use this bibtex if you want to cite this repository in your publications:
The libx264 error is due to a problem with the way ffmpeg is installed
on some linux distributions. One possible way to circumvent this is to
reinstall ffmpeg using conda:
$ conda install -c conda-forge ffmpeg
Alternatively, screencasting programs such as Kazam can be used to
record the graphical output of a single window.
@misc{gym_duckietown,
author = {Chevalier-Boisvert, Maxime and Golemo, Florian and Cao, Yanjun and
Mehta, Bhairav and Censi, Andrea and Paull, Liam},
title = {Duckietown Environments for OpenAI Gym},
year = {2018},
publisher = {GitHub},
journal = {GitHub repository},
howpublished = {\url{https://github.com/duckietown/gym-duckietown}},
}
By Duckietown, Inc.
© Copyright 2024.
