
Click2Export – User Manual
Click2Export –User Manual

Click2Export - User Manual
P a g e 2 | 40
CONTENTS
INTRODUCTION ............................................................................................................................................. 3
CRM REPORT TEMPLATES ............................................................................................................................. 4
Steps to create report template: .............................................................................................................. 4
Configuring CRM Report Template Parameters: ...................................................................................... 8
Steps to create Word template: ............................................................................................................. 10
Steps to create Excel template: .............................................................................................................. 11
Create CLICK2EXPORT WORKFLOW – WORD TEMPLATES & REPORTS ...................................................... 14
Click2Export CONFIGURATION .................................................................................................................... 20
Click2Export Security roles .......................................................................................................................... 21
Export Report .............................................................................................................................................. 22
SCHEDULE Reports ...................................................................................................................................... 25
Click2Export USE CASES .............................................................................................................................. 29
Click2Export selecting a single record or from within a particular record: ............................................ 29
Click2Export selecting multiple records from the view .......................................................................... 34
Click2Export EXPORTING EXCEL TEMPLATE ............................................................................................ 36
Click2Export Perform the Action for selected CRM word template with the Workflow ........................ 37
Limitations of Click2Export ......................................................................................................................... 40
CONTACT Inogic: India (Corporate Headquarters) - Mumbai ..................................................................... 40

Click2Export - User Manual
P a g e 3 | 40
INTRODUCTION
Click2Export is a Dynamics CRM solution which provides easy user experience of exporting any of the
Dynamics CRM Reports/Word/Excel templates. Dynamics CRM Reports can be exported in Excel, Word,
PDF, CSV or TIFF format. Word Templates can be exported in PDF and MS Word format. Whereas, Excel
Templates are exported in excel format. Users can further perform the required action for the exported
Report as attach to Email, Note, upload to SharePoint or simply download the file on your system or all of
the above.
One click export tool for Dynamics CRM Reports/Word/Excel Templates
Multiple file formats supported – PDF, MS Word, MS Excel, CSV &TIFF format
Support for Fetch based reports
Multiple export options supported – Download File, Attach as Email Attachment or Attach as a
note, Upload to SharePoint
Configure report parameters and filter criteria for reports
Create multiple templates with different filter options and parameter values for the report
Individual or organizational report can be exported
Available to export the report for a single record or multiple records with one click
Default Email templates can be specified for generating the email for the Email option
Available to auto send the Email by exporting and attaching the exported report file
Available to upload the exported report file on SharePoint
Available to automatically export Dynamics CRM Word Template/CRM Report Template and
attach to Email, auto send the Email with Email Attachment, Attach as a Note or upload report
file on SharePoint with the Workflow on various CRM processes
SSRS/Word/Excel Template scheduling for On-Premise and online
Support for Manager option while selecting email recipients
Click2Export - User Manual
P a g e 4 | 40
CRM REPORT TEMPLATES
CRM Report Template is custom entity where you would create templates for reports/word/excel that
you would like to make available for Click2Export.
There are three types of CRM Report Template.
I. Report Template
II. Word Template
III. Excel Template
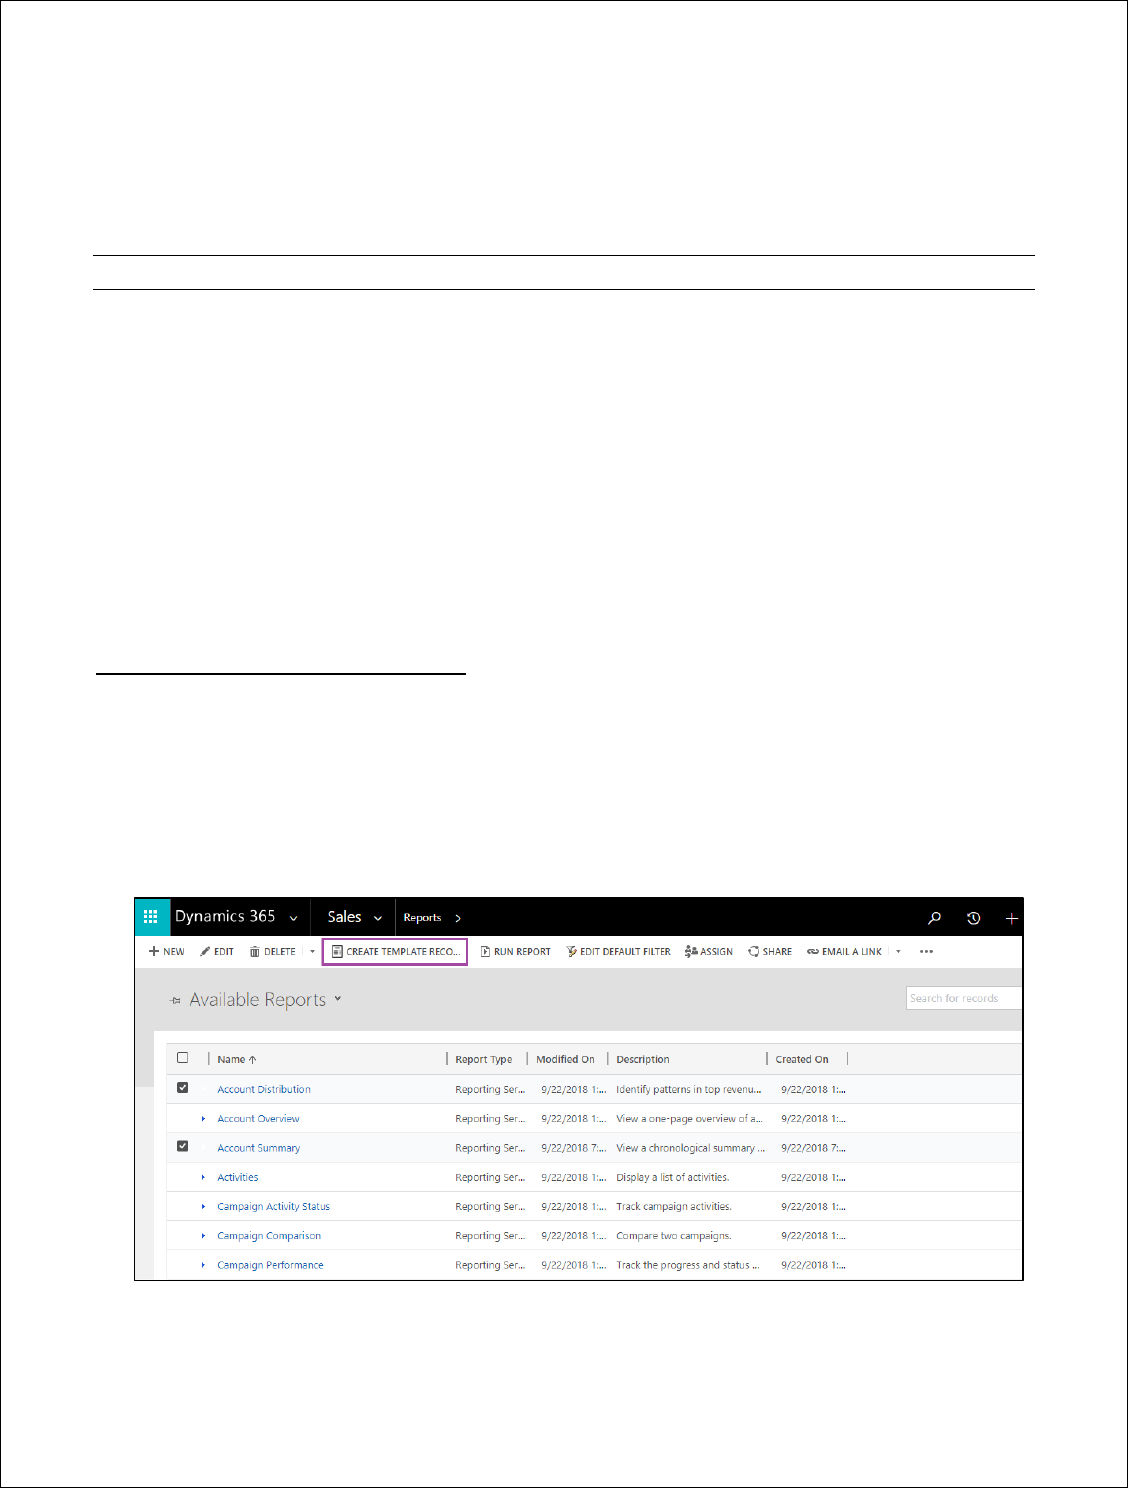
Report Template: To create a report template you need to navigate to Sales > Report. Select required
Available Reports and click on Create Template Record button.
STEPS TO CREATE REPORT TEMPLATE:
1. Navigate to the Reports area as shown below where all available reports are displayed. Select the
reports that need to be used for quick export using Click2Export then click on “Create Template
Records” button from the ribbon
2. The Create Template Record button would create a record for the selected report using the
default values setup in the report. You are allowed to edit the values here to match your needs.

Click2Export - User Manual
P a g e 5 | 40
3. The Create Template Records submits a background job to create records. This allows you to
continue with your work till all the templates have been created. You would be displayed the
following message for confirmation to proceed.
4. If you try to create a Report Template for a report that was already processed and has a CRM
Report Template for it, you would receive the following message.
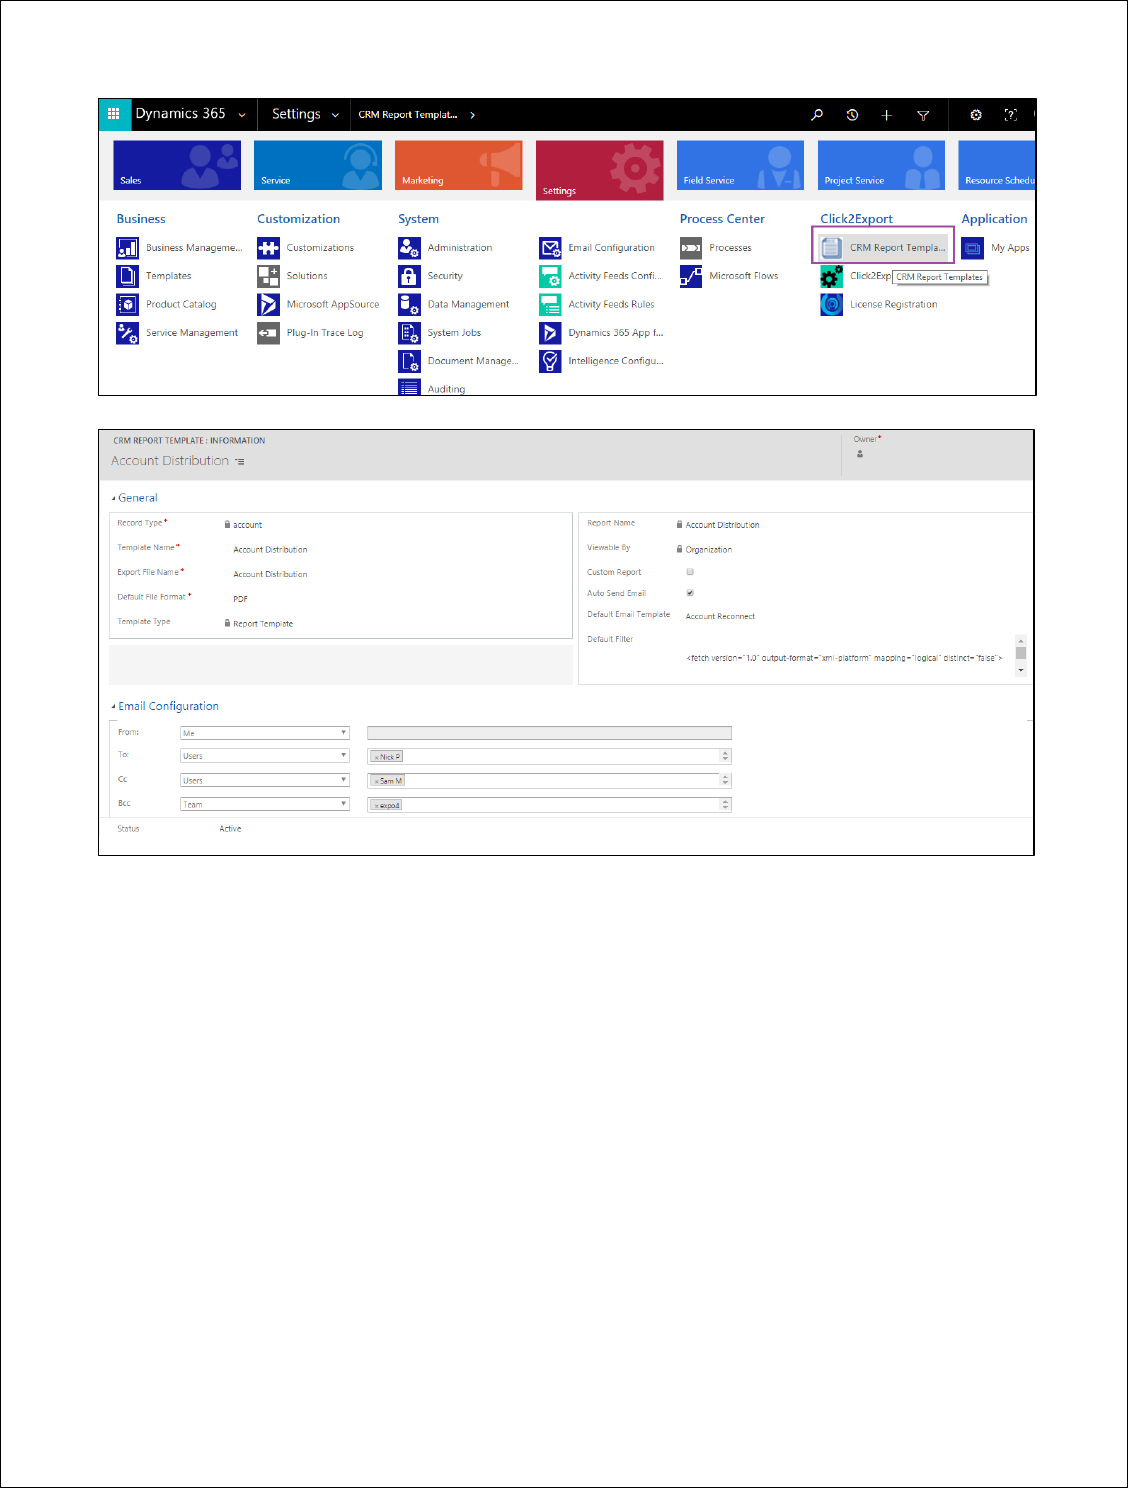
5. You can check the report templates created in the CRM Report Templates Area added in Settings
> CRM Report Templates
Click2Export - User Manual
P a g e 6 | 40
Template Name: By default this is set to the corresponding report name but is customizable and can be
changed. This name is displayed for Report selection in the Click2Export Window and should therefore be
unique and easy to identify with especially when you have multiple templates for the same report.
Export File Name: This is the name that would be provided to the file generated upon export. You could
provide a static name as well as have it configured to be named based on a field of the record.
For ex.
Account Summary – {name} – {primarycontactid} – {createdon}
Will create a file name as
Account Summary – A. Datum Corp – Joe Smith – 02/12/2015 8:12:33PM
You can use any field name including custom field from the record type provided
Default File Format – PDF, Excel, Word, CSV and TIFF are the options. By default with the solution it is set
as PDF. With this option you can decide the default format in which the report would be exported.

Click2Export - User Manual
P a g e 7 | 40
Template Type: Report Template
Auto Send Email: Send emails automatically with the attached exported file.
Default Email Template: The email would be created based on the default email template specified in
that section.
Default Filter: It contains the default fetch XML of template.
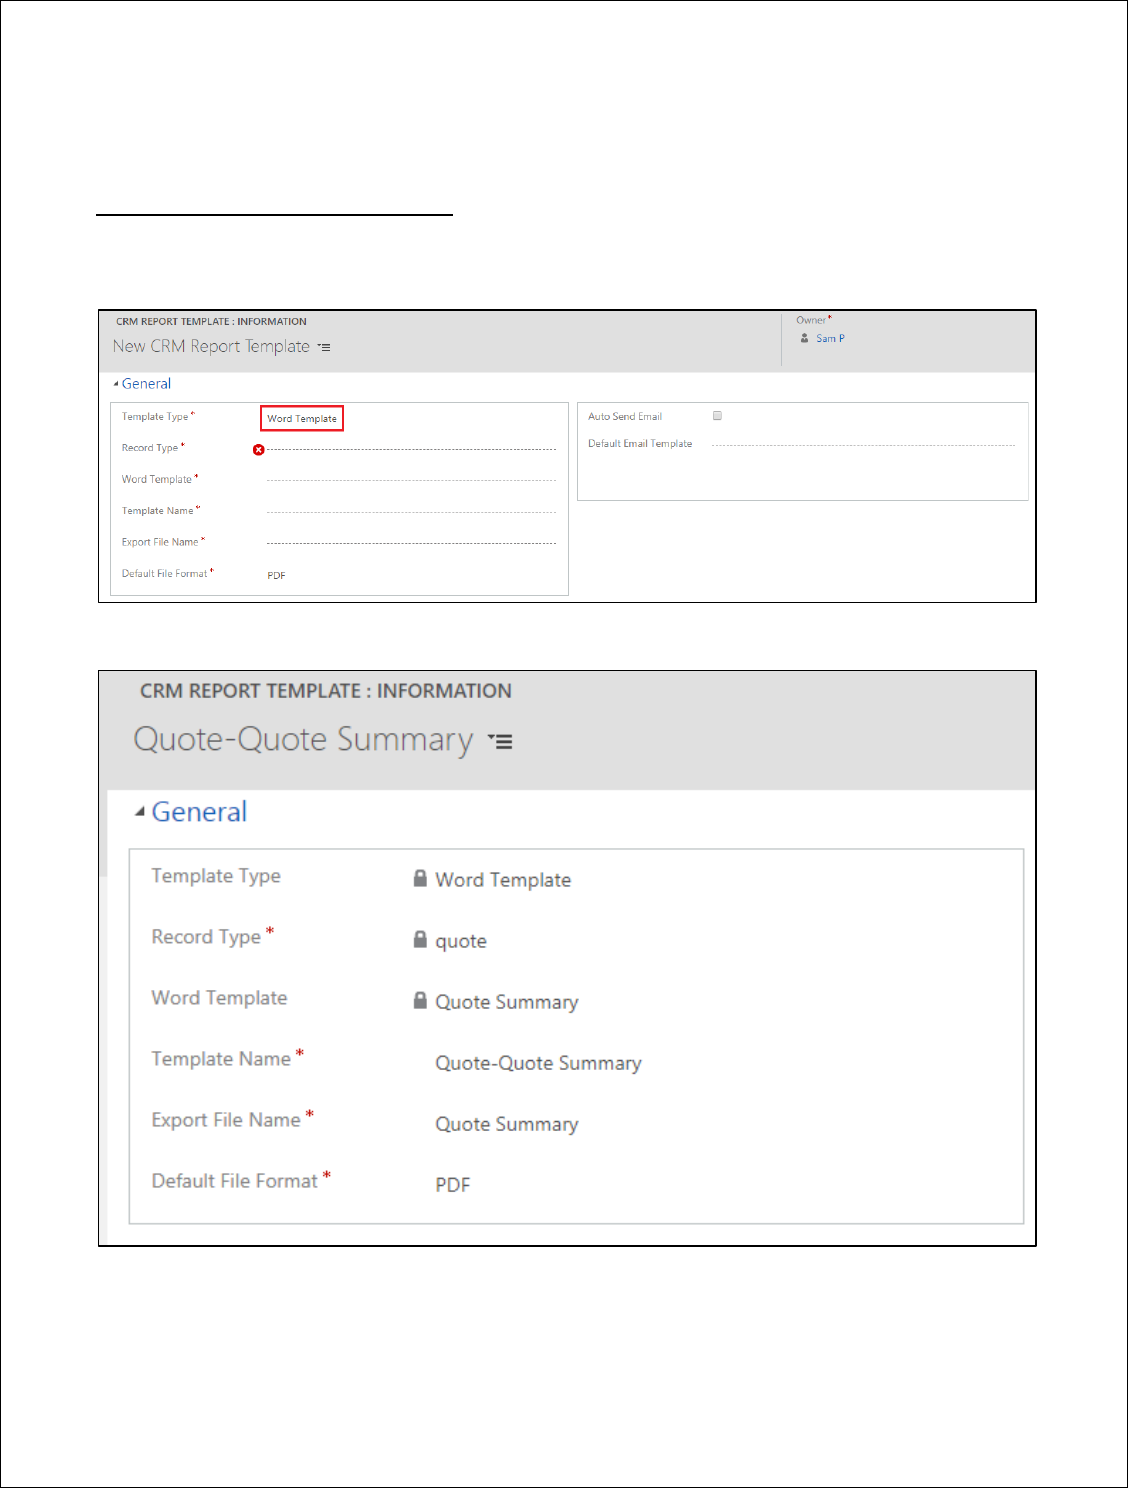
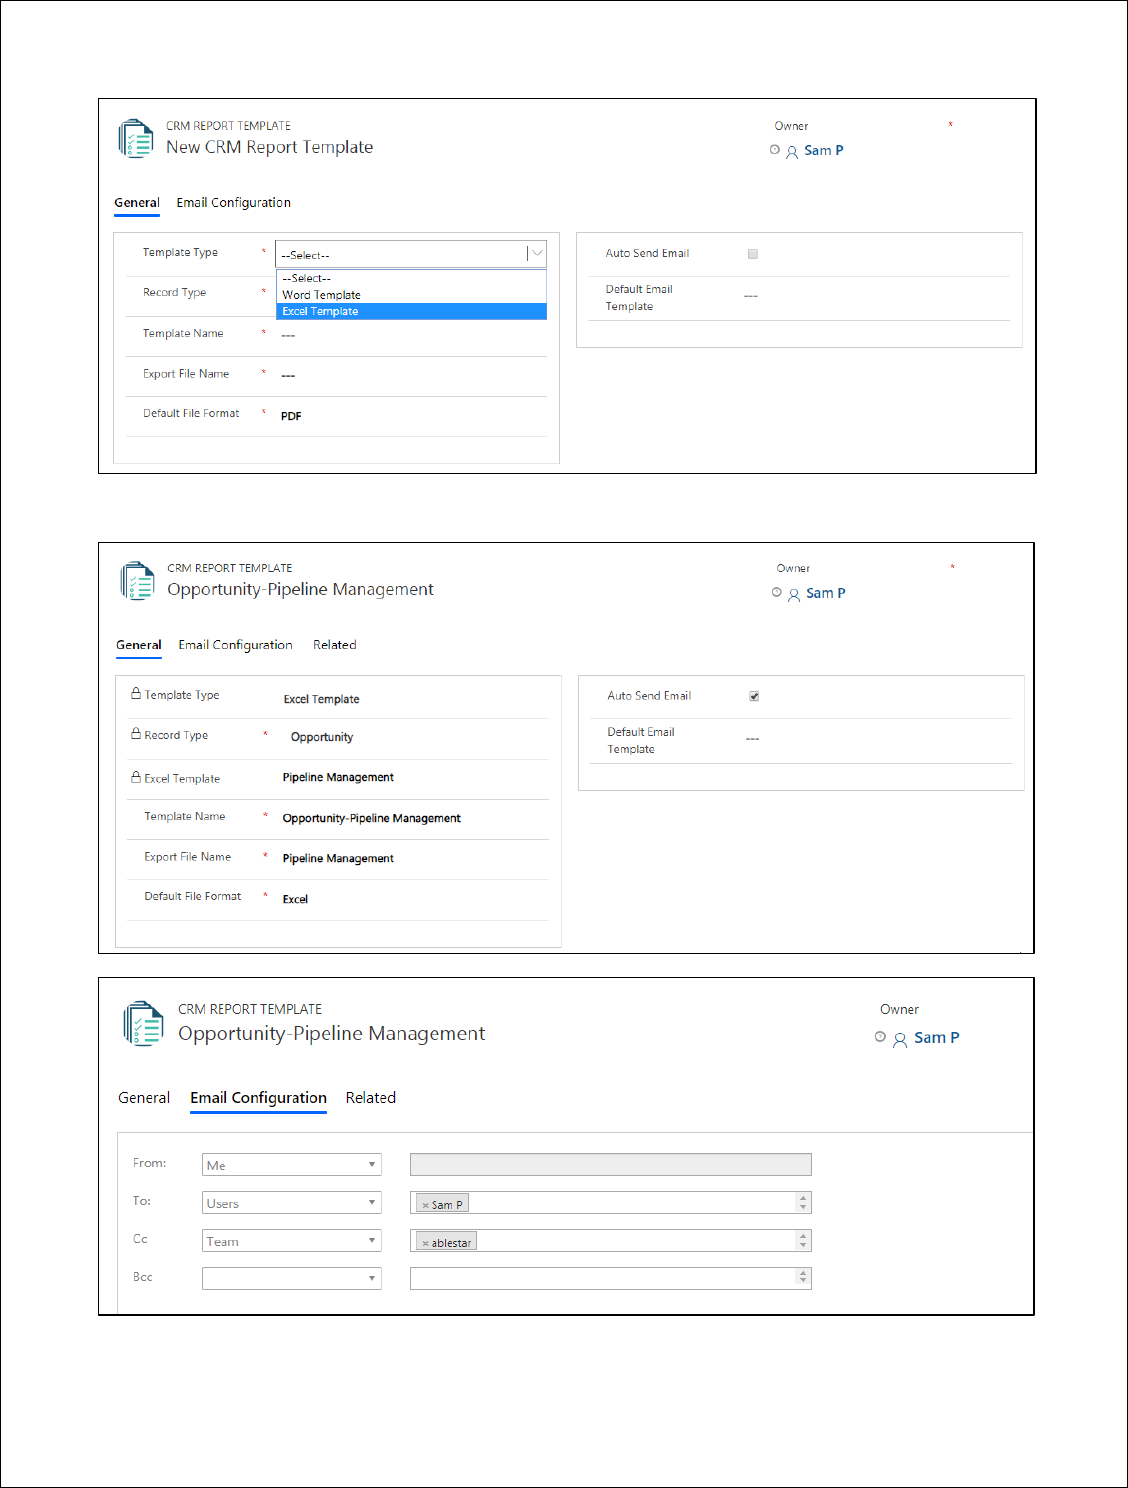
Email Configuration:
From – The sender i.e. the person who wants to send the email.
To – Recipient i.e. the person to whom the email is to be sent.
CC – Carbon Copy i.e. the person to whom you want to send copy of the email information.
BCC – Blind Carbon Copy i.e. if you are sending the Copy and you do not want the other
recipients to see that you sent it to the particular contact
Types of Email addresses to select
a. Users – If you select Users then all the CRM users present in the environment will be
enlisted while selecting the data.
b. Queue – If you select Queue then all the queues present in the environment will be
enlisted while selecting the data.
c. Team – If you select Team then all the teams created in the environment will be enlisted
while selecting the data.
d. Dynamics – E.g. If you have selected quote as an entity then all the lookup fields on quote
which are allowed to send email will be enlisted while selecting the data.
e. Manager – E.g. If you have selected quote as an entity then, all the system-user lookup
fields on quote entity will be enlisted while selecting the data, and recipient would be the
manager of the selected data.
Click2Export - User Manual
P a g e 8 | 40
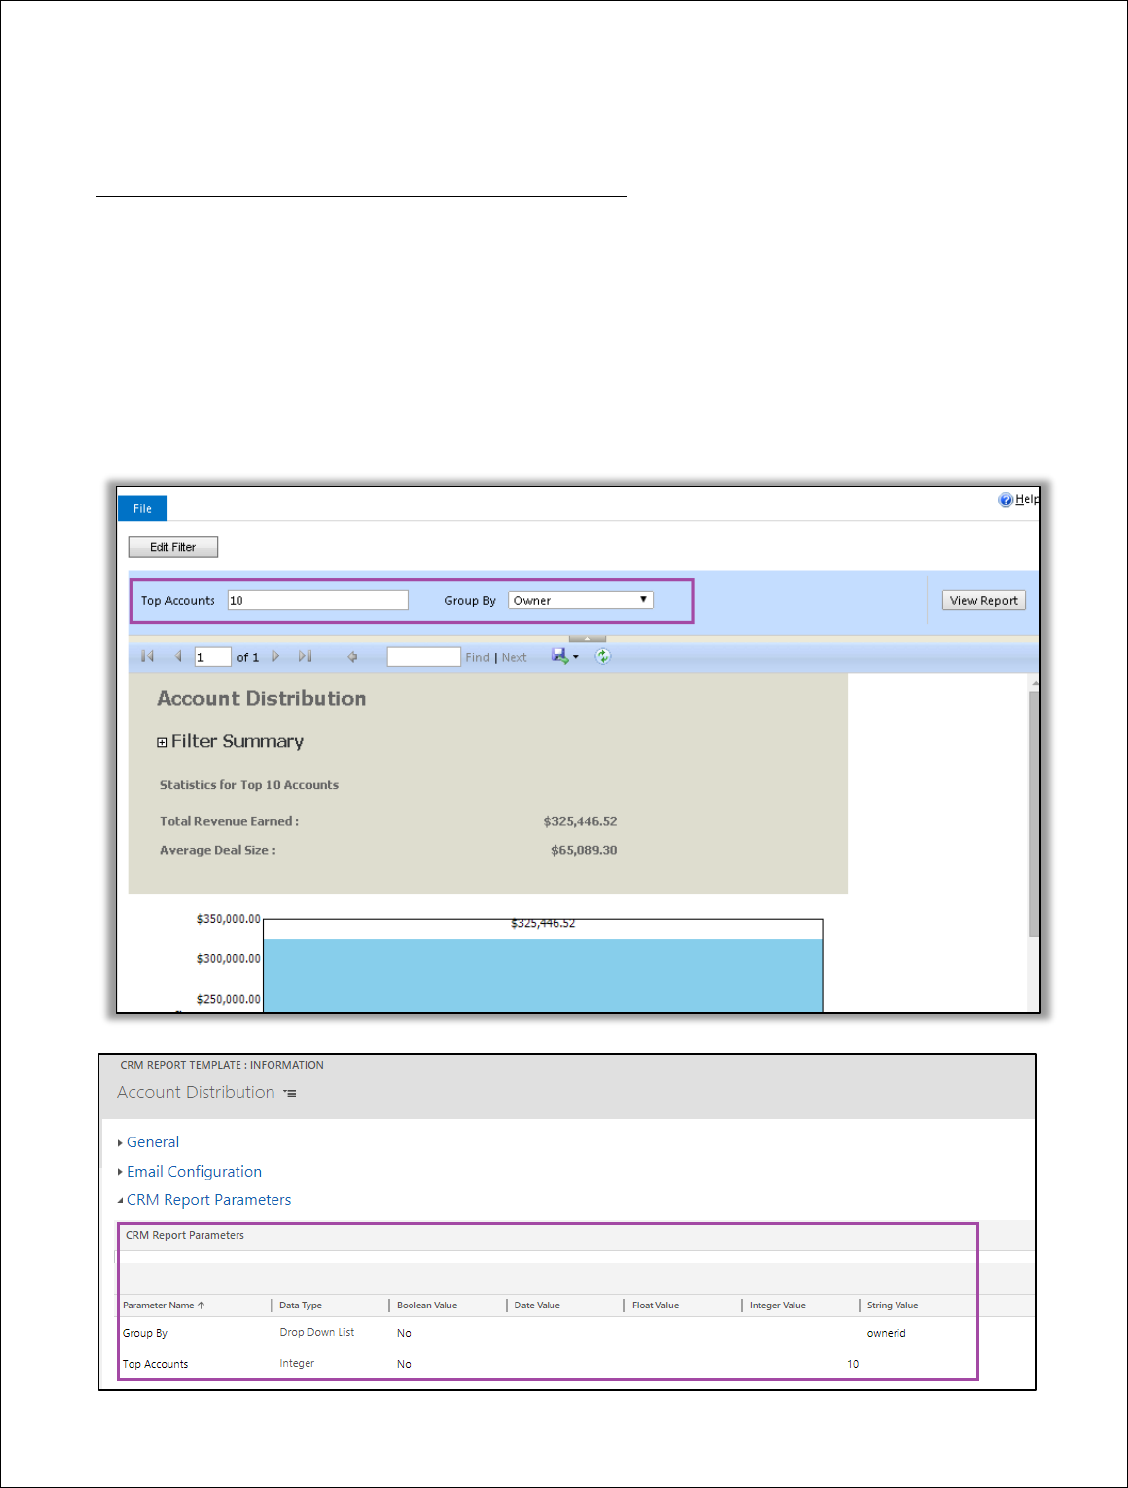
CONFIGURING CRM REPORT TEMPLATE PARAMETERS:
“CRM report parameter” is another custom entity which also comes packaged with the Click2Export
solution and it is used to store parameters of the corresponding report whose template is created above.
Some report have explicit parameters defined in addition to the pre-filtering criteria provided in the
report. You can manage the values to be passed for these report parameters through this screen.
Report Parameters are already created for the Report Templates. The program reads through all of the
Parameters defined for the report and auto-creates them.
Click2Export - User Manual
P a g e 9 | 40
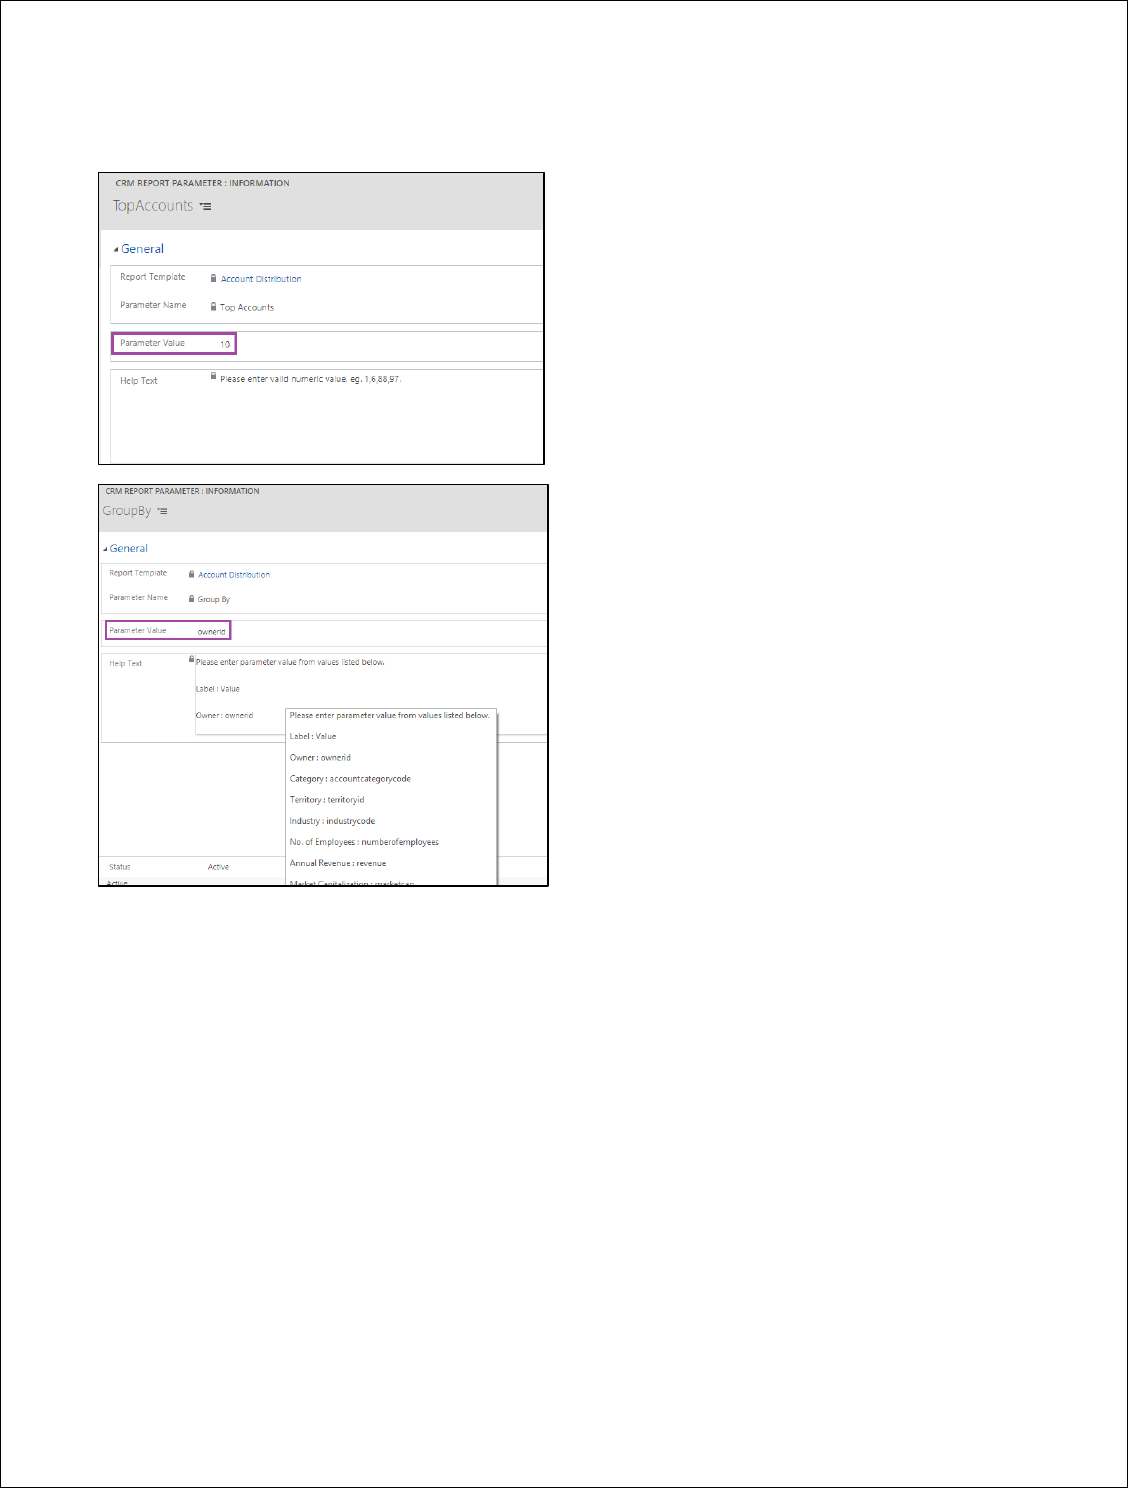
You are allowed to edit the individual parameter values to match your needs for the current Report
Template.
Report Template: The custom CRM Report Template record with which the parameters are associated.
This cannot be edited.
Parameter Name: The name of the parameter from the corresponding report. This cannot be edited.
Parameter Value: The default value of the parameter as set in the corresponding report. This can be
modified by you as per your use of this report.
Help Text: This will provide advisory around the values that can be accepted by the parameter. For a
parameter defined with multiple options to choose from, you will see the list of acceptable options
provided for easy understanding of the value to be set for this parameter.
Click2Export - User Manual
P a g e 10 | 40
Word Template: To create the word template you need to navigate to New > CRM Report Template.
STEPS TO CREATE WORD TEMPLATE:
1. Navigate to Settings > CRM Report Templates > New
2. Fill the relevant details in the New CRM Report Template.
Click2Export - User Manual
P a g e 11 | 40
Record Type: Entity for which you want to create the CRM Report Template.
Word Template: All the word templates from the document template entity present for the selected
record type will be enlisted.
Default File Format – Two options available PDF, Word. By default with the solution it is set as PDF. With
this option you can decide the default format in which the report would be exported.
STEPS TO CREATE EXCEL TEMPLATE:
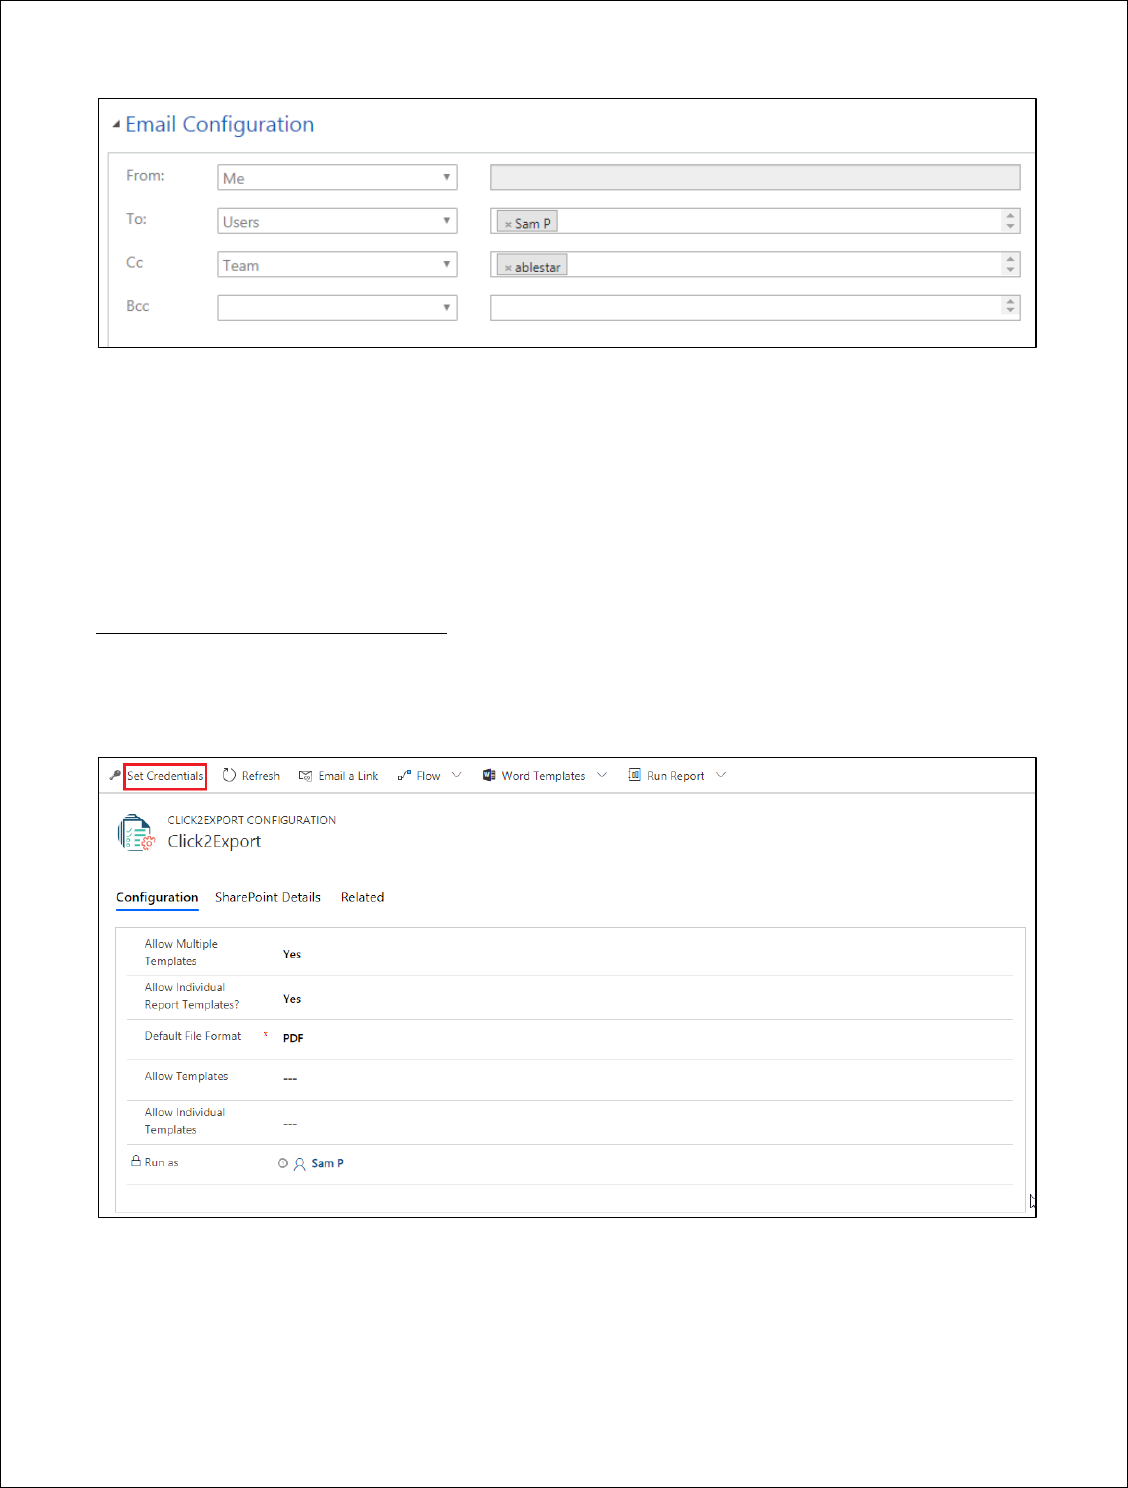
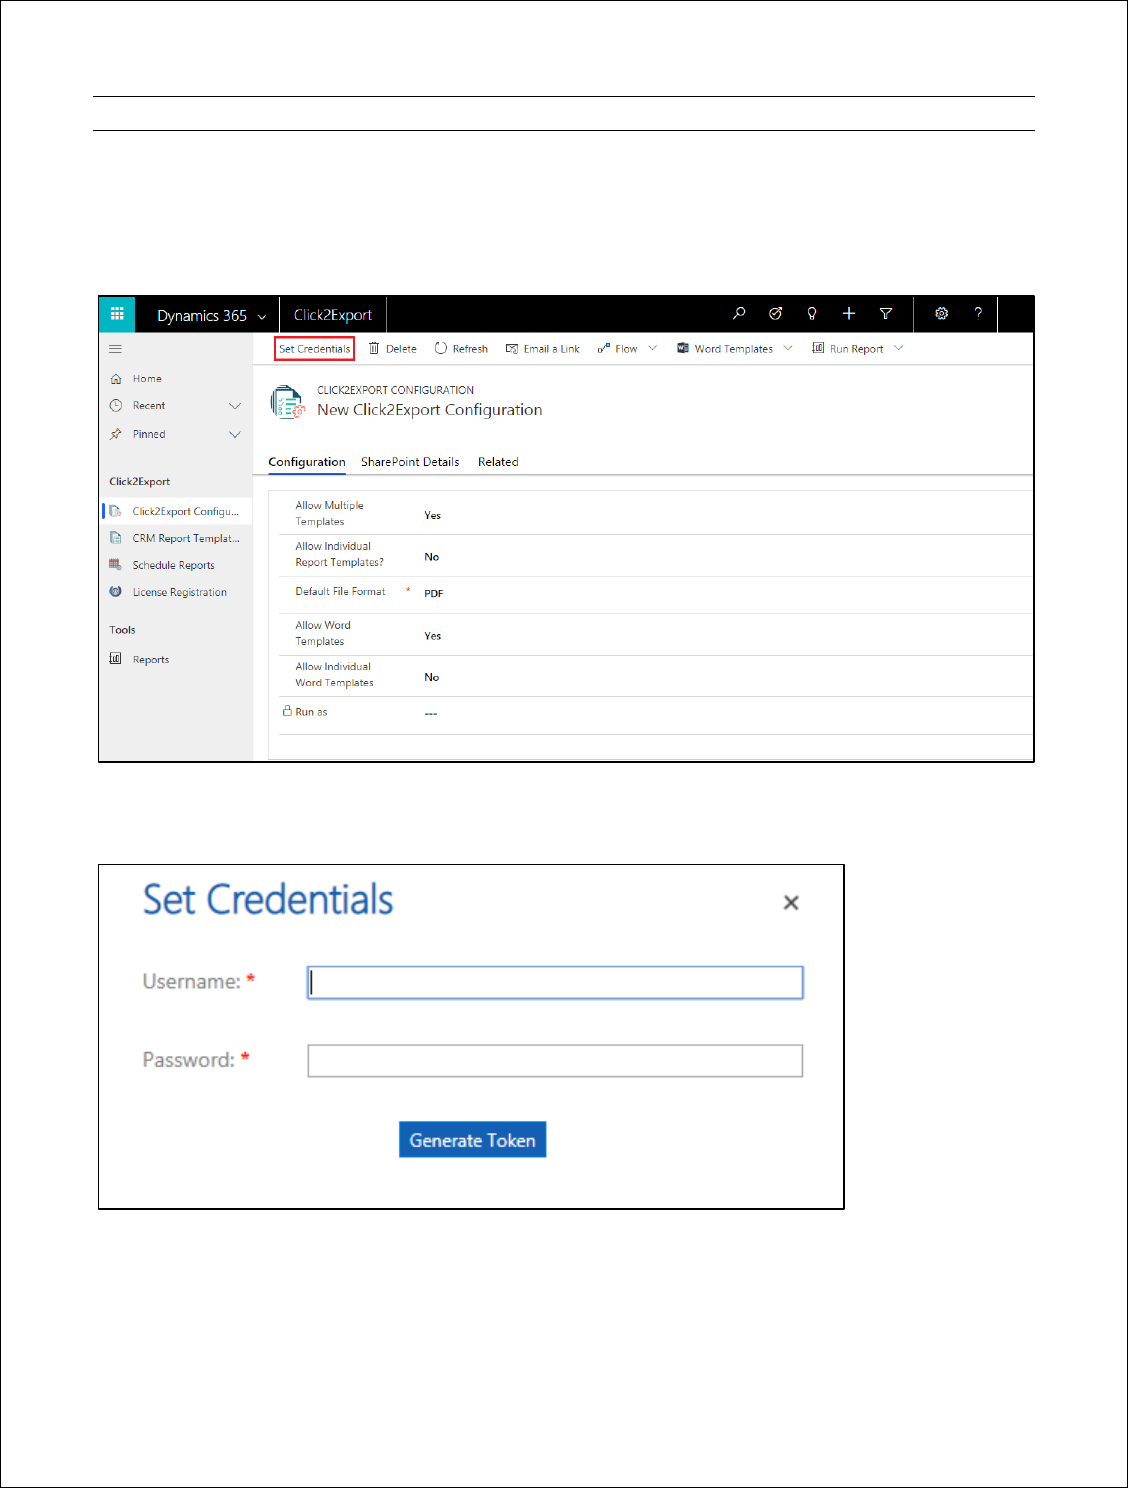
1. Navigate to Click2Export App > Click2Export Configuration > Set Credentials. Enter the
credentials and generate token. This step is mandatory to create excel template.
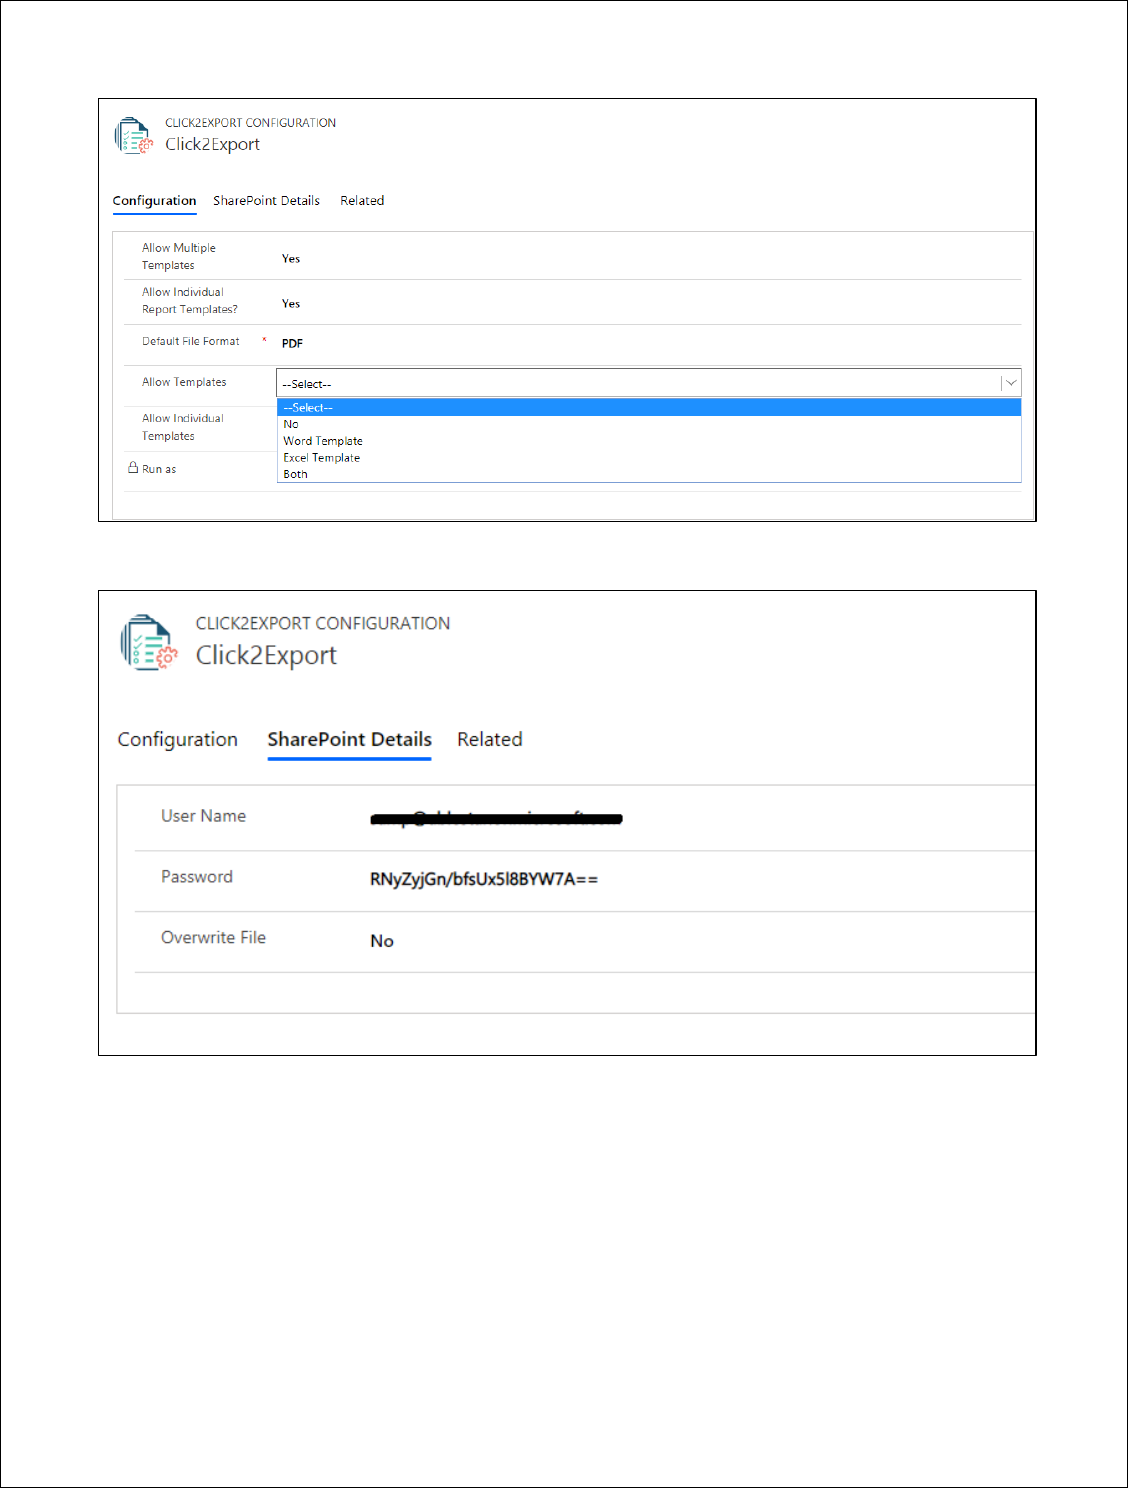
2. Next, select the option Excel Template or Both for the following fields - Allow Templates & Allow
Individual Templates. Click on Save.
Click2Export - User Manual
P a g e 12 | 40
3. Next, complete SharePoint configuration details and click on Save.
4. Now navigate to Click2Export App > CRM Report Templates > New
Click2Export - User Manual
P a g e 13 | 40
5. Fill the relevant details in the New CRM Report Template and save it.
Click2Export - User Manual
P a g e 14 | 40
Template Type: Excel and Word template options will be available depending on the configuration
settings.
Record Type: Entity for which you want to create the CRM Report Template.
Excel Template: All the excel templates from the document template entity present for the selected
record type will be enlisted.
Default File Format – Once you select the Excel template type the default file format is set as Excel.
CREATE CLICK2EXPORT WORKFLOW – WORD TEMPLATES & REPORTS
WORD TEMPLATES
1. Click2Export now supports exporting the Dynamics CRM Word Templates using Click2Export
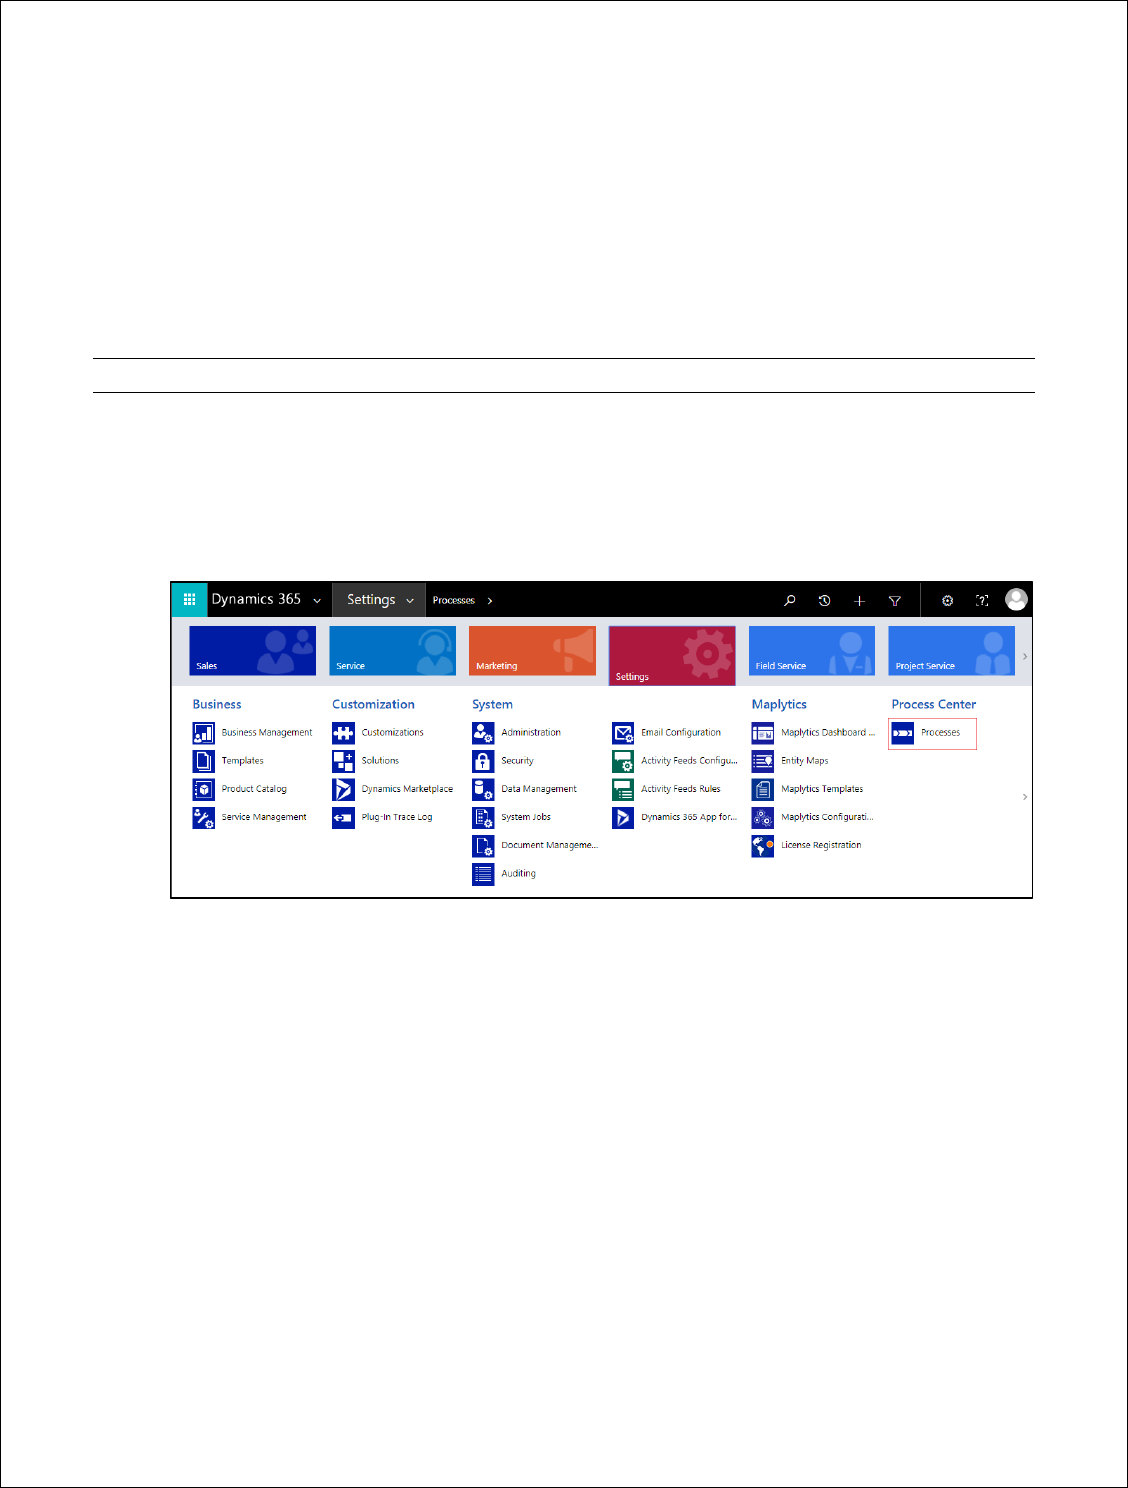
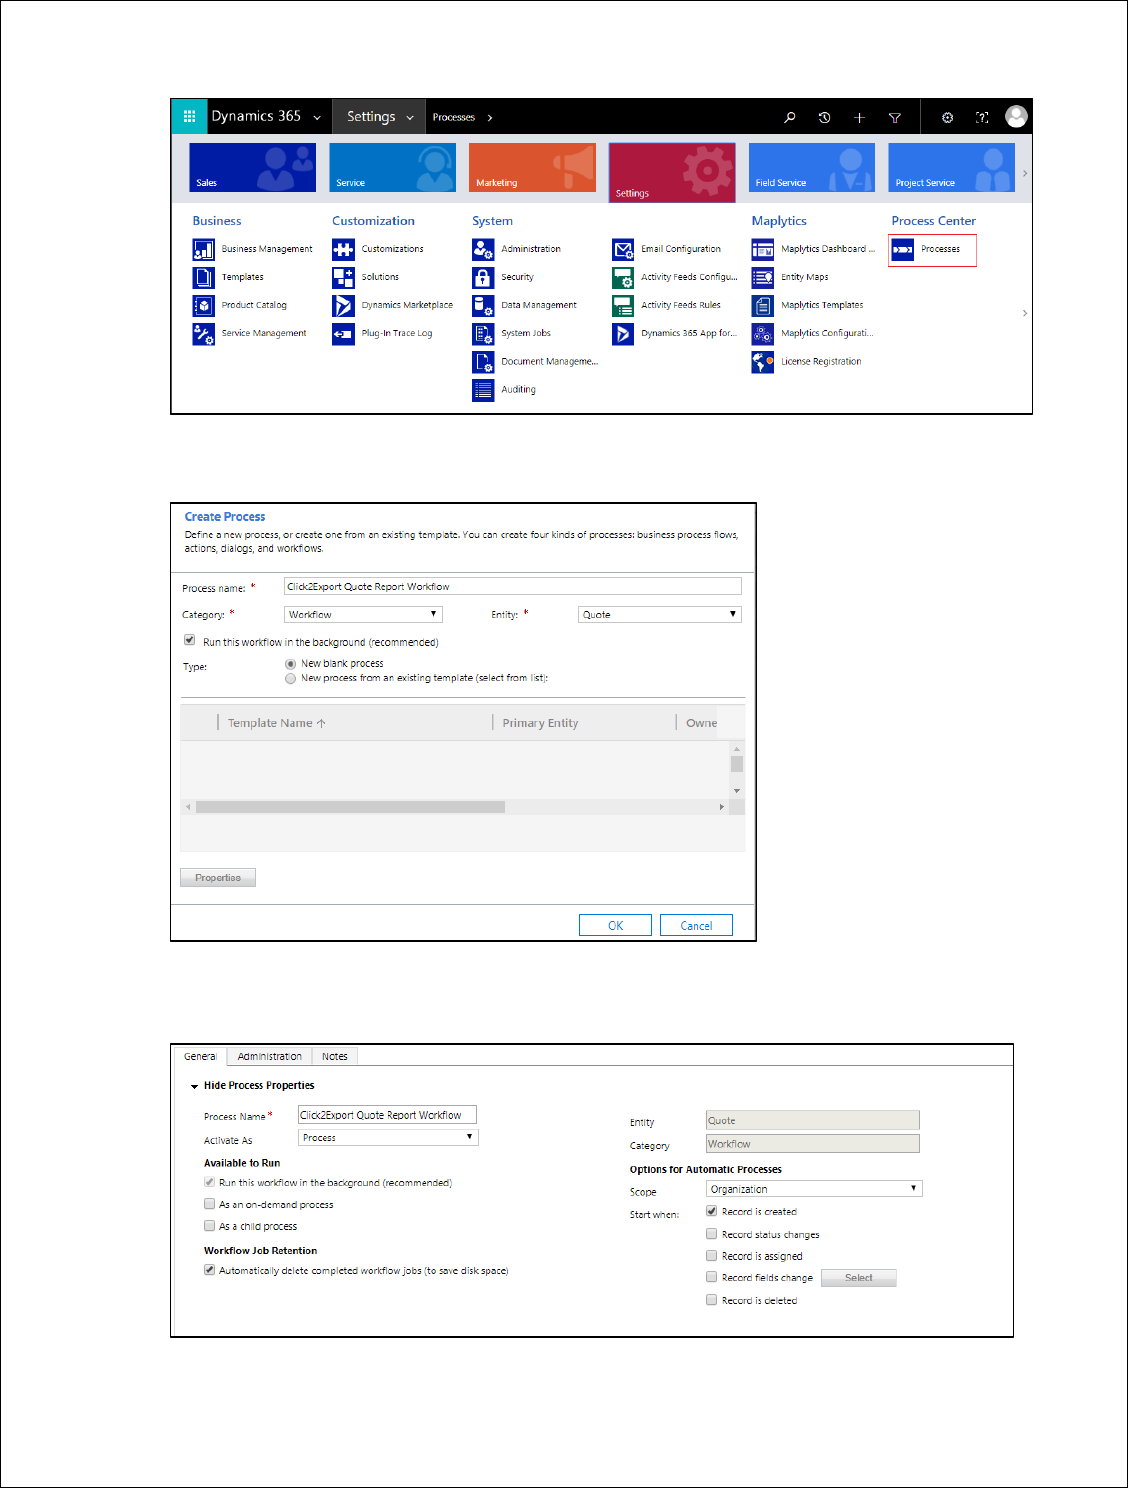
workflow. To create a workflow, navigate to Settings > Processes and click on ‘New’ to create a
new workflow.
2. Enter the ‘Process Name’, select the ‘Category’ as ‘Workflow’and ‘Entity’ for which you want to
create this workflow. Click on ‘OK’.

Click2Export - User Manual
P a g e 15 | 40
3. Here you can select whether you want the Workflow to be On Demand or trigger on a change of
Options for Automatic Processes.
4. First user needs to click on ‘Add Step’ and add Perform Action step that is predefined by Microsoft
to select the appropriate Action for required word template. Select Action as SetWordTemplate
option and Entity as None (global).
Click2Export - User Manual
P a g e 16 | 40
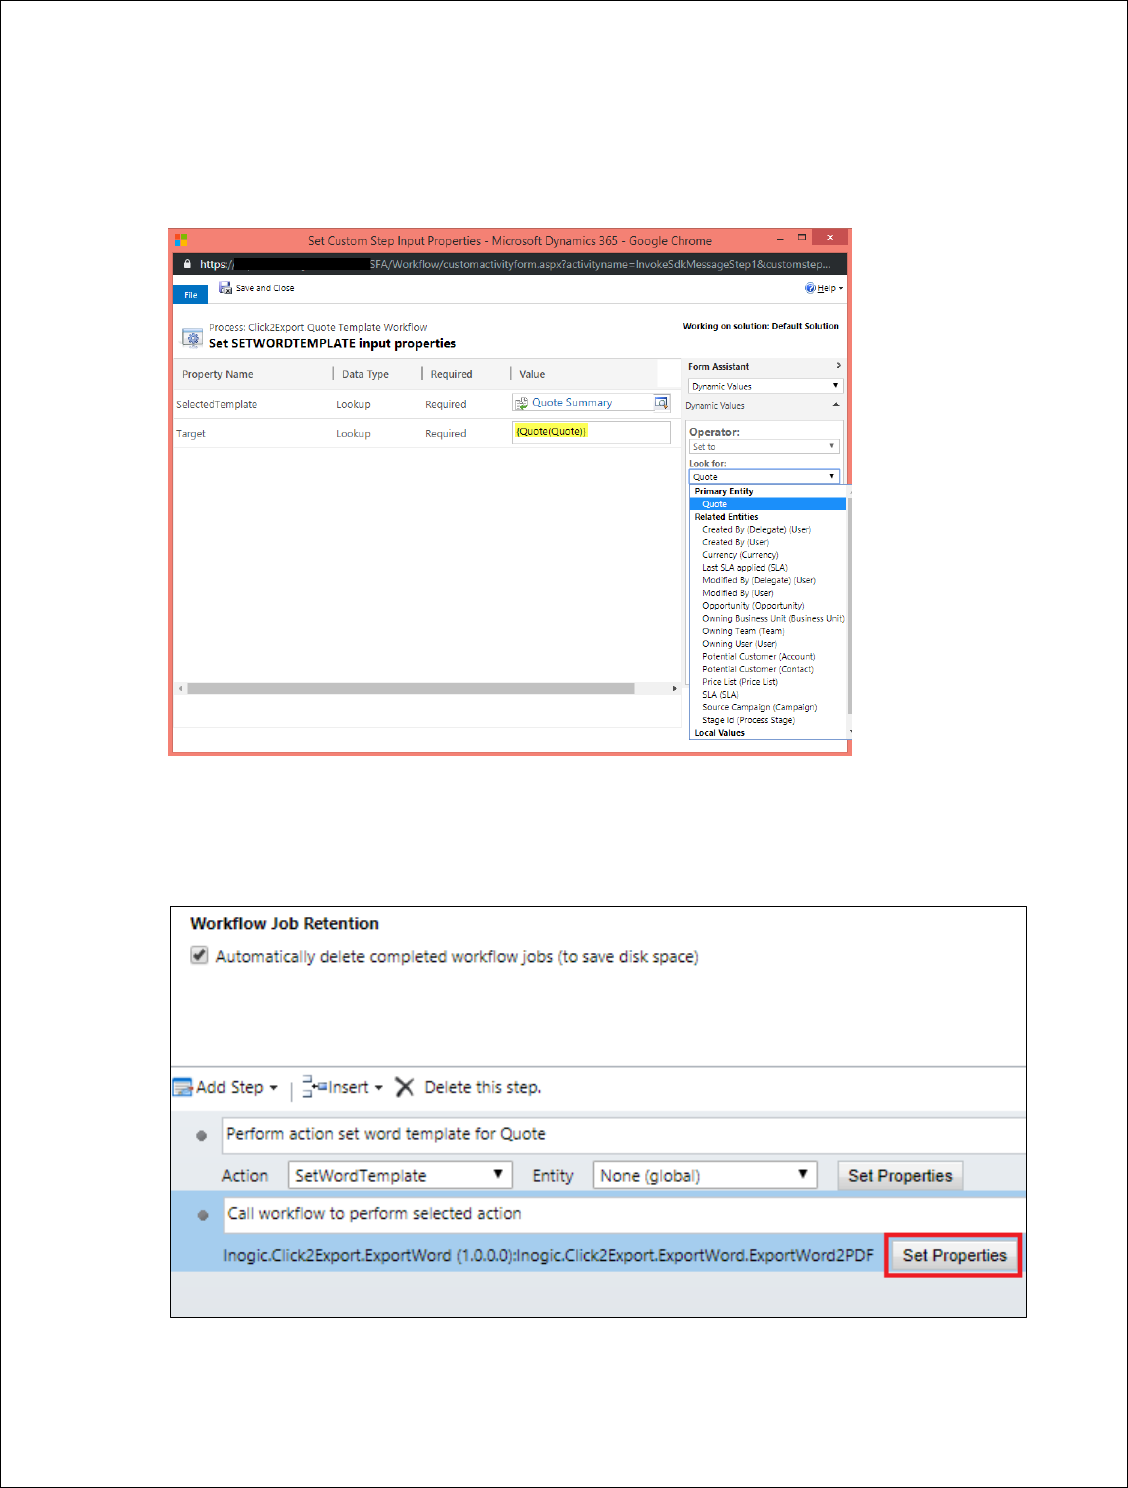
5. Now click on ‘Set Properties’ of Perform Action step and select the required Word Template in
SelectedTemplate section and required Entity in Target section.
6. Click2Export ships with one workflow assembly namely
‘Inogic.Click2Export.ExportWord.ExportWord2PDF’. This step is required to call the workflow for
performing the selected action.
7. Now click on ‘Set Properties’ for Inogic.Click2Export.ExportWord.ExportWord2PDF
Click2Export - User Manual
P a g e 17 | 40
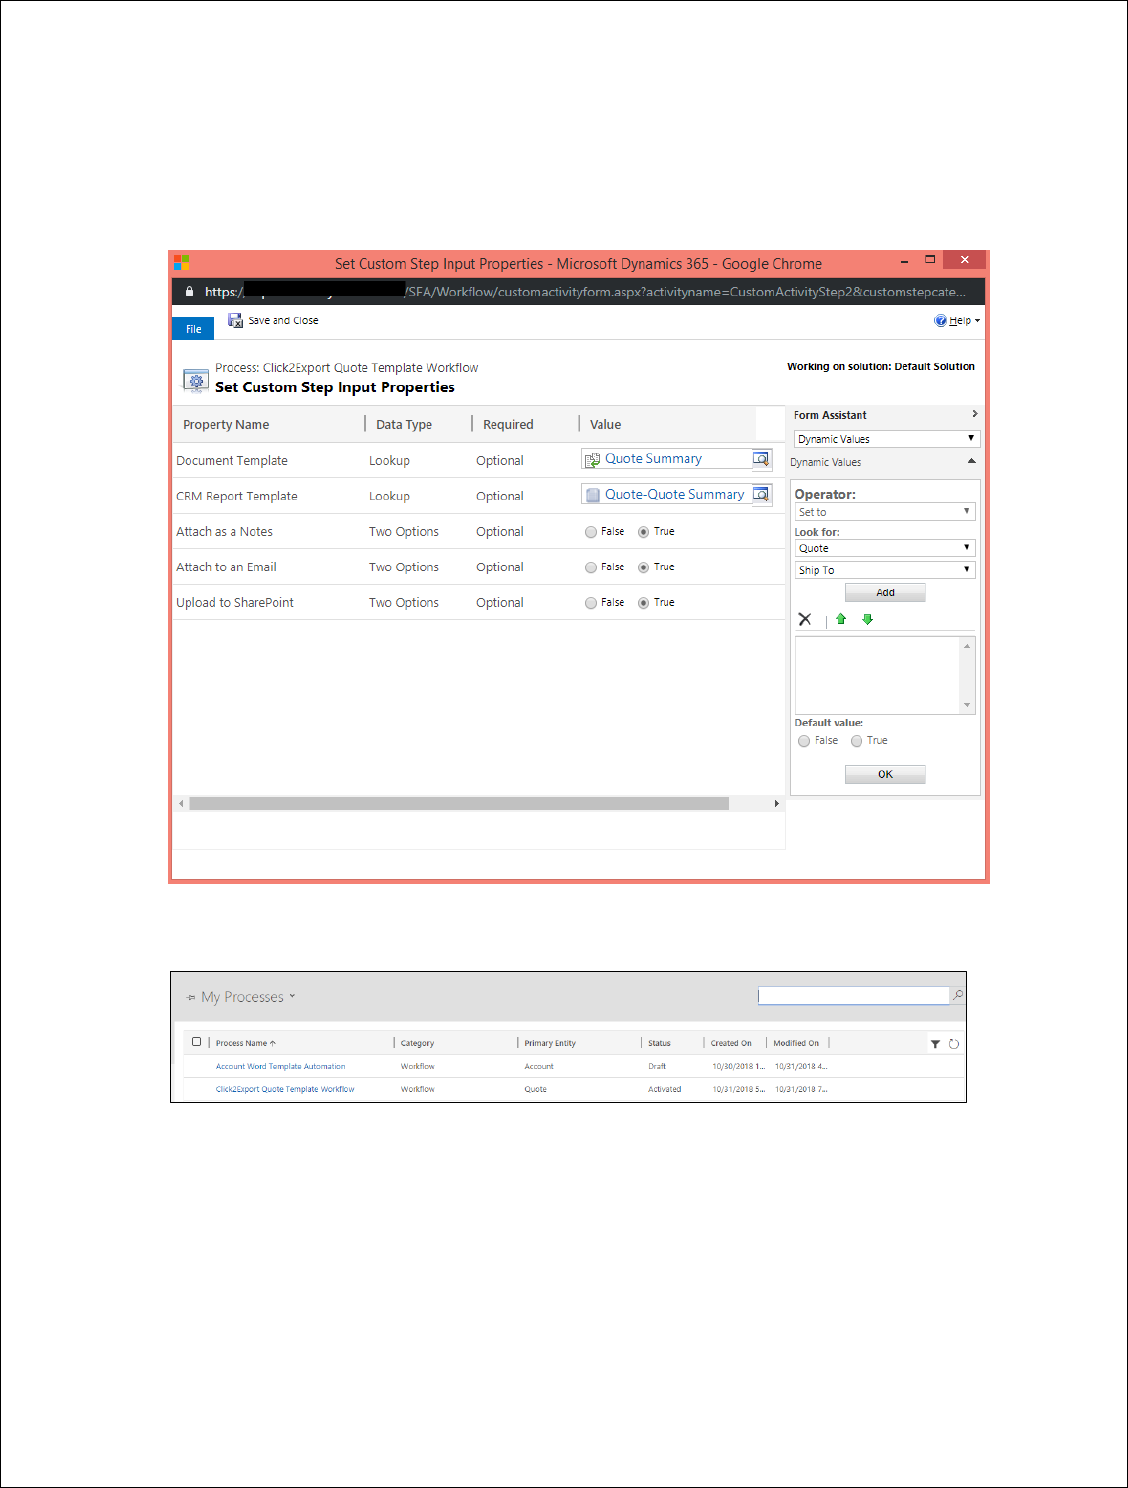
8. Now on the ‘Document Template select required ‘MS Document Template’ from the drop down
options. In CRM Report Template select the required ‘CRM Word Template’ for the selected
entity.
9. User can select the required action i.e. Attach as a Note, Attach to an Email or Upload to
SharePoint as True for performing the workflow accordingly and click on ‘Save and Close’.
10. Now ’Save’ and then ‘Activate’ the process.
11. You can now see the workflow in ‘My Processes’.
REPORTS
1. Click2Export now supports exporting the Dynamics CRM Report Templates using Click2Export
workflow. To create a workflow, navigate to Settings > Processes and click on ‘New’ to create a
new workflow.
Click2Export - User Manual
P a g e 18 | 40
2. Enter the ‘Process Name’, select the ‘Category’ as ‘Workflow’and ‘Entity’ for which you want to
create this workflow. Click on ‘OK’.
3. Here you can select whether you want the Workflow to be On Demand or trigger on a change of
Options for Automatic Processes.
Click2Export - User Manual
P a g e 19 | 40
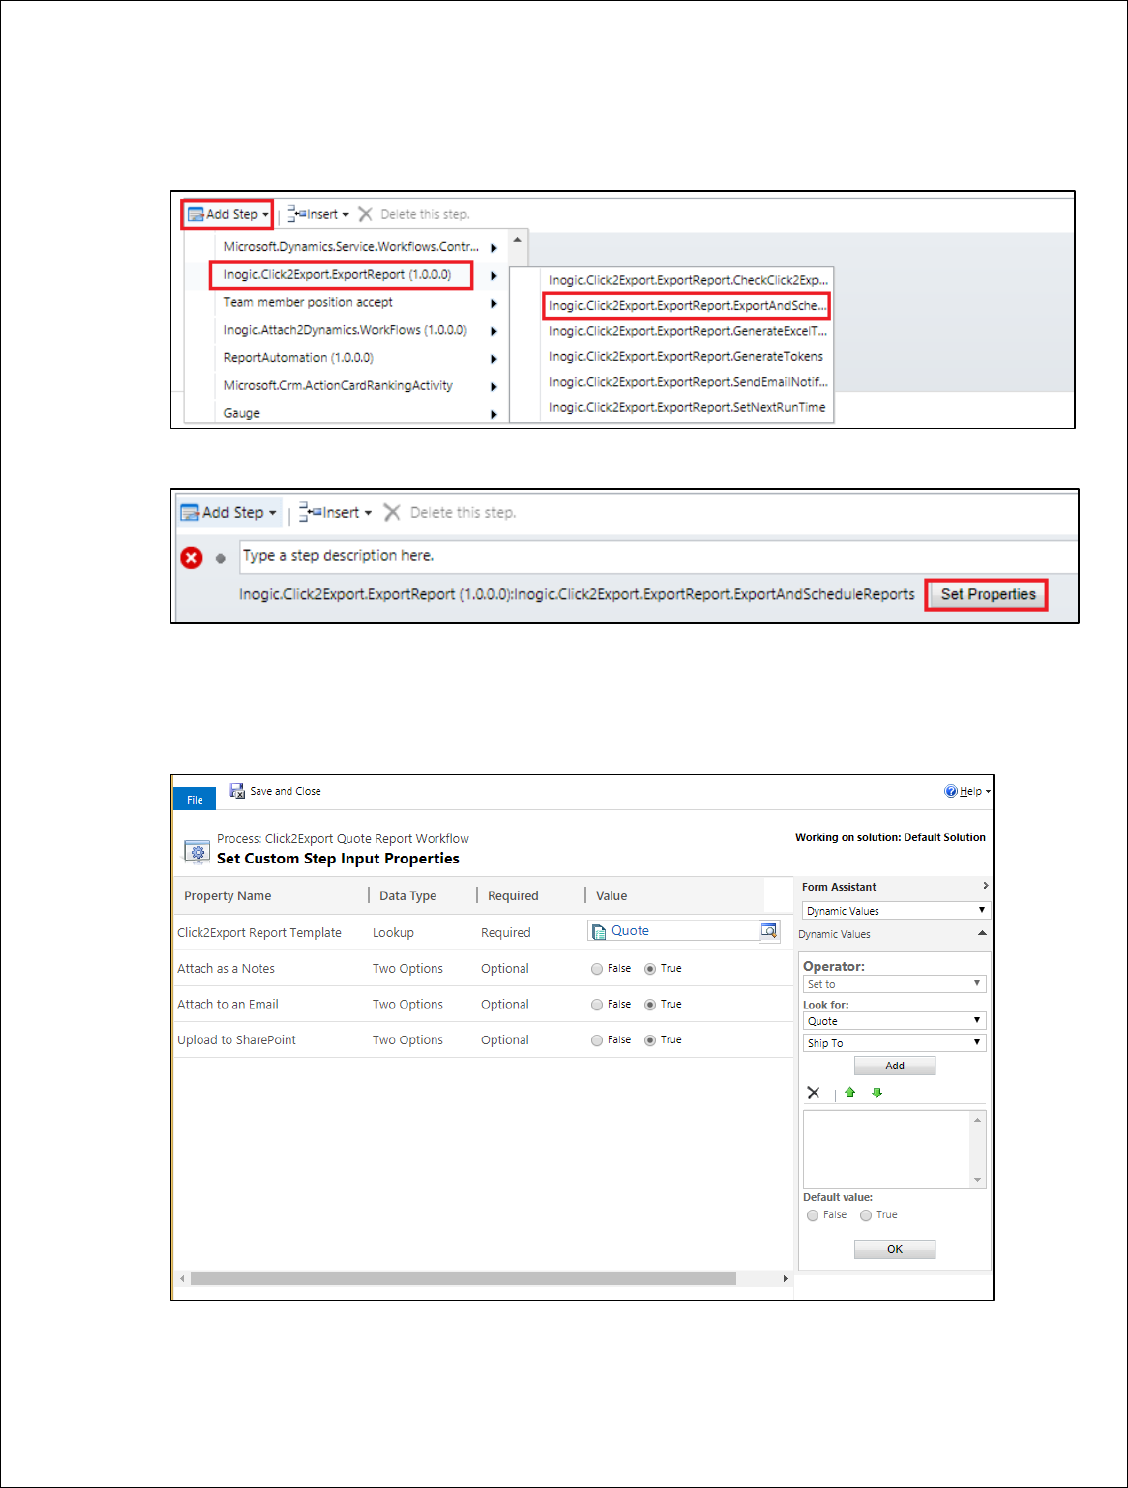
4. First user needs to click on ‘Add Step’. Click2Export ships with one workflow assembly namely
‘Inogic.Click2Export.ExportReport.ExportAndScheduleReports’. This step is required to call the
workflow for performing the selected action.
5. Now click on ‘Set Properties’ for Inogic.Click2Export.ExportReport.ExportAndScheduleReports
6. Now on the ‘Click2Export Report Template select required ‘Report Template’ from the drop
down options.
7. User can select the required action i.e. Attach as a Note, Attach to an Email or Upload to
SharePoint as True for performing the workflow accordingly and click on ‘Save and Close’.
8. Now ’Save’ and then ‘Activate’ the process.
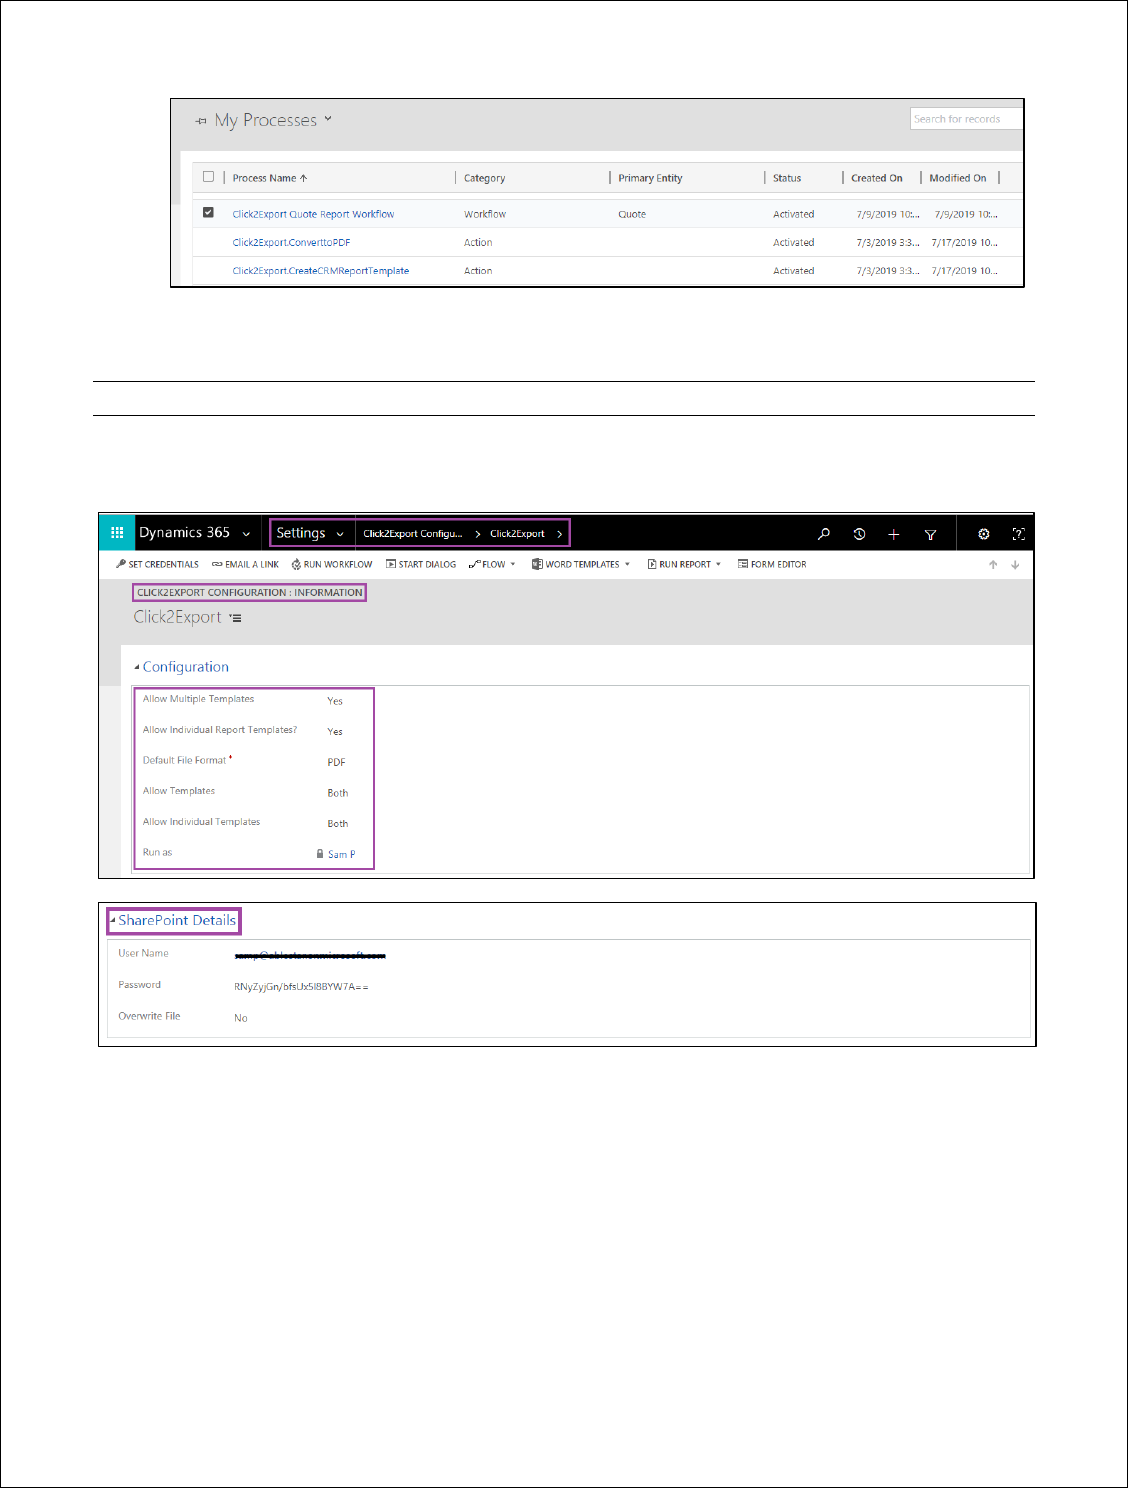
9. You can now see the workflow in ‘My Processes’.
Click2Export - User Manual
P a g e 20 | 40
CLICK2EXPORT CONFIGURATION
You can set the default settings to be used for Click2Export here.
The 5 configuration options you have in Configuration are as follows,
Allow Multiple Templates –This option allows you to decide whether you want to allow users to create
more than one CRM Report Template for a single report.
By default it is set as YES.
Allow Individual Report Templates –This option allows you to decide whether CRM Report Templates can
be created for Individual reports i.e. reports where viewable by is set as Individual.
By default it is set as NO.

Click2Export - User Manual
P a g e 21 | 40
Default File Format – PDF, Excel, Word, CSV and TIFF are the options. By default with the solution it is set
as PDF. With this option you can decide the default format in which the report would be exported.
Allow Templates –This option will allow the user to create new CRM Report Template for word and excel
document templates. The user can select either word, excel or both as per their requirement. If the user
selects excel then it is necessary to set credentials and generate token otherwise, the excel template will
not work.
Allow Individual Templates: This option allows you to decide whether CRM Report Templates can be
created for Individual/Personal template for both word and excel.
Run as: This option defines the user who has set credentials to generate token for SSRS/Word Template
scheduling.
Note: Once a CRM Report Template is created, it is accessible to all users in the organization and
anybody can export that report. So set these values accordingly.
SharePoint Details: User needs to fill the relevant details of the logged in user so as to make the
option available of uploading the exported file on their SharePoint.
The 3 options you have in SharePoint Details are as follows,
User Name: The user name credential detail of the SharePoint site.
Password: Password credential detail of the SharePoint site which gets encrypted to the code language.
Overwrite File: If it is set to Yes then already existing file on SharePoint would be overwritten by current
file otherwise the file name will be appended with the current date and time.
CLICK2EXPORT SECURITY ROLES
Click2Export ships with 2 security roles targetted at Administrator and User.
1. Click2Export Administrator
2. Click2Export User
Only users with Click2Export Administrator role will be allowed to “Create Report Templates” and edit
the CRM Report Templates. Configurations too can be managed by the Administrators only.
For users that would use the Click2Export functionality you need to assign the Click2Export User Role.
They will only be able to export the reports.
Click2Export - User Manual
P a g e 22 | 40
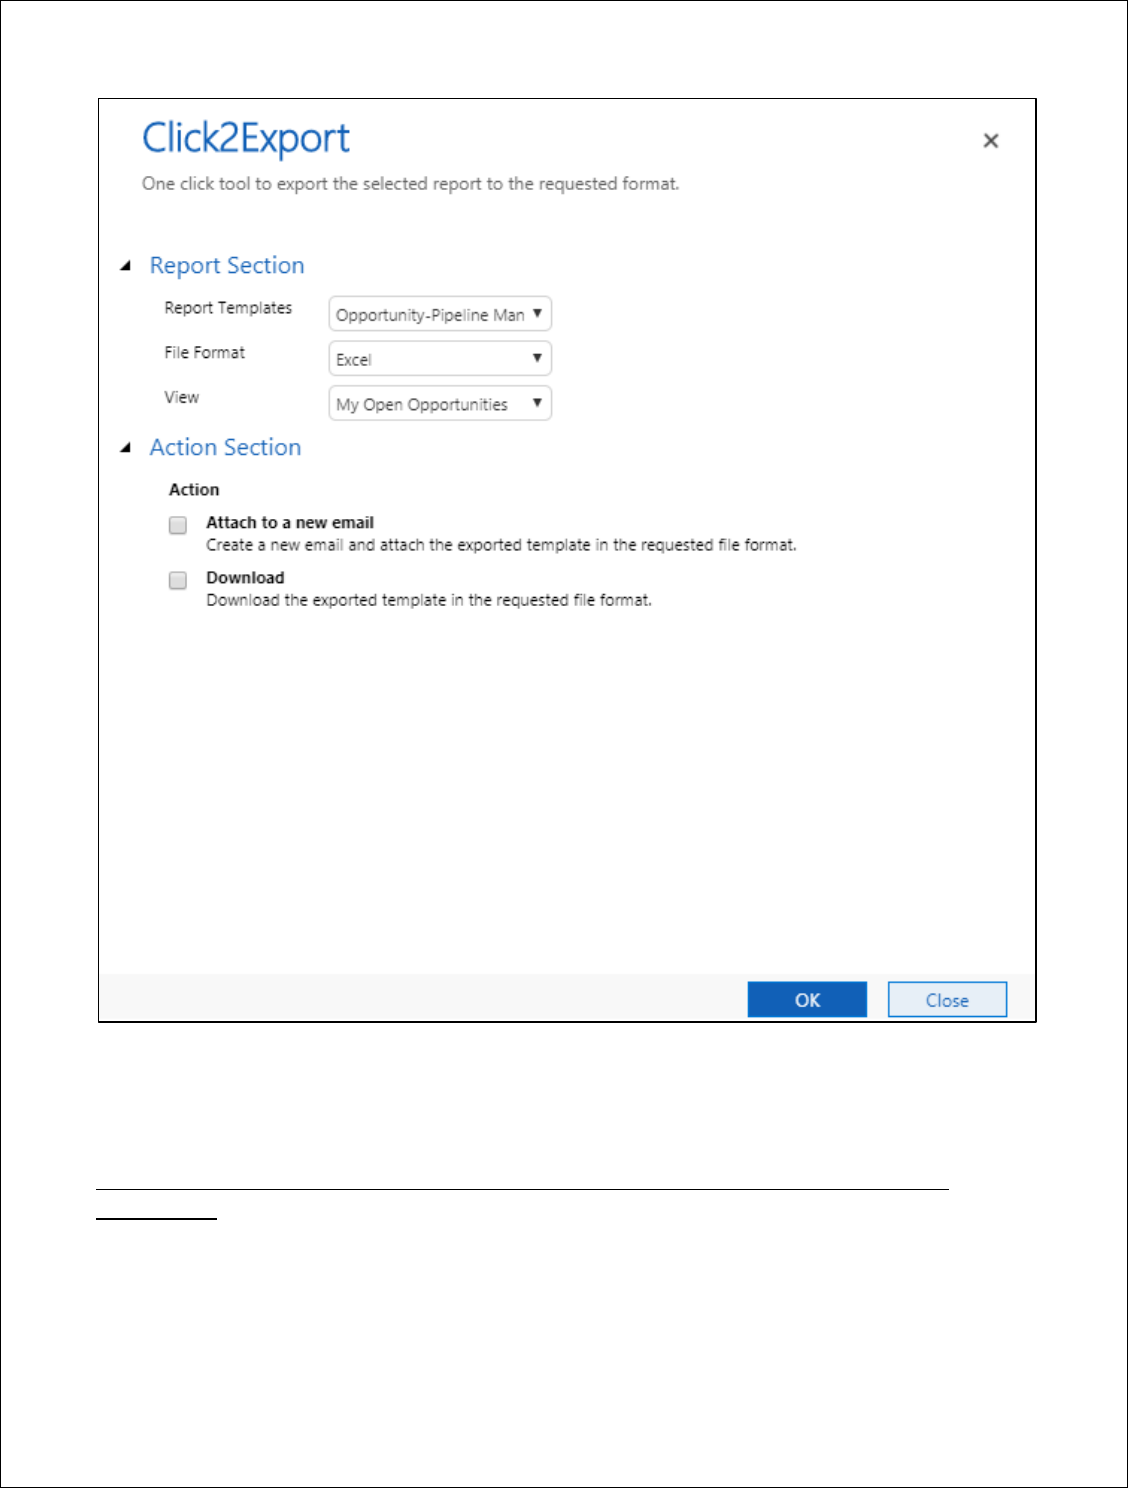
EXPORT REPORT
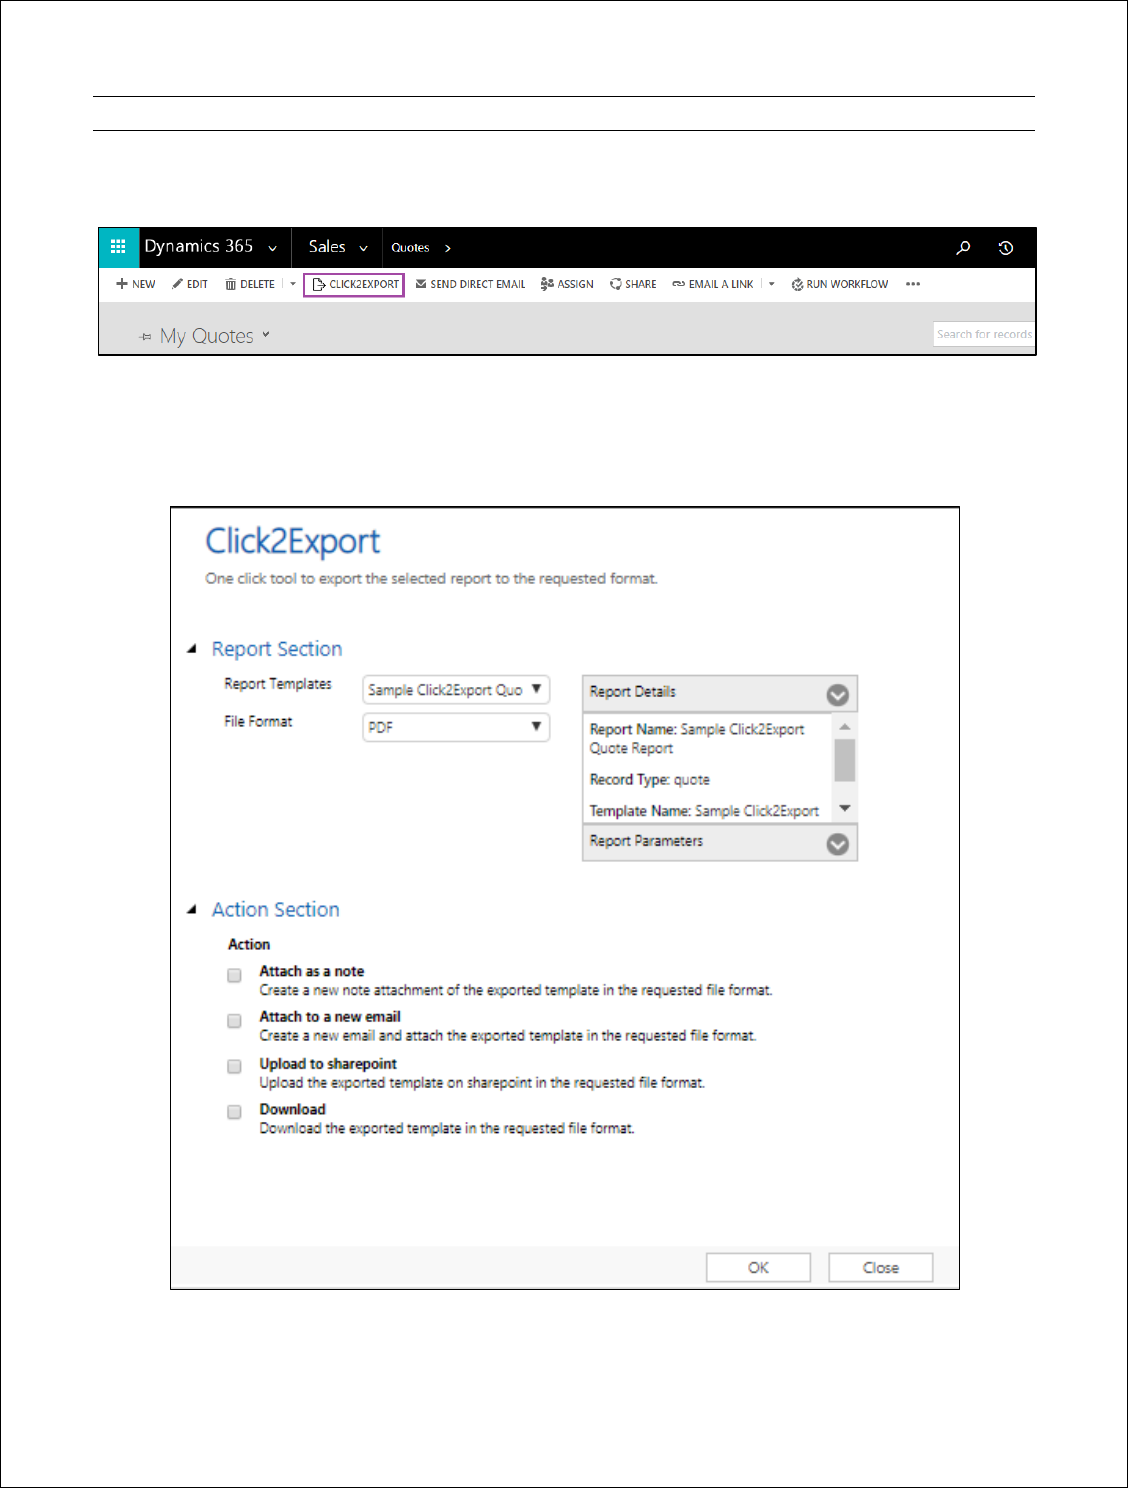
Click2Export is easily accessible through the ribbons on the home page as well as entity forms.
You can select single or multiple records from the home grid and click on Click2Export button to invoke
the Click2Export window as shown below. In case of export of excel templates, the Click2Export button is
visible on the home grid without the selection of any records. The reason being that excel template is
VIEW based and do not pertain to particular record(s).
Report Templates – This will list out all the CRM Report Templates created for that selected entity
record.

Click2Export - User Manual
P a g e 23 | 40
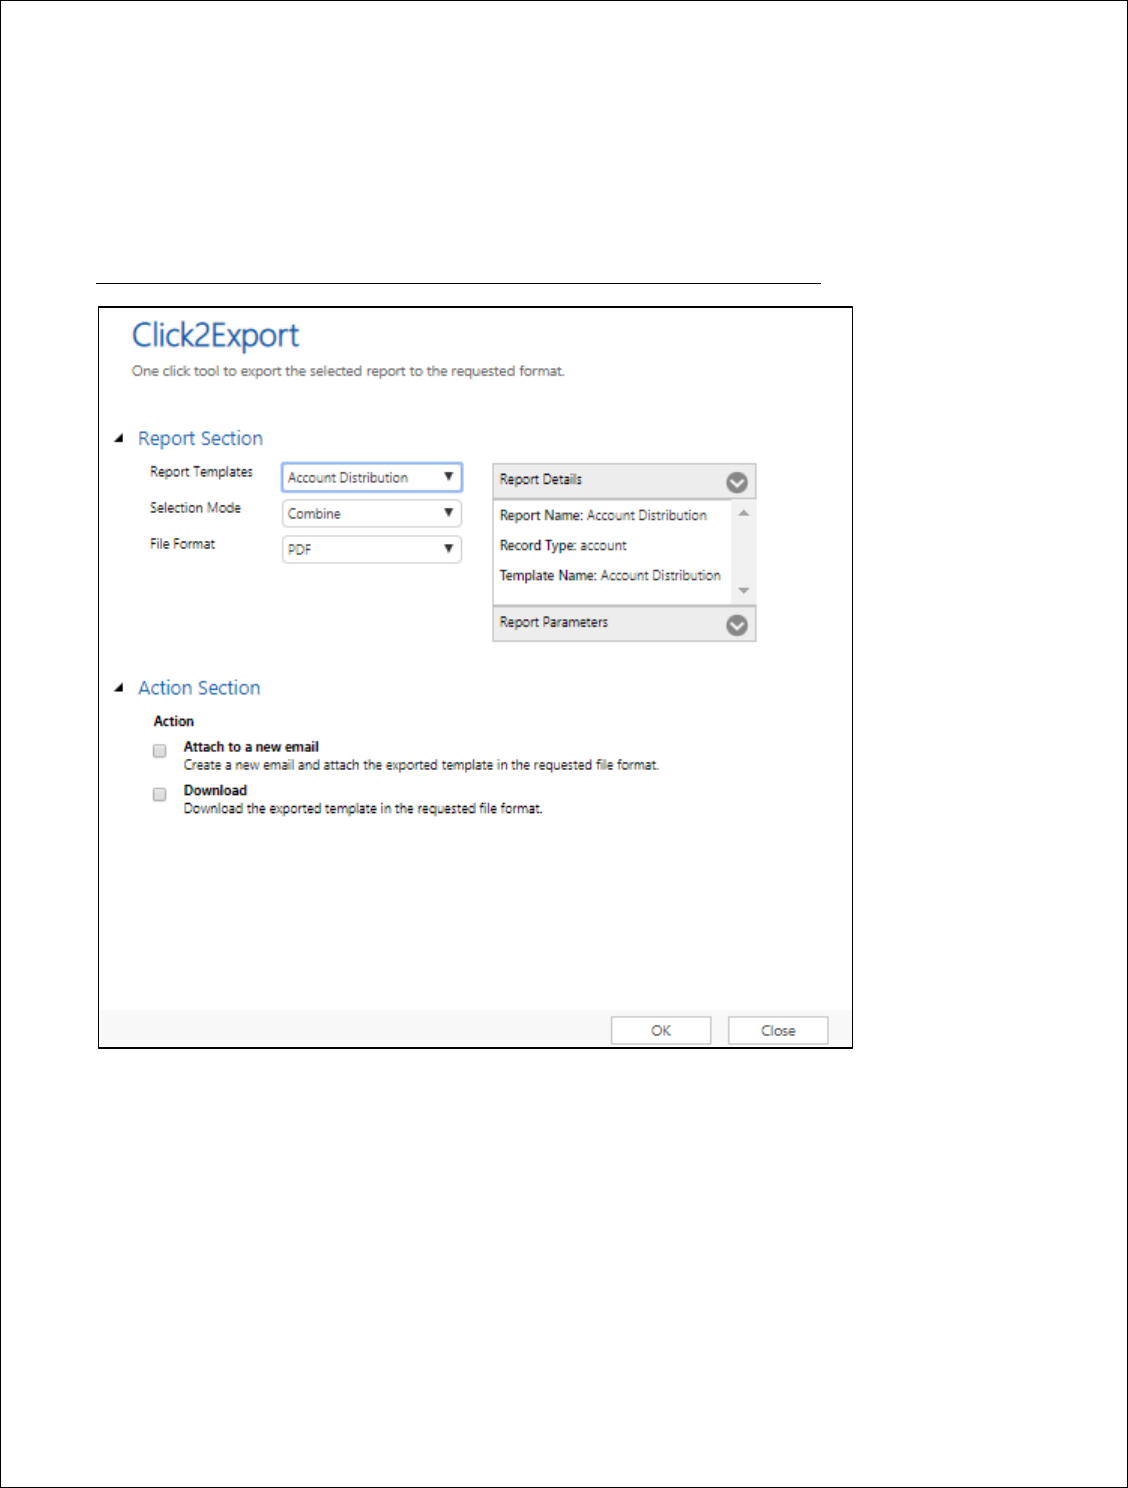
Selection Mode – This option appears only when you select multiple records from the entity grid and
click on Click2Export button. This has two option Per Record and Combine.
Note:
1. For word template only per record option is available and for report template both the options
i.e. per record and combine are available.
a. If Per Record is selected then the report will be exported per selected record i.e. 1
exported report file per selected record.
b. If Combine is selected then one single report will be exported, combined for all the
selected records.
2. For word/excel template, Report Details will not be available. If you select Report Template type
in Report Template then you will get the Report Details and Report Parameters table in right
side.
Report Details – The Report Details pane provides details of the selected report template.
Report Parameters–The parameter values set by default will be seen here and you can change them run
time as well, so that with those values the report is executed and exported.
File Format – You can choose the type of file format the report should be exported to. The options
currently supported are PDF, MS Excel, MS Word, TIFF, and CSV.
Note:
1. For Report Template type all 5 types of file formats are available to select. I.e. PDF, MS Excel,
MS Word, TIFF, and CSV.
2. For Word Template type user can select only 2 file formats i.e. PDF and Word type.
3. For Excel Template only one file format is available i.e. Excel.
4. If the user wants to set the mostly used file format say PDF then they can define it in
Click2Export Configuration and set that in Default file format.
5. If user have set the Default File Format as Word in Click2Export Configuration and Default File
Format for particular CRM Report Template as PDF, then the default file format populated on
Click2Export window will be set as given in the selected CRM Report Template.
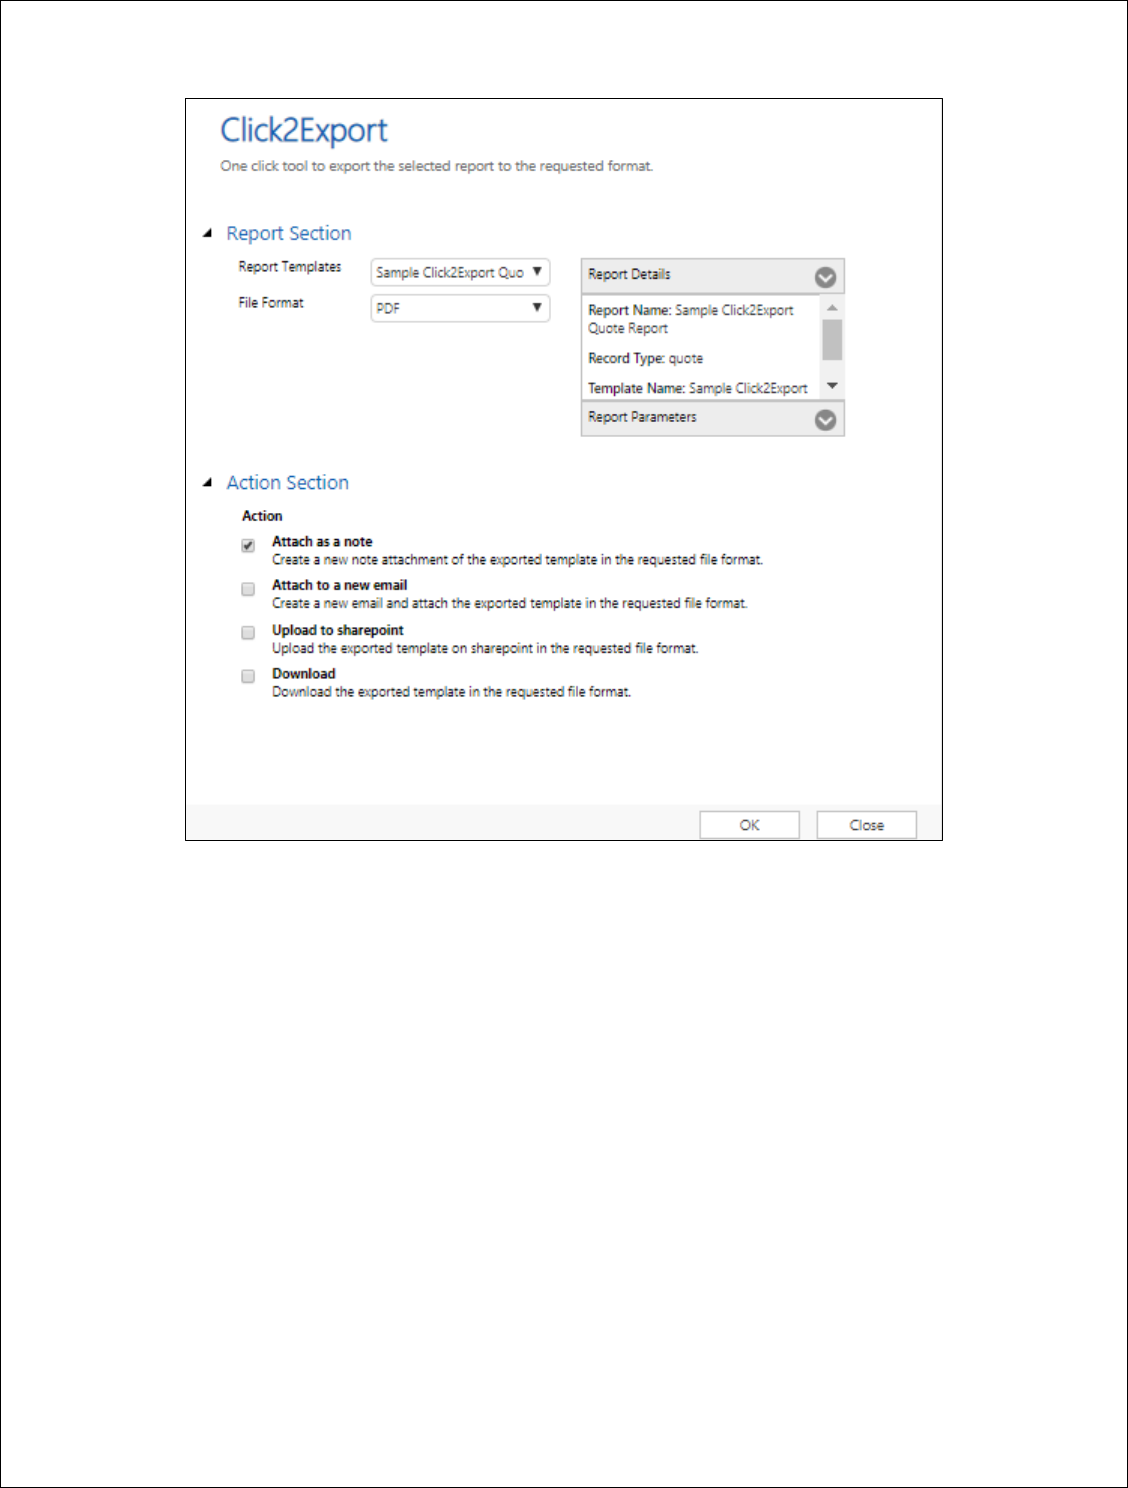
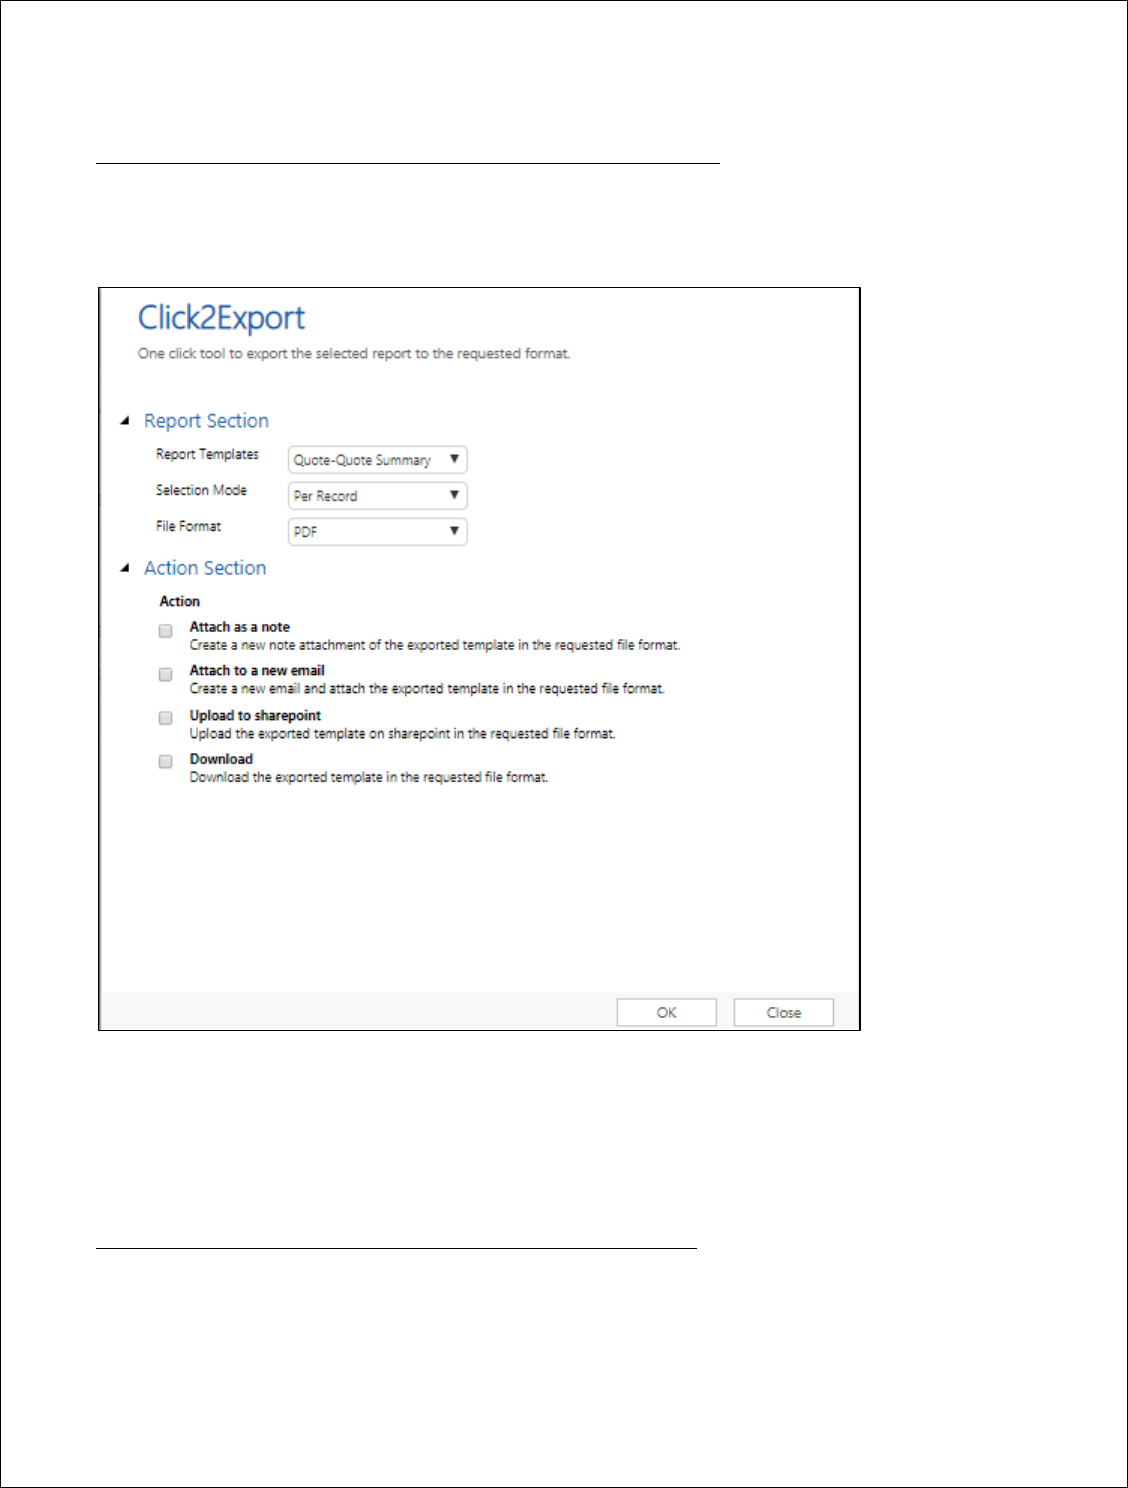
Action Section – This gives the available exporting options.
a. Attach as a note – The exported report file will be attached as a note to the record against which
the export has been executed in the selected file format. This option is not available for excel
template.
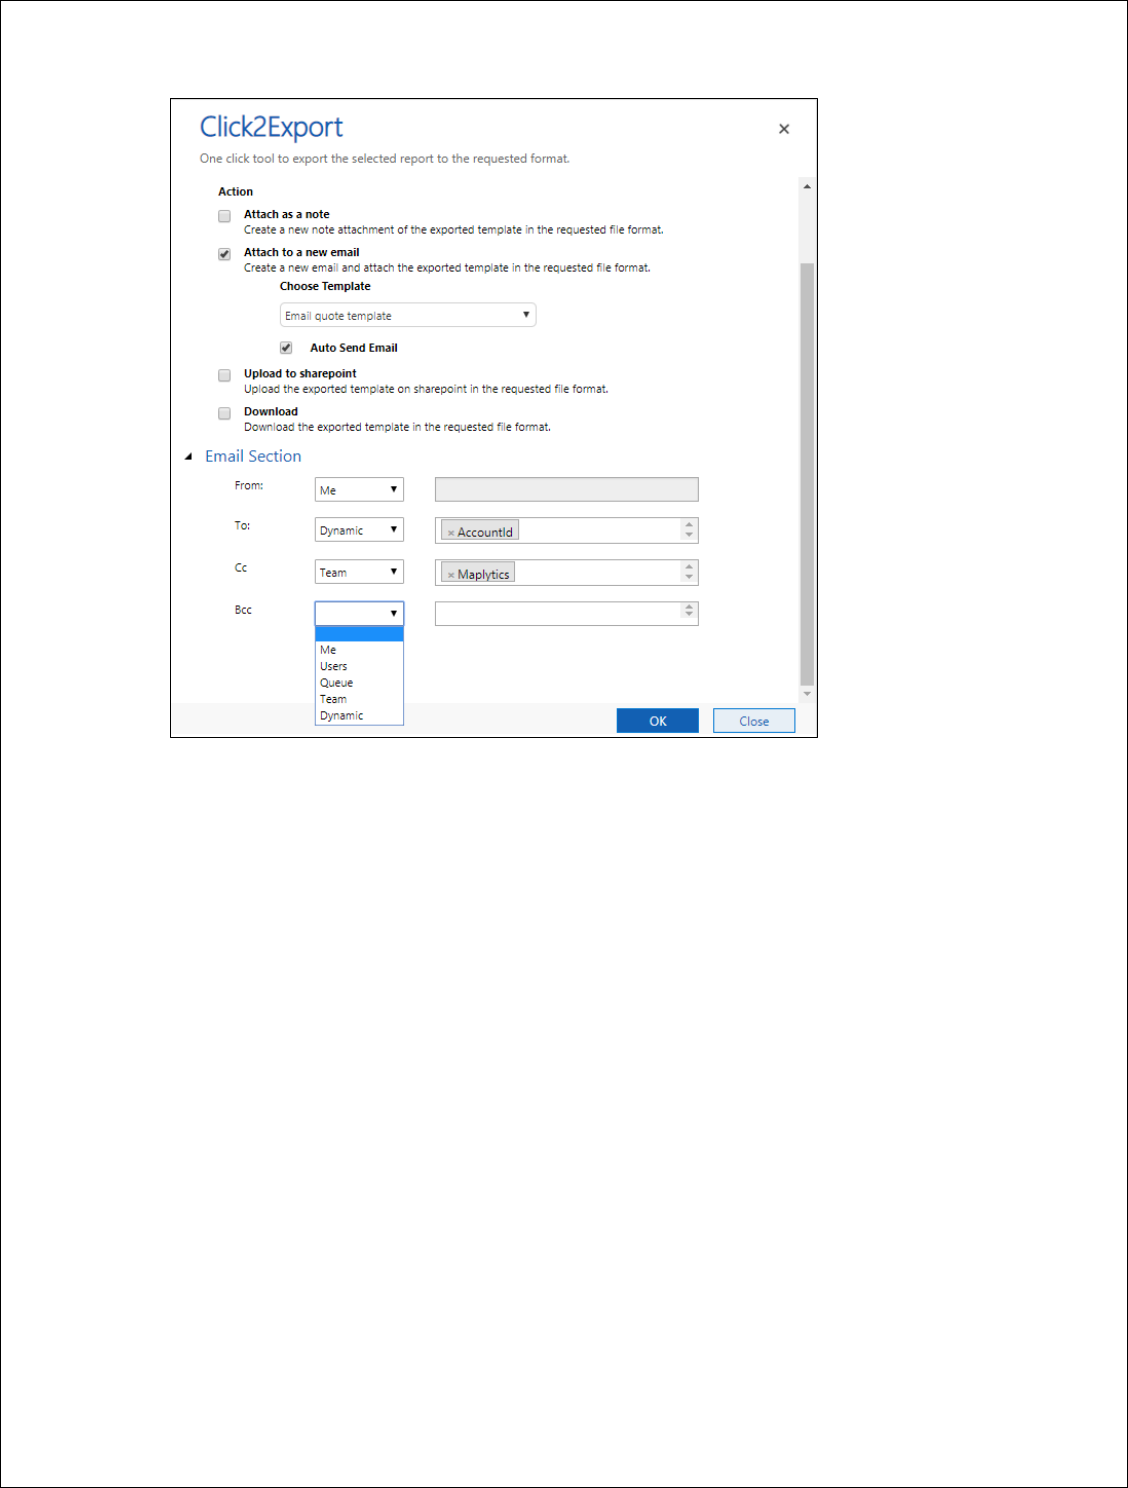
b. Attach to a new email – The exported report file will be attached as an attachment to a newly created
email. The email would be created based on the email template specified in the Choose Template
shown in the below window.
Click2Export - User Manual
P a g e 24 | 40
If Auto Send Email is checked then the user will be able to auto send email with the exported report
as an attachment with the same details selected in Email section.
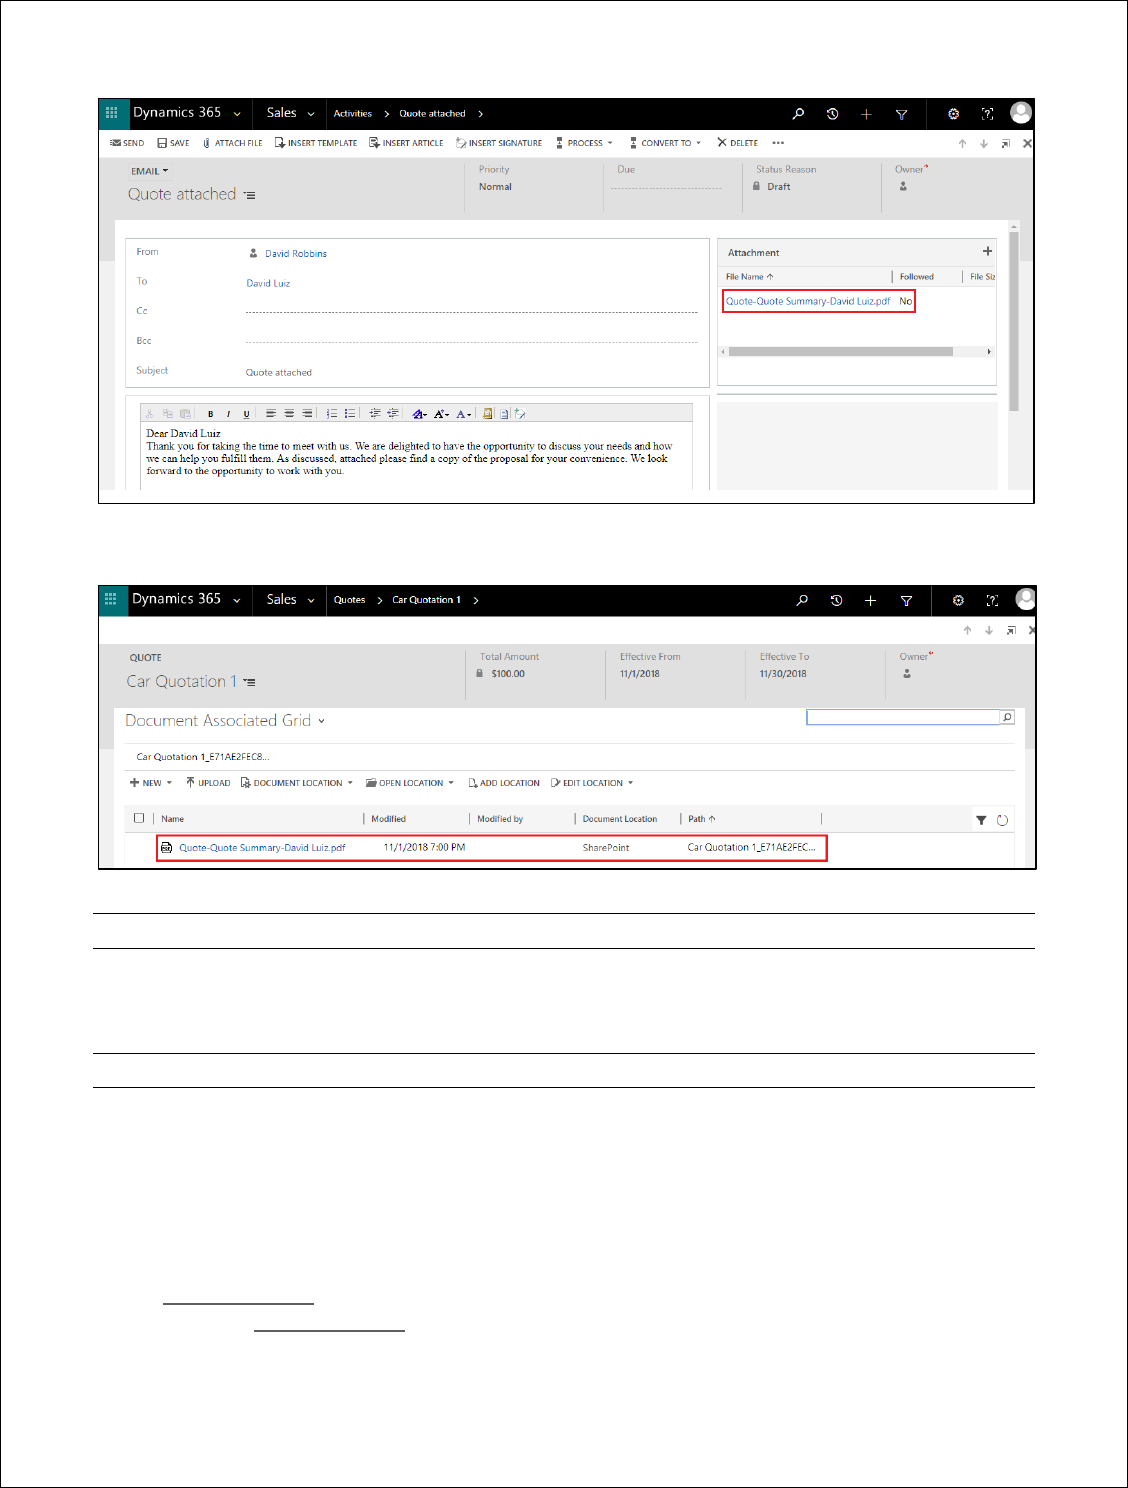
c. Upload to SharePoint –The exported report file will be uploaded on the SharePoint in the selected
file format. This option is not available for excel template.
Note: User needs to fill the SharePoint details in the Click2Export Configuration to enable this option
of upload to SharePoint in Action of Click2Export window.
d. Download – This option will only export the report to requested file format and make the file available
for download.
Click2Export - User Manual
P a g e 25 | 40
SCHEDULE REPORTS
In this feature, the user can set schedule to export and auto send Reports/Word/Excel
Templates as email attachments at regular intervals.
1. The first step to Schedule Reports is to Generate Tokens. For this navigate to
Click2Export Configurations Set Credentials.
2. The below pop-up will appear. The user has to enter credentials and click on Generate
Token.
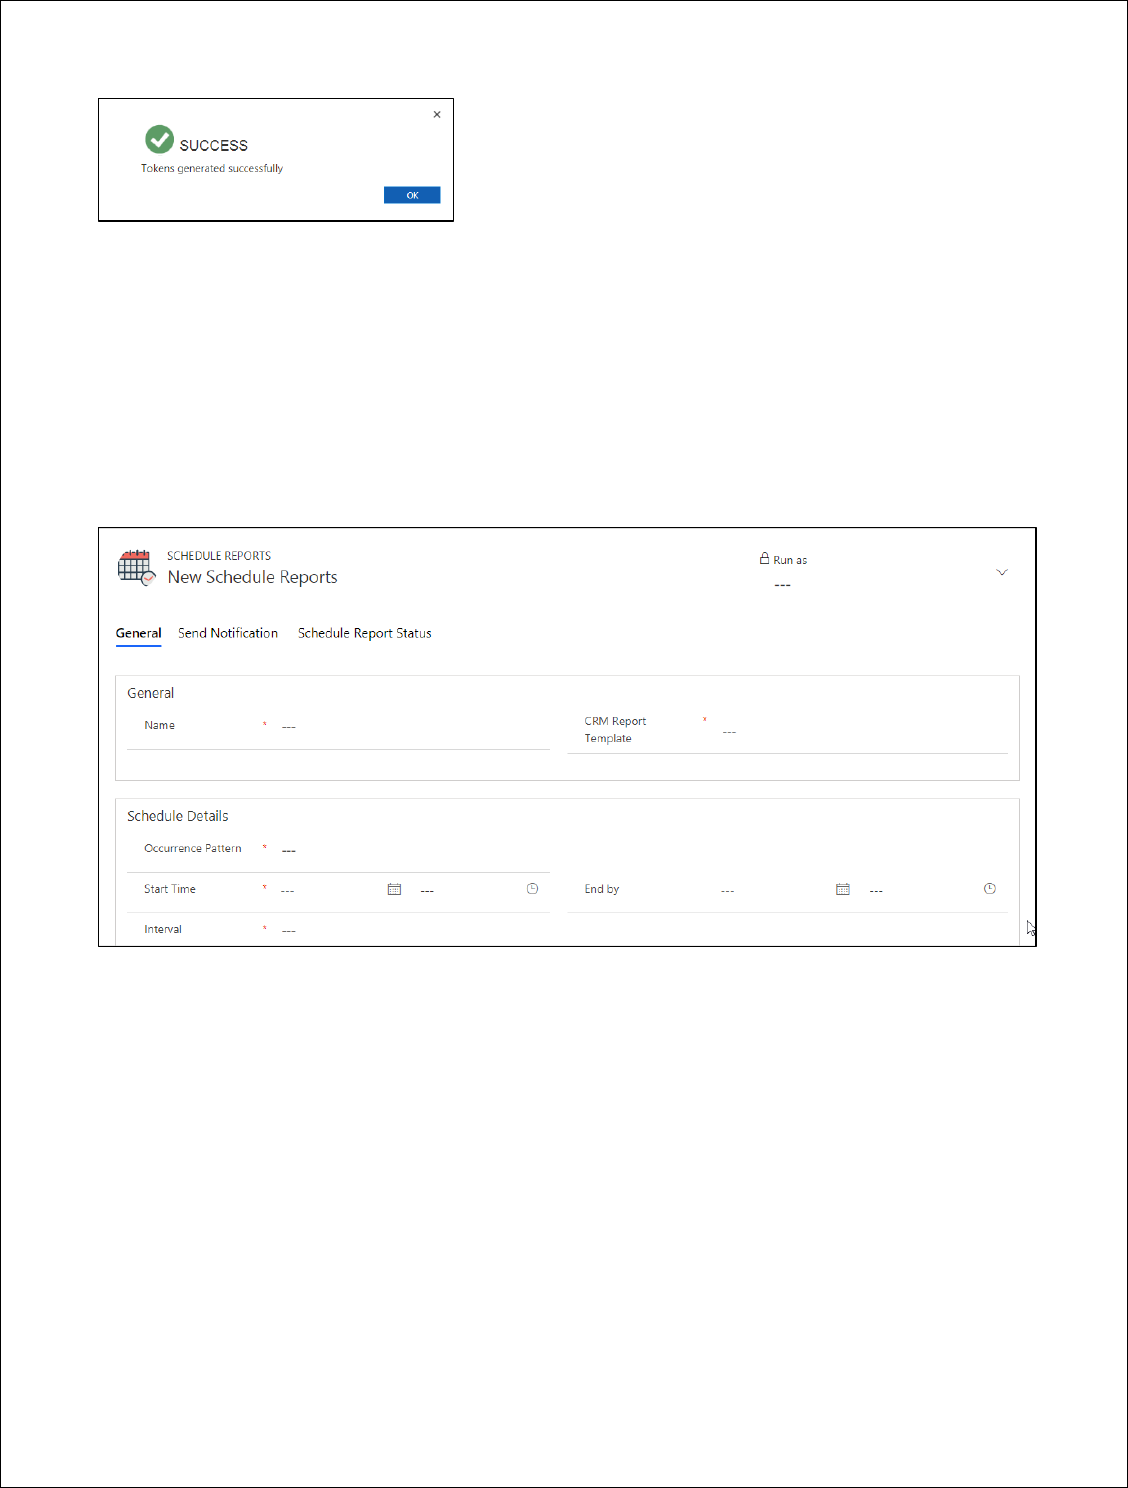
3. Once the user clicks on Generate Token button, token will be generated.
Click2Export - User Manual
P a g e 26 | 40
Note:
Click2Export Administrator has to generate token only once through Click2Export
Configuration
Click2Export User need to generate token for each and every record while scheduling
reports/word templates
4. Once the token is generated navigate to Click2ExportSchedule ReportsNew and fill
the relevant details in the New Schedule Reports Template.
In General details the following fields need to be defined.
Name: Give name for the record (Schedule Reports).
CRM Report Template: Select the required CRM Report Template from the lookup field –
SSRS/Excel/Word.
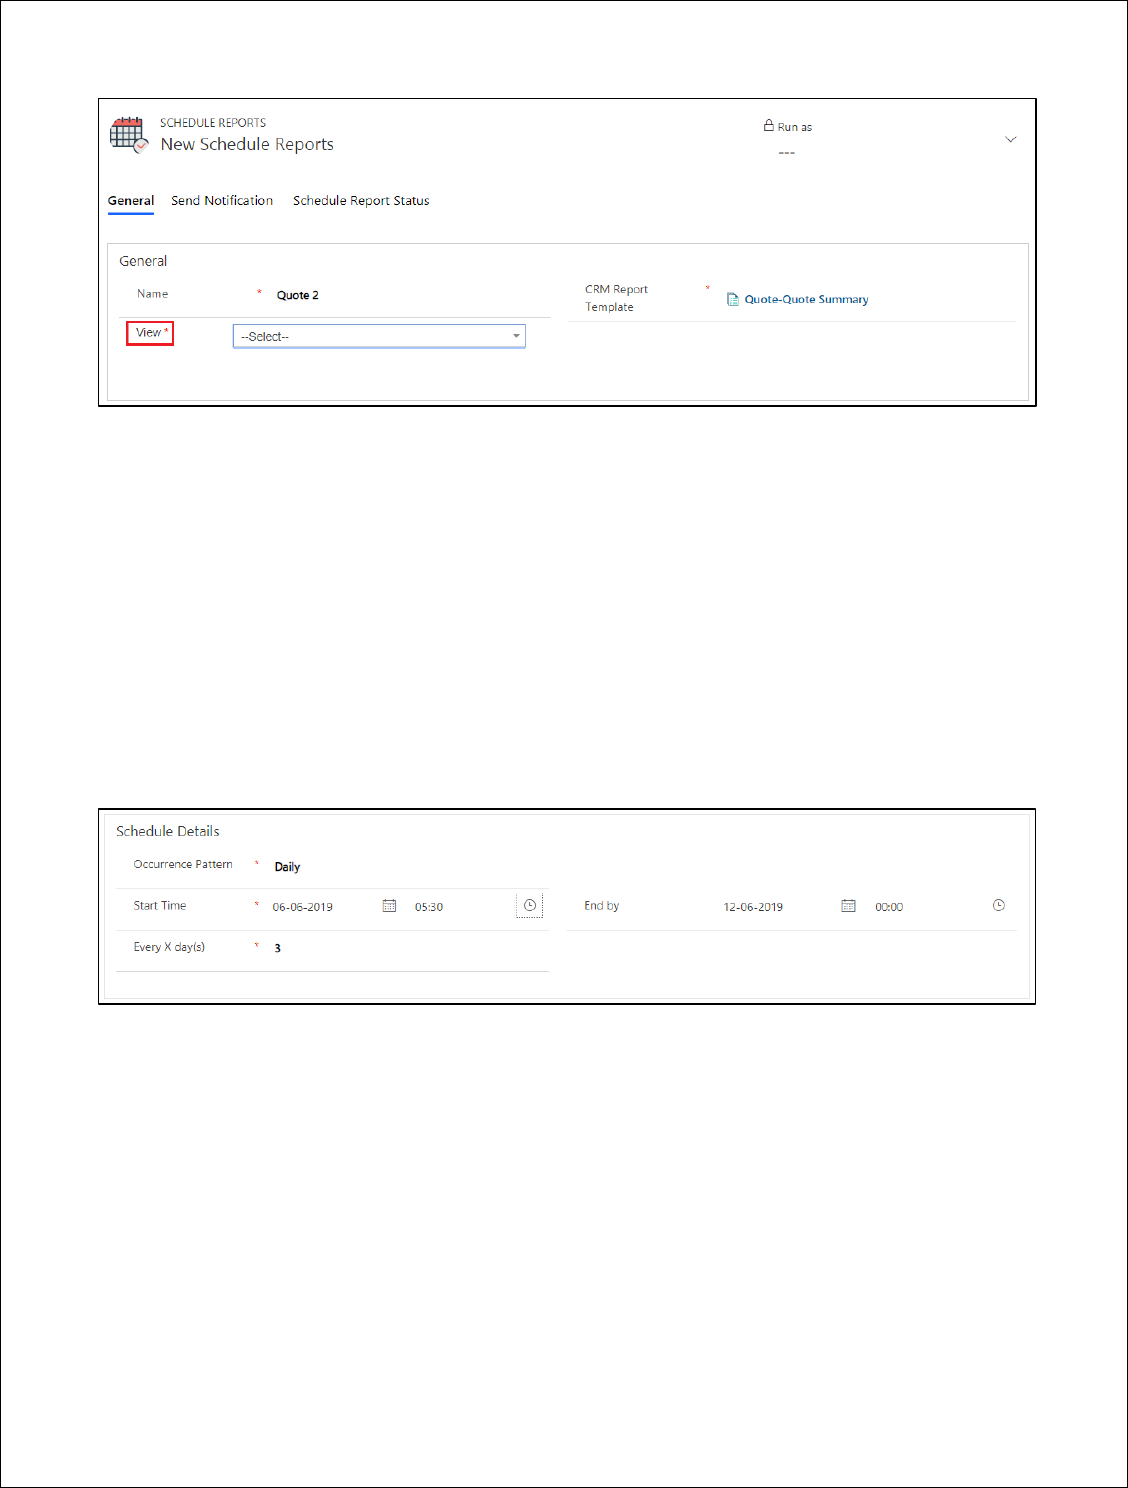
View: Select the necessary view from the dropdown. Export and mail selected Word Template
against each individual record present in the selected view. In case of Excel Template, the mail
will be sent only to particular recipients selected while configuring CRM Report Template. (This
field appears only if Word/Excel Template is selected for CRM Report Template).
Click2Export - User Manual
P a g e 27 | 40
Under Schedule Details the user has to fill the following requirements.
Occurrence Pattern: Select any one option from – Daily, Weekly and Monthly
Start Time: Select the starting date and time to trigger the first export. Date and time should be
current. Past date and time is not considered.
End by: Select the end date and time till when the report should be exported on a regular basis.
Interval: The interval period depends upon the occurrence pattern selected by the user.
a) In the below screenshot, Occurrence Pattern is set as Daily and Every X day(s) is set as
3. Here the first process will occur on 6
th
June 2019, at 5:30 and from there onwards
every 3
rd
day till the End by date & time.
b) In the below screenshot, Occurrence Pattern is set as Weekly and Recur every X
week(s) is set as 2. Here the first process will occur on the set Start Time. Next it will
occur on the coming Tuesday and from there onwards every 2 weeks on Tuesday, till
the End by date & time.
Click2Export - User Manual
P a g e 28 | 40
c) In below screenshot, Occurrence Pattern is set as Monthly, Day is set as 4 and Of every
X month(s) is set as 2. Here the first process will occur on the set Start Time and from
there onwards 4
th
day of every 2 months, till the End by date & time.
Fill the required fields and click on Save.
5. Next go to Send Notification section. Enable Notify on Failure checkbox and select
sender and recipient(s) from the dropdown. This will ensure that an email is sent to
notify recipient(s) about Schedule Reports process failure. Click on Save and complete
the configuration of Schedule Reports.
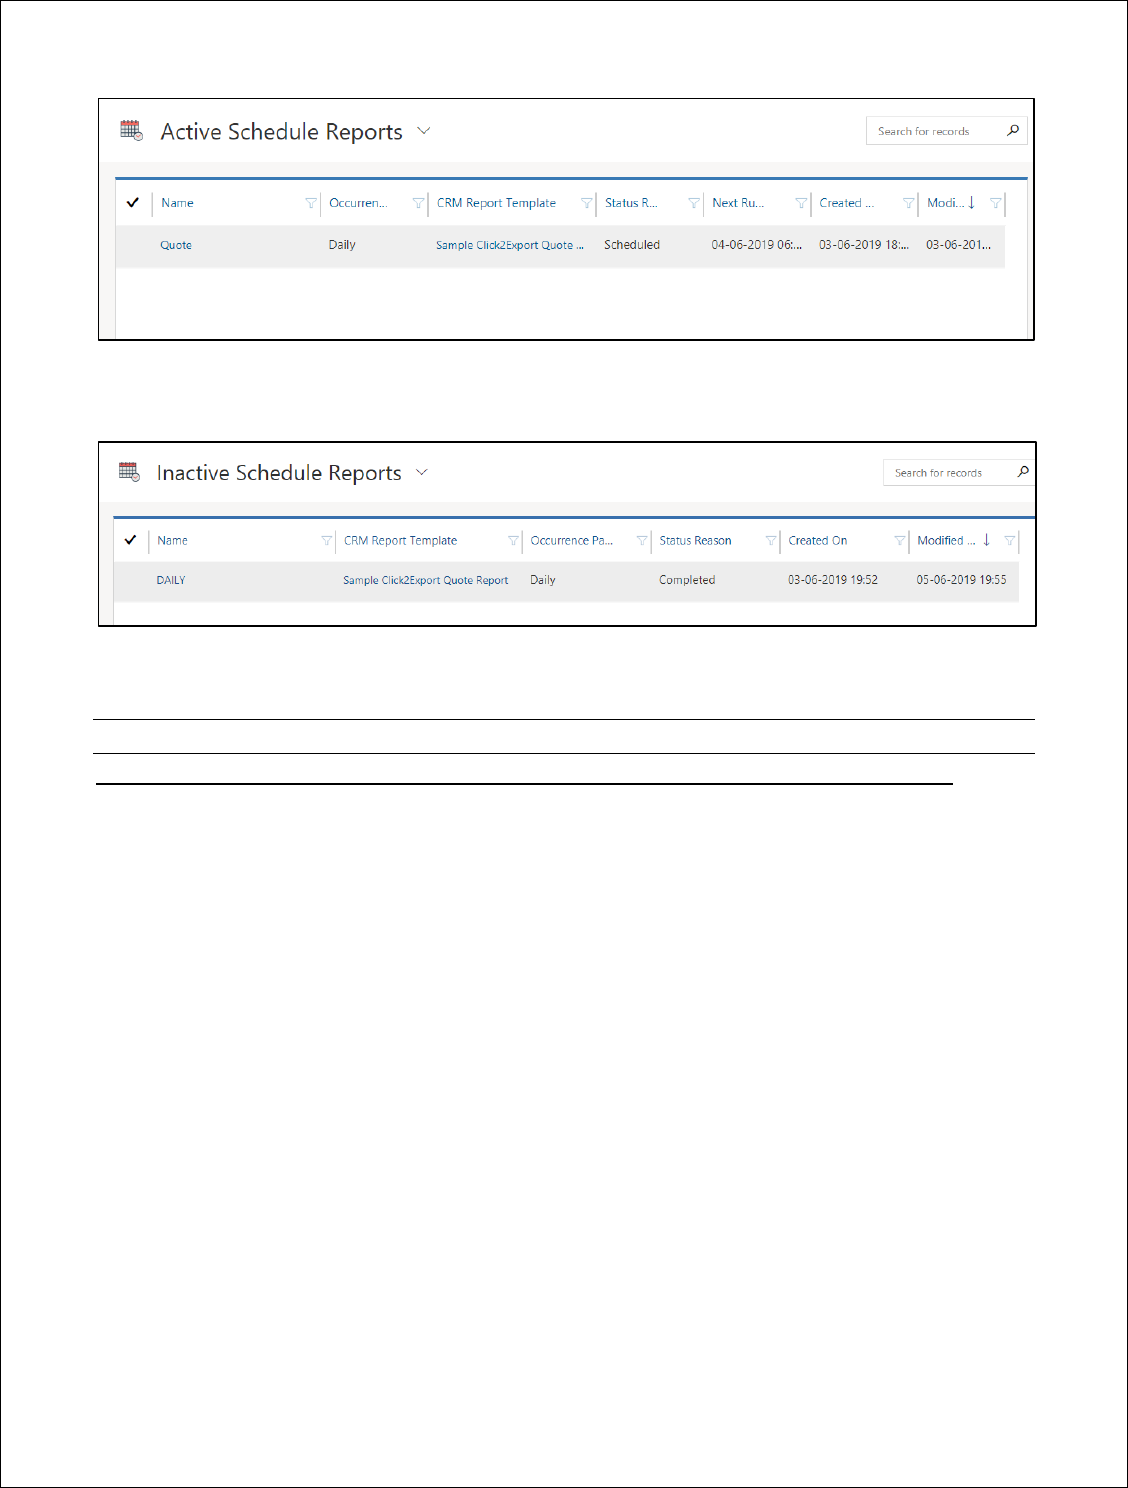
6. To view configured Schedule Reports navigate to Click2ExportSchedule
ReportsActive Schedule Reports.
Click2Export - User Manual
P a g e 29 | 40
7. Similarly, to view Schedule Reports with completed process navigate to
Click2ExportSchedule ReportsInactive Schedule Reports.
Note: If End by date is not defined, then the process will go on nonstop.
CLICK2EXPORT USE CASES
CLICK2EXPORT SELECTING A SINGLE RECORD OR FROM WITHIN A PARTICULAR RECORD:
The functionality can be accessed from an entity form as well as the home page grid. When the program
is invoked for only a single selected record you will be presented with the following options on the
Click2Export window.
Here all the four actions are allowed and you can also edit the default parameters before continuing.
Click2Export - User Manual
P a g e 30 | 40
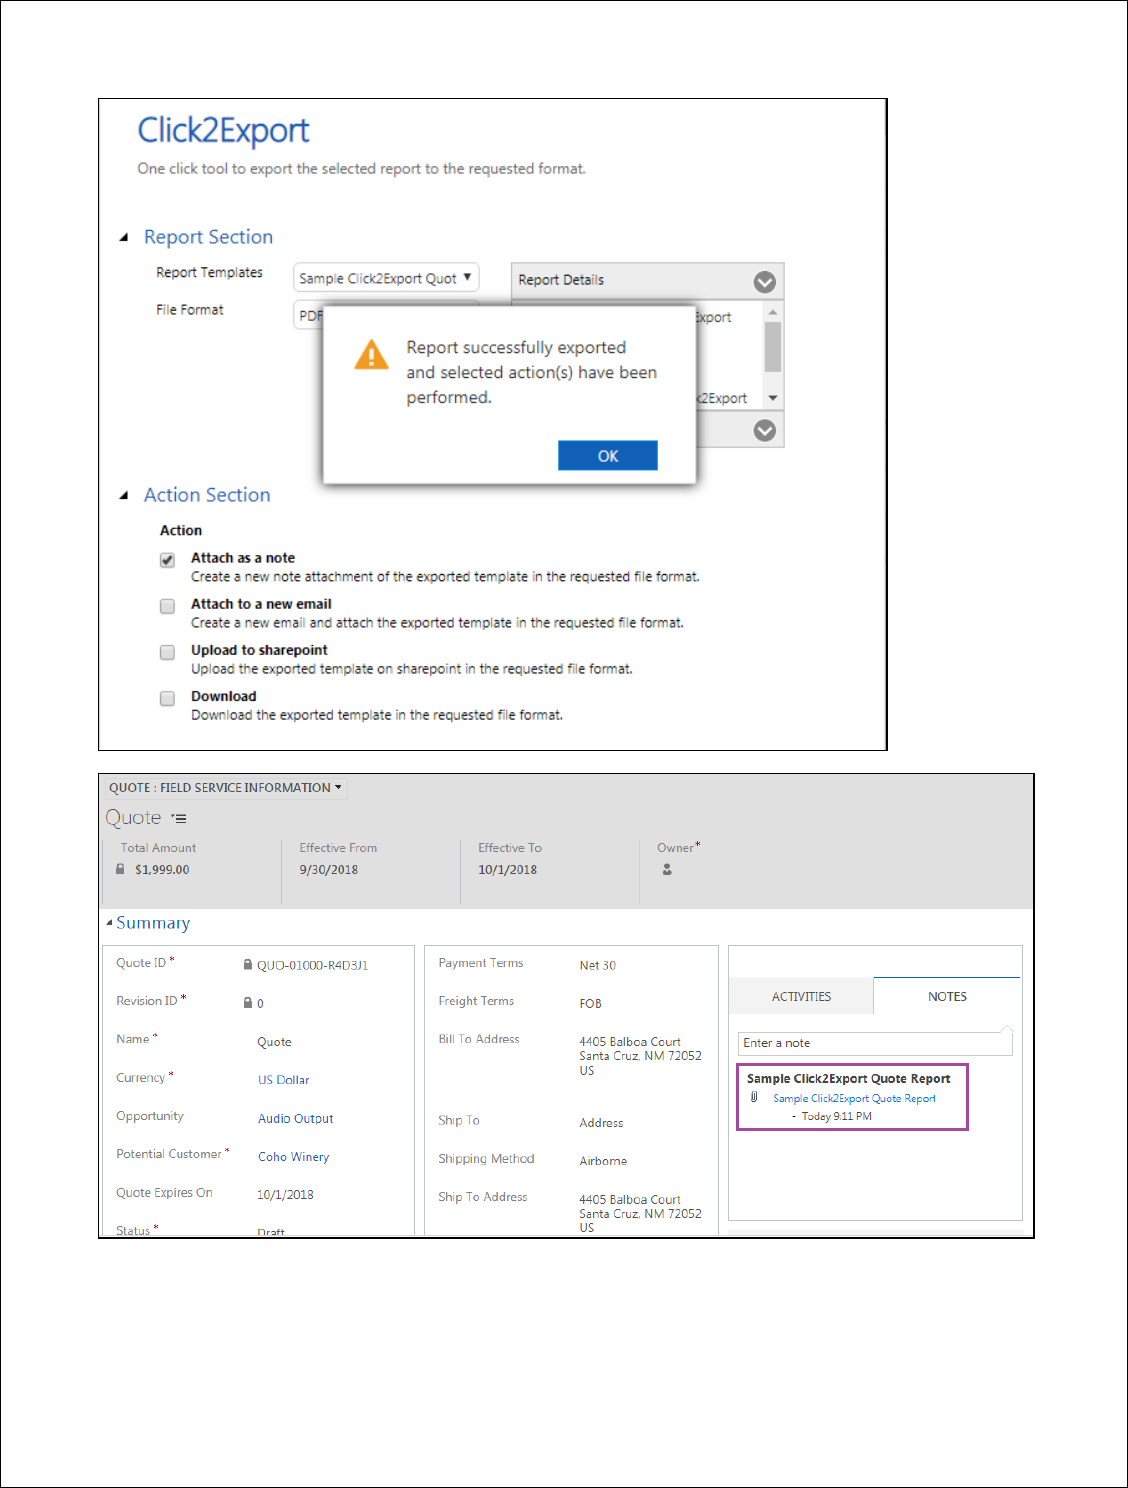
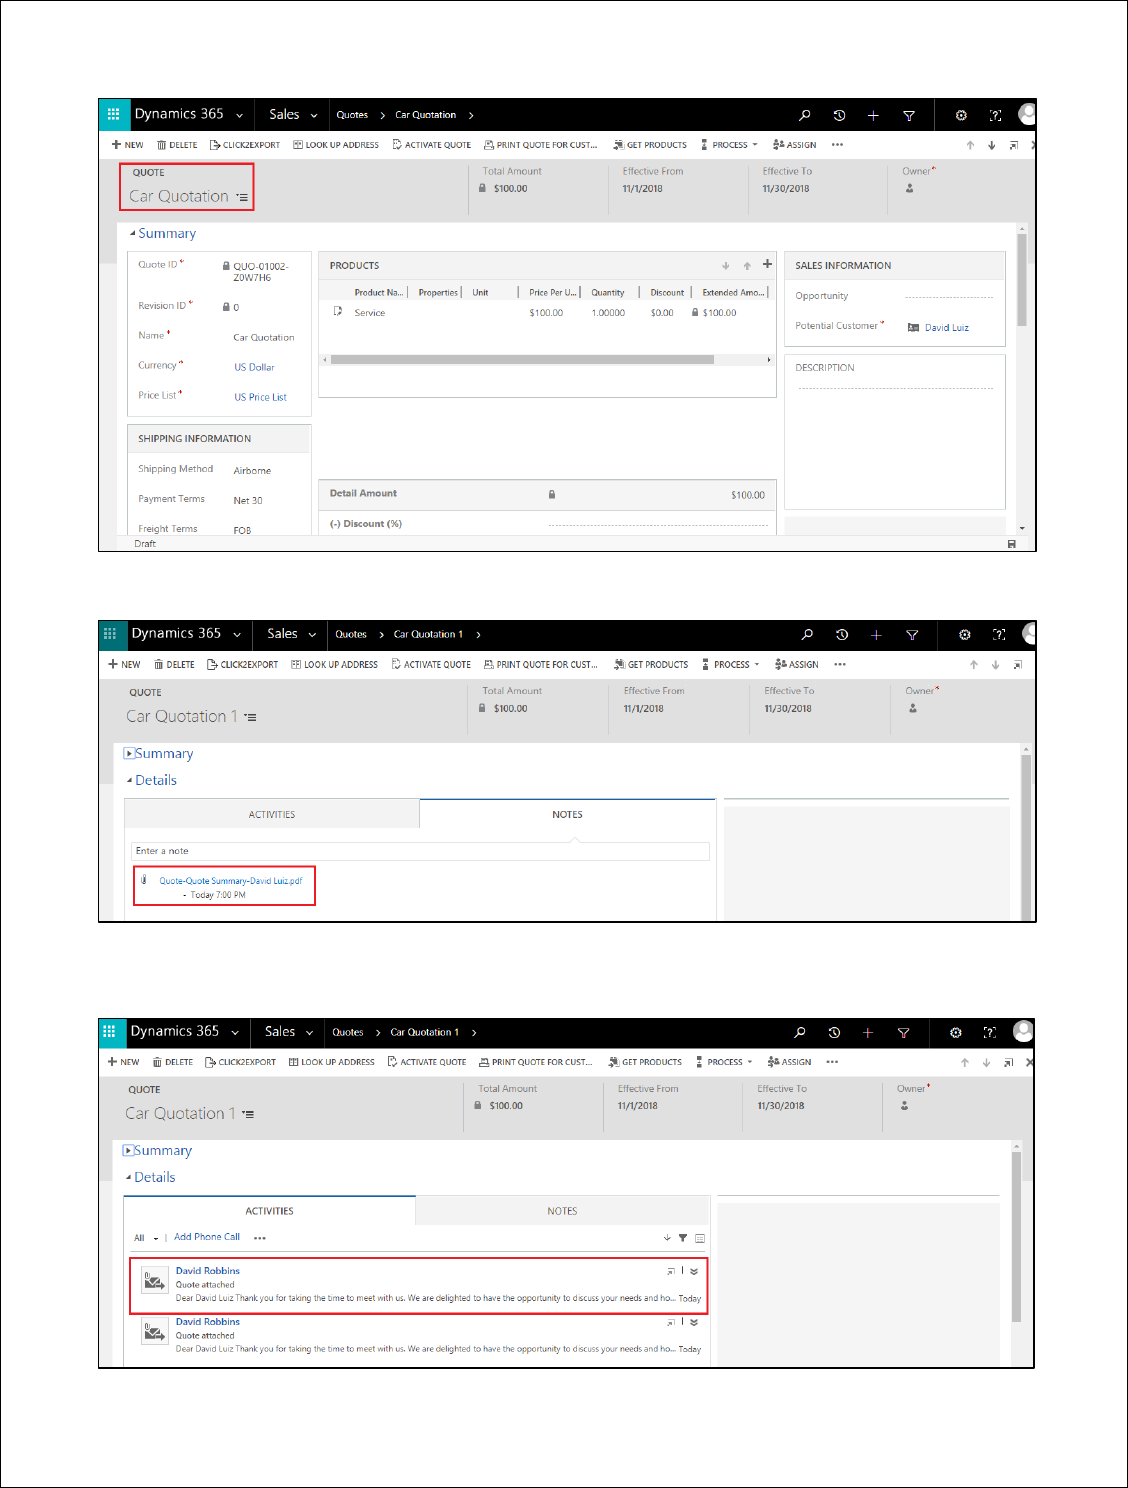
If you choose note option then the exported file in selected format will be attached to a note in that
selected record itself.
Click2Export - User Manual
P a g e 31 | 40
Click2Export - User Manual
P a g e 32 | 40
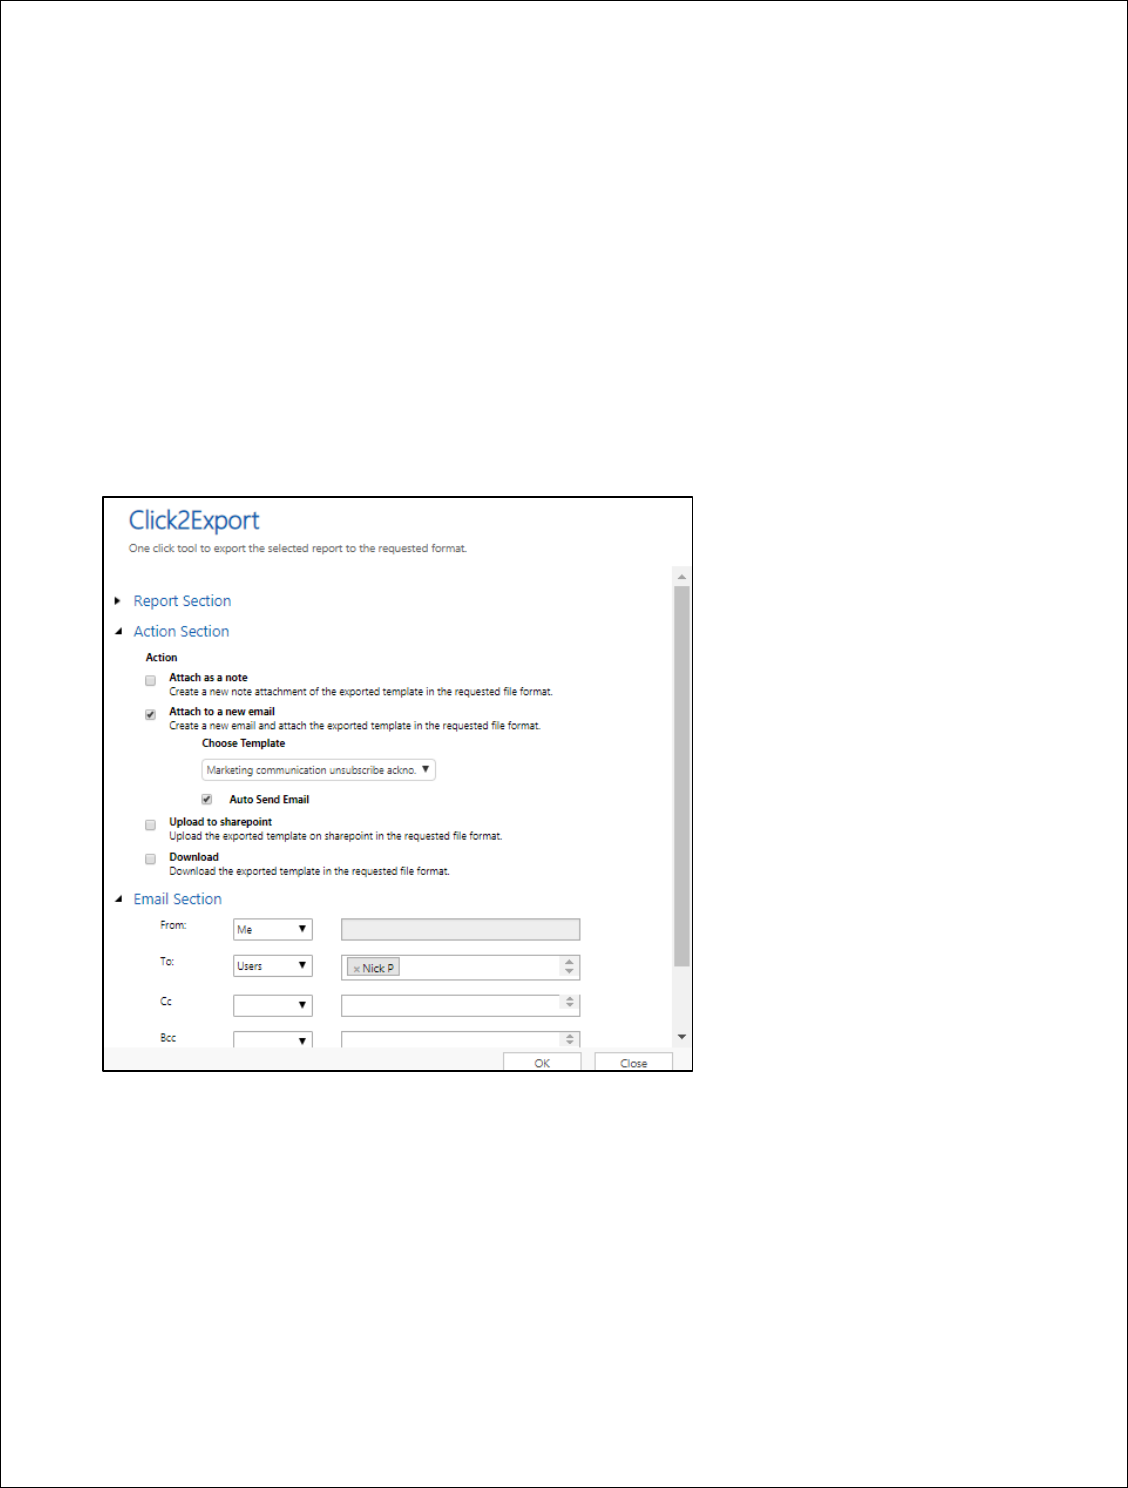
If you choose email attachment option then, it will ask for an email template to be used in order to
compose the email in choose template.
Also, Auto Send Email option will be available where user would be able to automatically send the email
with the attachment of exported report file.
Email Section is available to select the sender, receiver, CC and BCC.
A new email will be created with the exported file attached to it. This time, the email will be associated
with the primary record against which the report was executed. It will open the draft email and present
it to the user for further editing and send.
If the user set the Auto Send as yes then the email will be send automatically with the attachment of
exported file and the content of email would be as email template selected in the choose template
dropdown.
Click2Export - User Manual
P a g e 33 | 40
Click2Export - User Manual
P a g e 34 | 40
CLICK2EXPORT SELECTING MULTIPLE RECORDS FROM THE VIEW
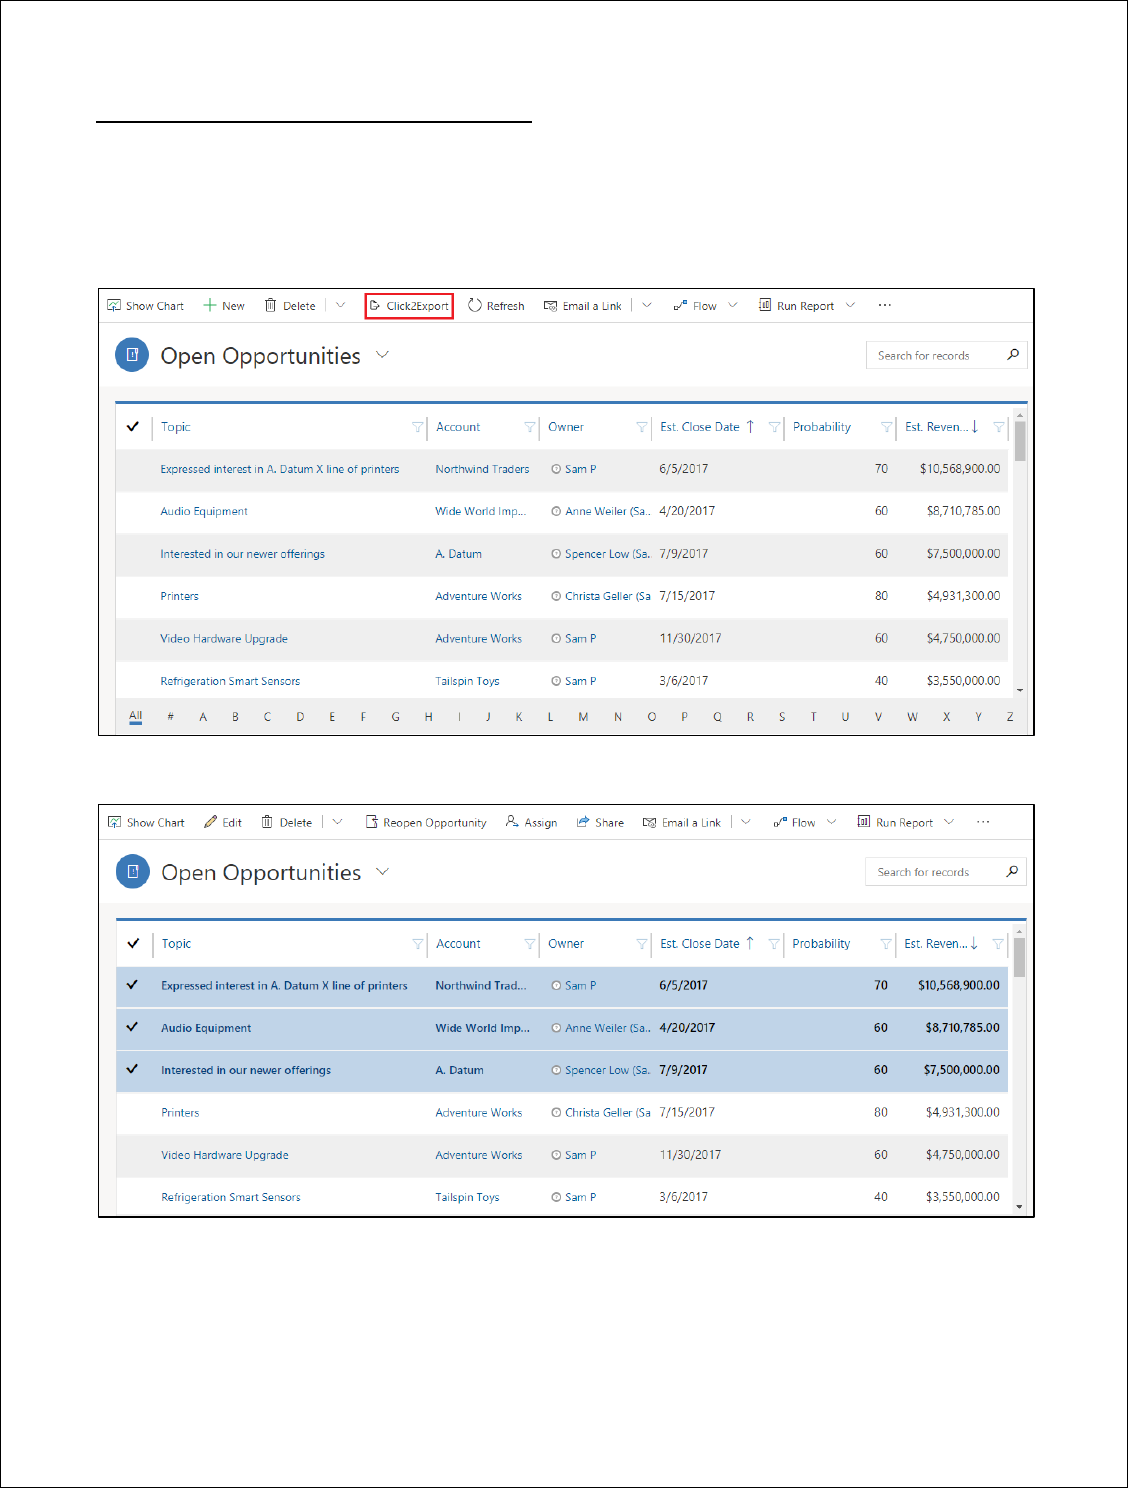
You may at time want to bulk export report for multiple records. This option is supported by Click2Export.
You can select multiple records from the entity grid and click the Click2Export ribbon button.
In this case of which you find a new option available as Selection Mode. This has two supported options
“Per Record” and “Combine”.
If you would like to generate one report per record, you would choose the “Per Record” option. However,
if you would like to use the selected records as filters to be passed to the report to be exported as a single
report, you would choose the option of “Combine”.
For “Per Record” option one report is exported per selected record.
Attach as Note – The file attached against the primary record.
Attach to a new email – This will create one new email with the template selected in Choose Template
per selected record and attach the respective exported file to the email. User can automatically send the
Click2Export - User Manual
P a g e 35 | 40
Email with the Auto Send Email option and select the sender, receiver, CC and BCC of the Email in Email
Section.
Upload to SharePoint – This will help the user to upload the exported file on SharePoint.
Download – This will make all the exported file available for download one after the other.
For “Combine” option only one report is exported to include all selected records.
Attach to a new email – This will create a new email and attach the exported file to the email template
selected in the Choose Template option. It will present the draft email window for the user to edit further
and send. User can automatically send the Email with the Auto Send Email option and select the sender,
receiver, CC and BCC of the Email in Email Section.
Download – This will make the exported file available for download.
Click2Export - User Manual
P a g e 36 | 40
CLICK2EXPORT EXPORTING EXCEL TEMPLATE
This option enables you to export necessary data in excel template. Excel template pertains to particular
‘VIEW’ i.e. All Opportunities, Open Opportunities, Lost Opportunities, etc. It does not adhere to a record
or set of records. Once you configure excel template Click2Export button is visible on home grid without
selection of any records.
But if you select any record or enter into a particular record the same will become unavailable.
As Excel Template is view based only two action options are available:-
Click2Export - User Manual
P a g e 37 | 40
Attach to a new email – This will create a new email and attach the exported file to the email template
selected in the Choose Template option.
Download – This will make the exported file available for download.
CLICK2EXPORT PERFORM THE ACTION FOR SELECTED CRM WORD TEMPLATE WITH THE
WORKFLOW
At times you need to automate the process of export and perform the suitable action to reduce the steps
of exporting the CRM word templates. For that, you can create the workflow for the required entity by
selecting the suitable word templates.

Click2Export - User Manual
P a g e 38 | 40
In this case, if you want to run the workflow on Record fields change (e.g. Name of Quote) then you can
create the workflow for that option in Automatic Processes. You need to add the Perform Action step and
Click2Export Assemblies and define the CRM Word Templates, entity and actions that are to be
performed after exporting.
If you choose any action i.e. Attach as a Note/Attach to an Email or Upload to SharePoint in assembly’s
set properties then, after the trigger of workflow the action will be executed in the selected record itself.
Here all the three actions are allowed by selecting as True.
For e.g. we have selected the Quote with the name Car Quotation.
Click2Export - User Manual
P a g e 39 | 40
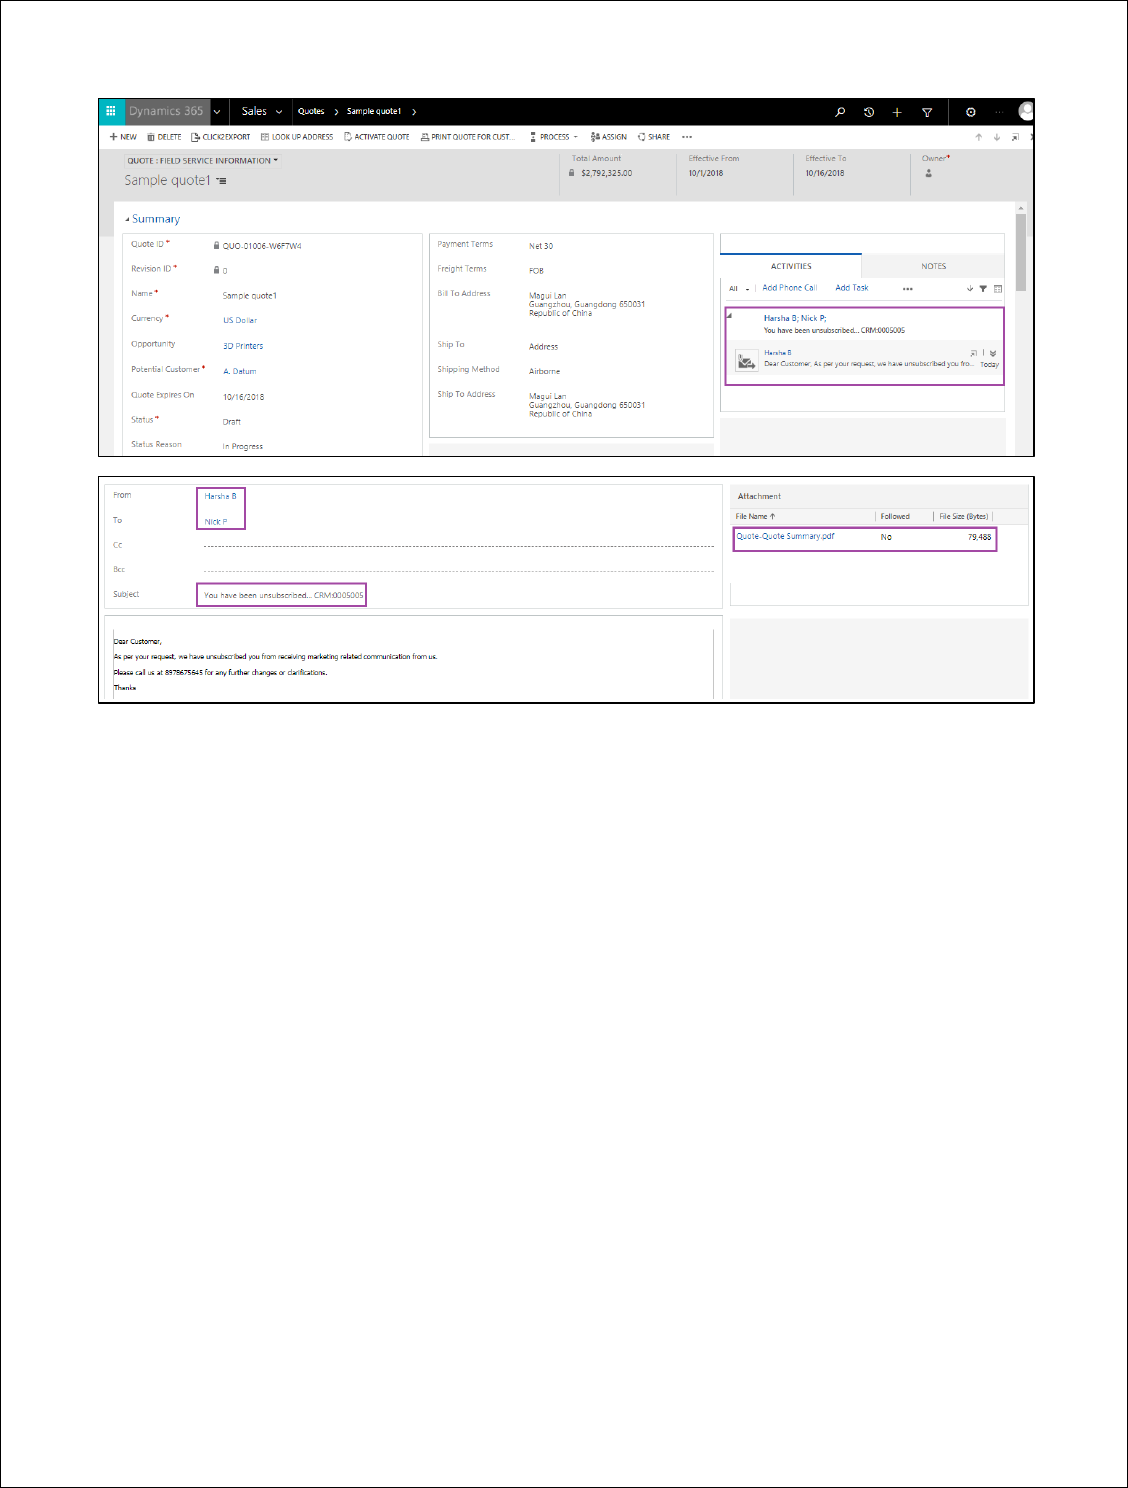
1. Export and attached the selected CRM Word Template as Note to selected Quote.
2. Export and attached the selected CRM Word Template to Email as an attachment in Email
Activities of the selected Quote.
Click2Export - User Manual
P a g e 40 | 40
3. Export and uploaded the selected CRM Word Template on Share Point of the selected Quote.
LIMITATIONS OF CLICK2EXPORT
The one-click solution does not support SQL reports.
Click2Export does not support reports with multi-select parameter.
CONTACT INOGIC: INDIA (CORPORATE HEADQUARTERS) - MUMBAI
M/S. INOGIC TECH (INDIA) PVT. LTD.
B-404, BSEL TECH PARK,
Plot No. 39/5 & 39/5A, Sector – 30A, Vashi.
Navi Mumbai – 400705.
INDIA
E-mail: [email protected]om
Live Chat/ Skype: crm@inogic.com
Twitter: @inogic
